
Worx WG119E Manual
PDF manual · 104 Pages
English



Quick check
Incorrect answer, please try again.
Chat with your Worx WG119E manual using AI
Get instant AI answers from your Worx WG119E manual
Ask anything about the Worx WG119E. Answers come from this manual, with the pages they are based on.
WG119E Maintenance Schedule
Inspect and maintain the machine regularly. Have repairs done only by an authorized repairer.
Before use, check the supply and extension cord for signs of damage or aging. Do not use if damaged.
Always visually inspect the machine for damaged, missing, or misplaced guards or shields before use.
Never use water or chemical cleaners. Wipe the trimmer clean with a dry cloth after use.
Ensure motor ventilation openings are kept clear of debris to prevent overheating.
Ask a Question
Do you recommend WG119E?
Yes NoFrequently Asked Questions
The Worx WG119E has a maximum cutting diameter of 30cm, allowing it to handle most residential garden edges and grass patches effectively.
Is this answer helpful?
To manually feed the line, press and release the line feed button while gently pulling the line until it reaches the cutter. If too much line is fed, remove the cover and rotate the spool counter-clockwise to shorten it.
Is this answer helpful?
Yes, the machine is designed for use on slopes, but users must always ensure they have firm footing and maintain balance. Never run on slopes and keep hands and feet away from the cutting area.
Is this answer helpful?
You must use nylon line with a maximum diameter of 1.65mm. Using thicker or metal lines can damage the motor and void the warranty.
Is this answer helpful?
Only qualified persons should replace the mains lead or plug. If the cord is damaged, contact the manufacturer or service agent to avoid electrical hazards.
Is this answer helpful?
Advantages and Disadvantages
Advantages

- Versatile 2-in-1 design functions as both a grass trimmer and an edger
- Lightweight at 2.4kg with a telescopic shaft for easy handling
- Powerful 550W motor runs at 8900 rpm for efficient cutting
- Automatic line feed system simplifies operation and saves time
Disadvantages

- Vibration levels may cause fatigue during extended use periods
- Noise level of 96dB(A) requires mandatory ear protection
- Line capacity is limited requiring frequent refills for large areas
- Not suitable for cutting metal or extremely thick woody vegetation
Product Specification
Type
String Trimmer
Power
550W
Cutting Width
12 inches
Cutting System
Line (2-line technology)
Line Advance
Fully Automatic
Line Diameter
0.07 inches
Line Length
16 feet
Features
Softgrip, Extra Handle
Weight
6.61 lbs
Product Description
Worx WG119E Electric Grass Trimmer: The Ultimate 2-in-1 Garden Solution
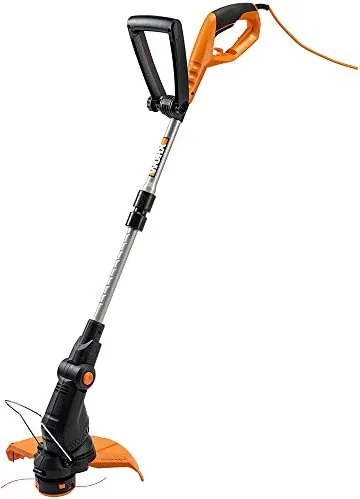
Gardening requires precision, power, and versatility. The Worx WG119E Electric Grass Trimmer stands out as a robust tool designed to handle the toughest edges and hard-to-reach grass patches that traditional lawnmowers simply cannot touch. This powerful 550-watt machine combines the functionality of a grass trimmer and an edger into one lightweight package, making it an essential addition to any homeowner's toolkit.
Weighing only 2.4kg, the WG119E is easy to maneuver even on steep slopes or around delicate flower beds. Its telescopic shaft allows for height adjustments, ensuring comfortable operation for users of all sizes. The adjustable auxiliary handle provides extra stability, while the rotating handle mechanism lets you find the perfect grip angle. Whether you are trimming under bushes or creating crisp borders along your driveway, this tool delivers consistent performance with every pass.
One of the standout features is the automatic line feed system. When you switch on the trimmer, the cutting line automatically feeds out until it reaches the correct length, signaled by a distinct clattering sound that stops once the cut is made. For those moments when you need more line, a manual feed button allows for quick and easy extension without stopping the motor completely. The unit uses durable nylon line with a maximum diameter of 1.65mm, ensuring clean cuts through thick weeds and tough grass.
Safety is paramount in the design of the WG119E. It features a safety guard, a flower guard to protect delicate plants, and a double-insulated housing. The machine includes clear warnings about vibration exposure and noise levels, encouraging users to wear appropriate protective gear like ear defenders and eye protection. With a no-load speed of 8900 rpm, it cuts efficiently while maintaining control.
Maintaining the Worx WG119E is straightforward. There are no user-serviceable parts inside, so cleaning involves simply wiping the exterior with a dry cloth and keeping ventilation slots free of debris. Always remember to disconnect the power cord before performing any maintenance or storage tasks. Store the unit in a dry place out of reach of children to ensure longevity and safety.
Notes
- Always use a residual current device (RCD) with a tripping current of no more than 30mA.
- Do not operate the machine in wet weather or near standing water.
- Ensure the cutting line is wound correctly to prevent excessive vibration.
- Replace the line spool with the specific WA0007 model recommended by the manufacturer.
Search for 67,706 Manuals online


Type-in Brand or Model