
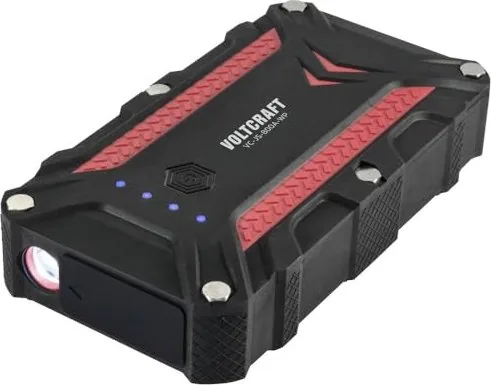
Voltcraft VC-JS-800A-WP Manual
PDF manual · 12 Pages
English



Quick check
Incorrect answer, please try again.
Chat with your Voltcraft VC-JS-800A-WP manual using AI
Get instant AI answers from your Voltcraft VC-JS-800A-WP manual
Ask anything about the Voltcraft VC-JS-800A-WP. Answers come from this manual, with the pages they are based on.
VC-JS-800A-WP Maintenance Schedule
To prolong battery life, fully charge the battery every 3 to 6 months even if not using the product.
Disconnect from power and clean with a dry, fibre-free cloth. Do not use aggressive agents or immerse in water.
Free maintenance reminders
Timed to your purchase date. Always free, unsubscribe anytime.
Ask a Question
Do you recommend VC-JS-800A-WP?
Yes NoFrequently Asked Questions
The unit is designed for 12 V onboard vehicle systems: petrol engines up to 6.0 L displacement and diesel engines up to 4.0 L. It must not be used on higher-voltage systems or engines beyond those limits.
Is this answer helpful?
Perform start attempts of no more than 3 seconds each, allow 30 seconds cooling between attempts, and limit to a maximum of three attempts within two minutes. If unsuccessful, disconnect and use the force-start method or consult a specialist.
Is this answer helpful?
Charge via USB-C or Micro-USB input (both 5 V / 2 A). Typical recharge time is about 6 hours. Do not charge via a computer USB-A port; it may provide insufficient current and risk damage.
Is this answer helpful?
The device has an IP68 rating and is protected from dust and strong water jets when the sockets cover is closed, making it suitable for outdoor use. Do not submerge it in water and avoid moisture contact when the cover is open.
Is this answer helpful?
Built-in protections include reverse polarity detection, short-circuit protection, overcurrent and over/under-voltage safeguards, thermal monitoring (overheat alerts if clamps exceed ~65°C) and software/hardware cutoffs to prevent damage and ensure safe operation.
Is this answer helpful?
After the engine starts, disconnect the black (negative) clamp first, then the red (positive) clamp. Replace the sockets cover and let the vehicle run for about 30 minutes to recharge the vehicle battery.
Is this answer helpful?
No. The Li-ion battery is permanently built into the unit and cannot be user-replaced. Repairs or battery service must be performed by authorized technicians to avoid safety risks.
Is this answer helpful?
Advantages and Disadvantages
Advantages

- IP68 rating protects against dust and strong water jets when ports are closed.
- High peak start current (400 A, 800 A peak) suitable for petrol ≤6.0 L and diesel ≤4.0 L.
- Dual fast-charge USB-A outputs (up to 18 W each) plus USB-C and Micro-USB charging inputs.
- Integrated LED with constant, SOS and flashing modes aids roadside visibility and emergencies.
- Multiple safety protections: reverse polarity, overcurrent, over/under-voltage, and thermal cutoffs.
Disadvantages

- Battery is non-removable—professional service required if battery fails.
- Do not submerge despite IP68; protection valid only with ports cover closed.
- Charging via a computer USB-A port is discouraged due to insufficient current.
- Limited to 12 V vehicle systems; not suitable for larger engines beyond specified limits.
- Requires careful adherence to start attempt limits and cooling intervals to avoid overheating.
Product Specification
Battery Type
Lithium-ion
Capacity
10000mAh (37Wh)
Output
2x USB-A (socket, 18W)
Input
1x USB Micro-B (socket, 10W), 1x USB-C (socket, 10W), max. 10W
Features
Charge level indicator (4x LED), Flashlight, Car jump start function, IP68-certified
Color
black, red
Dimensions
6.61x3.62x1.50in
Weight
1.15lb
Volume
35.83in^3
Product Description
Voltcraft VC-JS-800A-WP IP68 3-in-1 jump starter Manual
The Voltcraft VC-JS-800A-WP is a rugged, IP68-rated 3-in-1 jump starter and fast-charging power bank designed for modern motorists and outdoor use. Combining a 10,000 mAh Li-ion battery, dual USB-A outputs (up to 18 W each), and a high-current starter function, this compact unit (168 x 92 x 38 mm, 520 g) handles emergency jump starts for 12 V vehicle systems — petrol engines up to 6.0 L and diesel engines up to 4.0 L. It includes smart starter cables, USB-C and Micro-USB charging leads, a storage case and an integrated LED light with constant, SOS and flashing modes for roadside visibility.
Built for reliability in harsh conditions, the device’s IP68 protection guards against dust and powerful water jets when the ports cover is closed; it is suitable for outdoor use but must not be submerged. Safety features include reverse polarity protection, overcurrent and over/under-voltage safeguards, thermal monitoring, and software/hardware cutoffs to protect both the unit and vehicle battery. Status LEDs clearly indicate ready, force-start, protection errors, overheating, low battery and wiring faults so users can diagnose issues quickly.
In normal operation the starter provides a peak start current of 400 A (800 A peak quoted) and supports quick start procedures with cooling intervals: each attempt should be no longer than 3 seconds, with up to three attempts within two minutes and 30 seconds cooling between attempts. If normal starting fails, a force-start mode can be engaged by holding the dedicated button for 3 seconds; the LED will turn steady green and you have 30 seconds to attempt starting. After a successful start, remove the black clamp first, then the red, and let the vehicle run about 30 minutes to recharge its battery.
As a power bank the unit supplies fast charge outputs (5V/3A, 9V/2A, 12V/1.5A) for mobile devices. Charging inputs include USB-C and Micro-USB (both 5V/2A, ~6 hours charge). Regular charging every 3–6 months is recommended to prolong battery life. Important safety notes stress avoiding charging from computer USB-A ports, not charging unattended, and always keeping sockets covered to prevent moisture ingress.
Practical accessories and clear instructions make the Voltcraft VC-JS-800A-WP a versatile emergency tool for drivers, campers and technicians who need a portable, weather-resistant starter with multi-device charging and visible LED signaling. Follow all safety guidance: wear eye protection when working with lead-acid batteries, avoid flammable atmospheres, keep clear of moving engine parts, and never attempt to modify the unit.
Notes
- Always inspect clamps and cables before use; do not use if damaged.
- Ensure the jump starter is at least 50% charged before attempting a start.
- The device is not user-serviceable; the Li-ion battery is non-removable.
- Store in a dry place with the ports cover closed; adhere to specified temperature ranges.
Search for 67,706 Manuals online


Type-in Brand or Model