

Revell Roxter Manual
PDF manual · 28 Pages
English



Quick check
Incorrect answer, please try again.
Chat with your Revell Roxter manual using AI
Get instant AI answers from your Revell Roxter manual
Ask anything about the Revell Roxter. Answers come from this manual, with the pages they are based on.
Roxter Maintenance Schedule
Allow the battery to cool for 10 to 15 minutes after every flight before charging to prevent damage.
Verify that the product is working correctly before every flight.
If rotor blades are damaged, replace them following the specific procedure in section 8.
Remove batteries from the remote control when it is not in use or for extended periods.
Ask a Question
Do you recommend Roxter?
Yes NoFrequently Asked Questions
It is best for indoor flying, beginner practice, and short controlled flights. The stable rotor setup and easy charging make it a good entry-level RC helicopter for learning basic handling skills.
Is this answer helpful?
The battery usually needs about 20 to 30 minutes to charge. After that, flight time is typically around 5 to 7 minutes, depending on how aggressively it is flown.
Is this answer helpful?
It is recommended for users aged 8 and up, but adult supervision is required. Younger children should not use it, and very small parts make it unsuitable for children under 36 months.
Is this answer helpful?
Only in very calm, dry conditions, but it is mainly intended for indoor use. Wind, obstacles, and open spaces can make control much harder and less safe.
Is this answer helpful?
The remote control uses 4 AA batteries at 1.5 V each. These are not included, so they need to be purchased separately before first use.
Is this answer helpful?
Trimming helps correct unwanted spinning and improves flight stability. A properly trimmed helicopter is easier to control and will hover more predictably.
Is this answer helpful?
Yes, damaged rotor blades can be replaced with original spare parts. The blades are marked differently for top and bottom, so they must be installed in the correct position.
Is this answer helpful?
Advantages and Disadvantages
Advantages

- Stable coaxial rotor design with electronic gyro support.
- Easy charging through the remote control.
- LED lighting and sturdy plastic body add appeal and durability.
- Simple trim controls help beginners keep the helicopter steady.
Disadvantages

- Short flight time, so sessions are brief.
- Requires 4 AA batteries for the remote, and they are not included.
- Not suited for windy outdoor use.
- Adult supervision is needed, especially for younger pilots.
Product Specification
Type
Helicopter
Frequency
Infrared
Propulsion
Electric motor
Range
32.81 ft
Operating time
5 min
Product Description
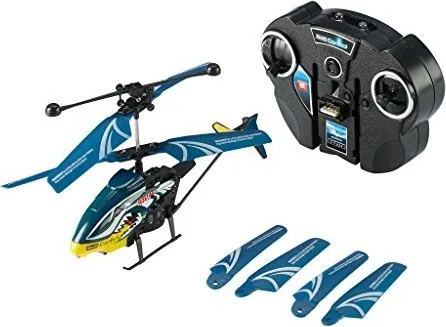
Revell Roxter: A Compact Indoor Helicopter with Big Personality
The Revell Roxter is the kind of micro helicopter that makes flying feel approachable from the very first takeoff. Built around a coaxial rotor system with an electronic gyro, it is designed for stable handling, smooth hovering, and easy correction during flight. For beginners, that means less frustration and more time enjoying the experience. For casual flyers, it offers a lightweight, responsive model that feels lively without being overly complicated.
A standout detail is the integrated rechargeable LiPo battery. Instead of needing a separate charger, the helicopter charges directly through the remote control, which keeps the setup simple and convenient. After a short charge, the Roxter is ready for a few minutes of flight, making it ideal for quick practice sessions, indoor fun, or a short break between tasks. The LED lighting and sturdy plastic body also give it a polished look that adds to the fun.
The Revell Roxter Manual focuses heavily on safe use and controlled flying, and that emphasis makes sense. This model is best suited for indoor spaces with no wind, plenty of room, and a clear flight path. The controls are straightforward: throttle for altitude, directional input for turning, and trim buttons for fine-tuning rotation. Once trimmed correctly, the helicopter becomes much easier to hold steady, which is especially helpful for new pilots learning to manage lift and direction at the same time.
Another strength of the Roxter is how beginner-friendly its maintenance is. If rotor blades are damaged, they can be replaced with original parts, and the instructions clearly explain how to handle that process. The overall design encourages careful learning, responsible use, and a realistic understanding of flight basics rather than gimmicks. It is a small aircraft, but it teaches the core rhythm of RC flying in a surprisingly practical way.
In short, the Revell Roxter is a compact helicopter built for indoor enjoyment, guided practice, and safe handling. It is not made for speed or long endurance, but for controlled flights that reward patience and precision.
Notes
- Best used in a windless indoor area
- Adult supervision is required for younger users
- Let the battery cool before recharging
- Replace damaged rotor blades with original parts only
Search for 67,706 Manuals online


Type-in Brand or Model
Maarten Blom
7 months ago
The listing says age 8+. Is the toy actually suitable for children? Ours stopped working after about 2 hours (on/off switch broke, remote connection cut out). What should we check or do?
Manual.ly
7 months ago
Thanks for the feedback. If the on/off switch or any part fails within the first hours, please do a quick check first: install/replace the remote batteries correctly, make sure the battery cover is closed firmly, and keep the remote within clear range/line of sight. Also confirm the toy is fully powered before use and avoid rough handling during the first attempts (the controls can feel tricky at the start). If the toy still fails or the switch is broken, it likely arrived defective. Contact our support with your order number and a short video/photo, and we will arrange a replacement or warranty solution. Supervision is recommended for children, especially during setup and remote handling.