

Holzmann TS305 Manual
PDF manual · 12 Pages
English



Quick check
Incorrect answer, please try again.
Chat with your Holzmann TS305 manual using AI
Get instant AI answers from your Holzmann TS305 manual
Ask anything about the Holzmann TS305. Answers come from this manual, with the pages they are based on.
TS305 Maintenance Schedule
Verify the sanding table and mitre gauge are set to 90 degrees using a precise angle gauge. Readjust if the index does not match exactly.
Disconnect power. Remove wood dust ideally with compressed air or a dry cloth, followed by a slightly damp cloth. Do not use aggressive cleaners.
Free maintenance reminders
Timed to your purchase date. Always free, unsubscribe anytime.
Ask a Question
Do you recommend TS305?
Yes NoFrequently Asked Questions
It is designed for sanding small wooden workpieces and wood-based materials. It works especially well for edge finishing, bevels, and precise shaping tasks in a workshop setting.
Is this answer helpful?
Yes. The sanding table can be tilted from 0° to 45°, which helps with angled sanding and more flexible workpiece positioning.
Is this answer helpful?
It can be used by beginners only if they are properly trained and follow the safety instructions carefully. Protective equipment and correct feeding technique are very important.
Is this answer helpful?
Feed the workpiece so the disc moves from above into the material. Also avoid taking too deep a cut and do not sand pieces that are too short or too thin.
Is this answer helpful?
Routine cleaning, checking fasteners, and replacing worn sanding discs are the main tasks. The machine should always be disconnected from power before maintenance.
Is this answer helpful?
No. The machine is intended for indoor use only. It should be kept in a dry, clean, and well-ventilated workshop area.
Is this answer helpful?
Advantages and Disadvantages
Advantages

- 305 mm disc and 750W motor provide solid sanding power for small workshop tasks.
- Tilting table and mitre gauge support accurate edge work and angled sanding.
- Maintenance is simple, with easy cleaning and straightforward sanding disc replacement.
- Built-in emergency-off switch and clear safety guidance improve operator control.
Disadvantages

- Designed mainly for small workpieces, so it is not ideal for large stock removal.
- Noise levels are noticeable, making hearing protection important.
- Dust management is essential because sanding can create harmful fine particles.
- Requires careful setup and trained use to avoid kickback and inaccurate results.
Product Specification
Power
750 W
No-load speed
1,450 rpm
Disc diameter
12.01 in
Tool mounting
Hook and loop
Special features
Dust extraction, Angle stop
Weight
59.52 lb
Product Description
Holzmann TS305 Electric Disc Sander: Compact Power for Precise Woodworking
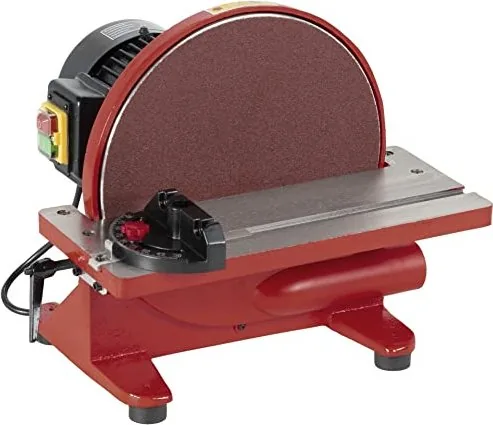
The Holzmann TS305 Electric Disc Sander is built for woodworkers who want accurate edge shaping and smooth sanding in a compact machine. Designed for small workpieces made of wood and wood-based materials, it combines a 750W motor with a 305 mm sanding disc to deliver steady performance for workshop tasks that demand control rather than brute force. For anyone looking into the Holzmann TS305 Electric Disc Sander Manual, the key takeaway is that this machine is all about precision, safe handling, and consistent setup.
One of the most useful features of the TS305 is its adjustable sanding table, which tilts from 0° to 45°. This makes it practical for bevels, angled edges, and repeatable shaping tasks. The included mitre gauge helps keep workpieces aligned, while the large table surface supports stable feeding. With two operating speeds, the machine offers flexibility for different sanding needs, and the angle settings can be checked and fine-tuned for better accuracy over time.
Safety is a major part of the TS305 experience. The machine is meant to be used by trained users only, with proper eye, ear, and respiratory protection. The manual strongly emphasizes clean working conditions, stable placement, and correct feed direction so the sanding disc always moves from above the workpiece downward. That approach reduces kickback risk and helps achieve cleaner results. Because fine dust can be harmful, good ventilation and dust protection are not optional extras but essential habits.
Maintenance is straightforward, which is another advantage for busy workshops. Regular cleaning, checking fastening bolts, and replacing the sanding disc when worn are the main routine tasks. The machine is not designed for heavy disassembly, and repairs should be left to professionals. This keeps downtime low and helps the sander stay reliable over the long term.
Overall, the TS305 suits hobbyists and small professional shops that need a dedicated disc sander for detailed work. It is not a machine for oversized stock or aggressive material removal, but it shines when accuracy, repeatability, and safe operation matter most. For woodworking projects involving edges, corners, and small components, it offers a balanced mix of power and control.
Notes
- Best for small wooden workpieces and wood composites.
- Always verify table and gauge angles before precise sanding.
- Use dust protection and hearing protection during operation.
- Keep the machine on a stable surface and away from moisture.
Search for 67,706 Manuals online


Type-in Brand or Model
Kristin Hirsch
10 months ago
How loud is this disc sander and does it vibrate much while grinding?
Manual.ly
10 months ago
Customers report a very quiet and smooth running machine with low vibration. Because the unit is heavy (cast body) and has rubber feet, it stays stable on the workbench and vibrations are largely absorbed, resulting in a calm working sound. Several users specifically mention a quiet operation and almost vibration-free behavior during sanding. If you plan to use attachments/angle guides, just make sure everything is set firmly and aligned, so the workpiece and accessories do not introduce extra movement.