
Benning MM 4 Manual
PDF manual · 124 Pages
English



Quick check
Incorrect answer, please try again.
Chat with your Benning MM 4 manual using AI
Get instant AI answers from your Benning MM 4 manual
Ask anything about the Benning MM 4. Answers come from this manual, with the pages they are based on.
MM 4 Maintenance Schedule
Send the device to Benning Service Center for calibration to maintain measurement accuracy. Recommended interval is once per year.
Replace the two 1.5V batteries when the battery symbol appears in the display. Ensure device is voltage-free before opening.
Clean exterior with a dry cloth. Do not use solvents or abrasives. Clean battery contacts if electrolyte leakage or white deposits are found.
Free maintenance reminders
Timed to your purchase date. Always free, unsubscribe anytime.
Ask a Question
Do you recommend MM 4?
Yes No
edward59
4 months ago
Does this unit come with all necessary accessories or does it require additional purchases for basic operation?
Frequently Asked Questions
The device is rated for a maximum of 600 V in Category II circuits and 300 V in Category III circuits against earth potential. Always observe safety limits to prevent electric shock.
Is this answer helpful?
Attach the current clamp accessory firmly to the multimeter. Switch to AC current mode by pressing the blue function button for two seconds. Open the clamp jaws, surround a single live conductor, and read the value on the display.
Is this answer helpful?
No, the device is designed only for dry surroundings. It has an IP30 protection rating which guards against solid objects but offers no protection against water ingress.
Is this answer helpful?
It uses two 1.5 V micro batteries (IEC LR03). The display will show a battery symbol when the voltage drops below the required operating level.
Is this answer helpful?
Yes, the HOLD/REL button allows you to freeze the displayed measurement value. Pressing it once holds the value, while holding it for two seconds activates the relative value mode.
Is this answer helpful?
For optimal accuracy, Benning recommends calibrating the unit once per year through their service center to maintain compliance with technical specifications.
Is this answer helpful?
The package contains the multimeter, current clamp attachment, black safety test lead, two red test probes, a compact protective case, two micro batteries, and the operating manual.
Is this answer helpful?
Advantages and Disadvantages
Advantages

- Measures AC current up to 300 A without breaking the circuit
- Clear LCD display with auto-ranging capabilities
- Includes safety test leads and protective carrying case
- Buzzer alerts for continuity testing under 50 ohms
- Dual voltage measurement for DC and AC applications
Disadvantages

- Cannot measure temperature, humidity, or other environmental factors
- Requires manual range selection for some high-precision tasks
- No water resistance rating beyond IP30 protection
- Maximum altitude limit of 2000 meters for operation
- Battery life depends on usage frequency and alkaline quality
Product Specification
Measurement range
max. 300A, max. 600V, max. 42MΩ
Package contents
Bag
Product Description
Discover the Benning MM 4 Current Clamp Multimeter
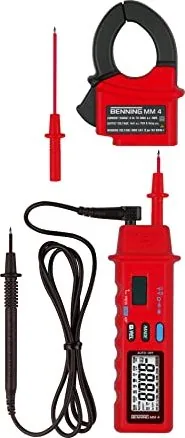
The Benning MM 4 Current Clamp Multimeter is a versatile digital tool designed for electricians and technicians who require precision in dry environments. This robust device combines a standard multimeter with an attachable current transducer clamp, allowing users to measure alternating current without breaking the circuit. Whether you are troubleshooting electrical panels or performing routine maintenance, this instrument provides reliable readings for voltage, resistance, and continuity.
Designed with safety as a priority, the Benning MM 4 operates within specific overvoltage categories, ensuring protection up to 600 volts in category II circuits. The unit features a clear liquid crystal display that shows measurement values, polarity, and battery status at a glance. Users can easily switch between functions like direct voltage, alternating voltage, resistance, diode testing, and continuity checks using the intuitive sliding switch and function buttons. The included buzzer provides audible feedback during continuity tests, making it easier to verify connections quickly.
The package includes essential accessories such as safety test leads, red test probes, a compact protective case, and two micro batteries. The current clamp attachment expands the device capabilities significantly, enabling AC current measurements from 0.1 A to 300 A. Its ergonomic design allows for a maximum conductor diameter of 29 mm, fitting most standard cables. Maintenance is straightforward, with clear instructions for battery replacement and cleaning, ensuring long-term reliability. This multimeter stands out as an essential tool for anyone needing accurate, safe, and efficient electrical measurements.
Search for 67,706 Manuals online


Type-in Brand or Model
Ruthe Watsica
5 months ago
Is this measuring device compact and portable enough for service technicians to carry easily?
Manual.ly
5 months ago
Yes, the device is designed to be small and handheld, making it ideal for service and customer support work. It includes all the essential features you need for your tasks.