
Benning MM 3 Manual
PDF manual · 127 Pages
English



Quick check
Incorrect answer, please try again.
Chat with your Benning MM 3 manual using AI
Get instant AI answers from your Benning MM 3 manual
Ask anything about the Benning MM 3. Answers come from this manual, with the pages they are based on.
MM 3 Maintenance Schedule
Send the device to the factory service center once a year to maintain specified measurement accuracy.
Change the 9 V battery when the low battery symbol appears on the display.
Replace the 1 A and 16 A fuses if they blow due to overload protection activation.
Check test leads for damaged insulation or broken conductors before each use and discard if damaged.
Free maintenance reminders
Timed to your purchase date. Always free, unsubscribe anytime.
Ask a Question
Do you recommend MM 3?
Yes NoFrequently Asked Questions
It measures DC and AC voltage, DC and AC current, resistance, diode condition, continuity, capacitance, and frequency. That makes it useful for general electrical troubleshooting and basic component checks.
Is this answer helpful?
Yes, it is aimed at electricians and electrically trained users. Its safety ratings, fuses, and practical measurement ranges make it well suited to routine service and maintenance tasks.
Is this answer helpful?
Yes. The Benning MM 3 switches off automatically after about 30 minutes. This helps save battery life when the meter is left idle between measurements.
Is this answer helpful?
It uses a 9 V block battery. A low-battery symbol appears on the display when the voltage drops too far, so you know when replacement is needed.
Is this answer helpful?
Yes, but only after the capacitor has been fully discharged. You should never apply voltage to the capacitance input terminals, as this could damage the meter.
Is this answer helpful?
The continuity mode checks whether a circuit path is intact. If resistance drops below about 50 ohms, the built-in buzzer sounds, making fault tracing faster.
Is this answer helpful?
Yes. It includes built-in fast-blow fuses for the current inputs and is designed with category-based protection limits. Using the correct leads and settings is still essential.
Is this answer helpful?
Advantages and Disadvantages
Advantages

- Covers voltage, current, resistance, diode, continuity, capacitance, and frequency testing in one compact meter.
- Clear 3½-digit LCD and automatic polarity help make readings quick and easy to interpret.
- Protective rubber holster improves durability and allows standing or hanging during use.
- Built-in fuses, safety leads, and category-rated protection support safer everyday electrical work.
Disadvantages

- Designed for dry environments only, so it is not suitable for damp or wet job sites.
- The 20 A current range is limited to short measurements, which reduces heavy-duty testing flexibility.
- Accuracy and functionality are practical rather than advanced, so it may not suit specialized lab work.
- Capacitance testing requires fully discharged capacitors, adding an extra preparation step.
Product Specification
Measurement Range
max. 20A, max. 600V, max. 20MΩ
Package Contents
Bag, Test leads
Product Description
Benning MM 3 Multimeter: A Reliable Everyday Tester
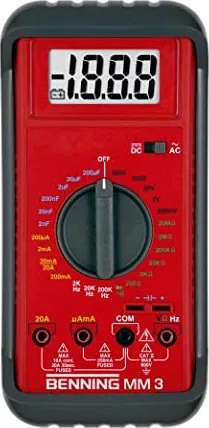
The Benning MM 3 Multimeter is built for practical electrical work where dependable readings and straightforward control matter most. It combines the core functions technicians reach for daily with a compact, rugged design that feels ready for the workshop, service van, or bench. If you are searching for the Benning MM 3 Multimeter Manual, this overview highlights what the instrument is designed to do and why it remains useful for routine diagnostics.
At its heart, the MM 3 is a 3½-digit digital multimeter with clear measurement handling and automatic polarity indication. It covers DC and AC voltage, DC and AC current, resistance, diode testing, continuity checks with an audible buzzer, capacitance, and frequency. That broad range makes it a versatile tool for checking power supplies, tracing faults in circuits, testing components, and verifying signal behavior without switching between multiple devices.
One of its strengths is simplicity. The rotary selector makes mode changes easy, while the display shows values clearly and flags overload conditions. The meter also includes an automatic shutdown function after roughly 30 minutes, helping preserve battery life during busy work sessions. A 9 V battery powers the unit, and the low-battery symbol gives a timely warning before readings become unreliable.
Safety is a major part of the MM 3’s appeal. It is designed for dry environments and supports typical categories used in electrical testing, with protective fuses and supplied safety leads included. The rubber holster adds impact protection and also lets the meter stand upright or hang in place for easier viewing. For field work, that small detail can make a big difference.
The instrument is not overloaded with complex features, and that is part of its value. Instead of trying to be everything at once, it focuses on essential test modes, solid handling, and practical protection. For electricians, maintenance staff, and technically trained users, the Benning MM 3 offers a balanced mix of functionality and durability.
Notes
- Best suited for dry, controlled measuring environments.
- Use only proper safety leads and caps for higher measurement categories.
- Capacitors should be fully discharged before capacitance testing.
- Regular calibration helps maintain the stated accuracy.
Search for 67,706 Manuals online


Type-in Brand or Model
autem_est
9 months ago
How fast is the shipping and order processing? Is the handling straightforward and do I get tracking?
Manual.ly
9 months ago
We aim for quick, uncomplicated processing. After your order is placed, it is prepared and handed to the carrier promptly, and you will receive a confirmation email with tracking details once it ships. Delivery times can vary slightly depending on your location and the carrier, but you can follow the shipment in the tracking link throughout the journey.