
Benning CM P1 Manual
PDF manual · 69 Pages
English



Quick check
Incorrect answer, please try again.
Chat with your Benning CM P1 manual using AI
Get instant AI answers from your Benning CM P1 manual
Ask anything about the Benning CM P1. Answers come from this manual, with the pages they are based on.
CM P1 Maintenance Schedule
Send the device to Benning service center for regular recalibration to maintain measurement accuracy. Recommended interval is once a year.
Replace the two AAA batteries when the battery symbol appears on the display. Ensure device is voltage-free before opening.
Free maintenance reminders
Timed to your purchase date. Always free, unsubscribe anytime.
Ask a Question
Do you recommend CM P1?
Yes NoFrequently Asked Questions
The primary difference lies in their measurement capabilities. The BENNING CM P1 is designed exclusively for measuring Alternating Current (AC). In contrast, the BENNING CM P2 can measure both AC and Direct Current (DC), offering greater versatility for specific applications requiring DC analysis.
Is this answer helpful?
No, the BENNING CM P1/ P2 is intended for dry environments only. It has an IP 30 rating which offers no protection against water. Using it in wet conditions or exposing it to moisture can damage the device and create serious electrical hazards.
Is this answer helpful?
First, ensure the device is powered off. Place the unit face down, remove the screw from the battery cover on the rear, lift the cover, and remove the old batteries. Insert two new 1.5V AAA batteries observing correct polarity, then reattach the cover securely.
Is this answer helpful?
This device is rated for use in circuits with a nominal voltage up to CAT III 600 V. Exceeding this limit violates safety standards and may result in severe injury or equipment failure. Always adhere to these safety guidelines.
Is this answer helpful?
Yes, the blue H/INRUSH button serves as the Hold function. Pressing it once stores the current reading on the display. Pressing it again returns the device to normal measuring mode. A long press activates the inrush current measurement feature.
Is this answer helpful?
Advantages and Disadvantages
Advantages

- True RMS technology ensures accurate readings on complex waveforms
- Inrush current measurement captures high startup spikes effectively
- Non-contact voltage detection enhances safety during inspections
- Auto-ranging feature simplifies operation for all skill levels
- Compact and lightweight design fits easily in toolkits
Disadvantages

- Battery life is significantly shorter for the DC-capable P2 model
- No protection against water exposure limits use in wet conditions
- Display backlight turns off automatically after ten seconds
- Overload protection does not provide visual warning for total overload
- Requires manual null balance for DC differential measurements
Product Specification
Measurement range
max. 400A, max. 600V
Product Description
Benning CM P1 Current Clamp Multimeter Review
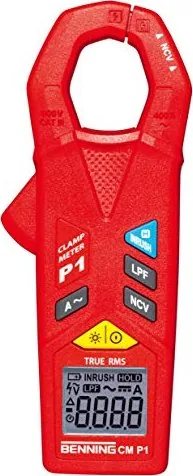
The Benning CM P1 Current Clamp Multimeter stands as a robust tool for electricians and technicians seeking precision in AC current measurements. Designed with a True RMS digital readout, this device ensures accurate readings even when dealing with non-sinusoidal waveforms, making it indispensable for modern electrical diagnostics. The unit features a clear four-digit LCD display that automatically selects the measurement range, simplifying the workflow for professionals who need quick and reliable data.
Operating within a CAT III 600 V safety category, the meter is built to handle demanding environments while maintaining user safety. Its ergonomic design includes a protective jaw guard to prevent accidental contact with live conductors. The inclusion of an Inrush current function allows users to capture high startup currents for up to 100 milliseconds, a critical feature for analyzing motor loads and power supplies. Additionally, the Non-Contact Voltage (NCV) indicator provides a visual and audible alert for detecting AC voltages without physical contact, enhancing safety during troubleshooting sessions.
Powering the device are two standard AAA batteries, offering extended runtime for the BENNING CM P1 model. The unit also boasts an auto-power-off feature to conserve energy after approximately fifteen minutes of inactivity. With dimensions of 149 x 59 x 27.5 mm and a lightweight build of roughly 140 grams, it fits easily into any technician's toolkit. Whether you are checking residential circuits or industrial machinery, the Benning CM P1 delivers consistent performance and reliability.
Search for 67,706 Manuals online


Type-in Brand or Model