
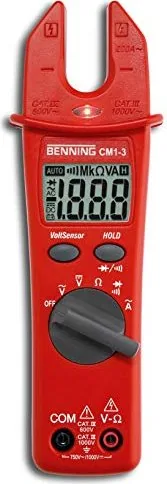
Benning CM 1-3 Manual
PDF manual · 100 Pages
English



Quick check
Incorrect answer, please try again.
Chat with your Benning CM 1-3 manual using AI
Get instant AI answers from your Benning CM 1-3 manual
Ask anything about the Benning CM 1-3. Answers come from this manual, with the pages they are based on.
CM 1-3 Maintenance Schedule
Send the device to Benning Service Center for recalibration once a year to maintain specified measurement accuracy.
Replace the two 1.5V micro batteries immediately if the battery symbol appears on the display. Ensure device is voltage-free before opening.
Wipe exterior with a clean dry cloth. Check battery contacts for electrolyte leakage or white deposits and clean them with a dry cloth if found.
Free maintenance reminders
Timed to your purchase date. Always free, unsubscribe anytime.
Ask a Question
Do you recommend CM 1-3?
Yes NoFrequently Asked Questions
The device can measure up to 1000 V DC and 750 V AC. It is rated for overvoltage category III at 1000 V and category IV at 600 V relative to earth.
Is this answer helpful?
Select the continuity function on the rotary switch and press the HOLD key for continuity mode. Connect the leads to the points being tested. If resistance is below 50 ohms, the internal buzzer will sound.
Is this answer helpful?
No, the device is designed strictly for measurements in dry ambient conditions. It has an IP 30 rating which offers no protection against water.
Is this answer helpful?
Using alkaline batteries, the device offers an approximate battery life of 250 hours. The meter will display a battery symbol when the voltage drops below the operating threshold.
Is this answer helpful?
The VoltSensor button activates a non-contact voltage indicator. It detects AC fields and signals the presence of phase voltage via a red LED and an audible beep without needing test leads.
Is this answer helpful?
Yes, the Benning CM 1-3 automatically switches off after approximately 10 minutes of inactivity to preserve battery power.
Is this answer helpful?
Advantages and Disadvantages
Advantages

- Supports multiple measurement types including AC/DC voltage, current, resistance, and diode tests
- Includes a non-contact VoltSensor for safe phase detection and cable break tracing
- Built-in buzzer provides immediate acoustic feedback during continuity testing
- Complies with high safety standards (CAT III 1000V / CAT IV 600V) for professional use
- Auto-power off feature conserves battery life after ten minutes of inactivity
Disadvantages

- Intended only for dry environments and cannot withstand water exposure
- Requires annual calibration by service center to maintain specified accuracy
- Battery replacement requires removing the cover and unscrewing a fastener
- Maximum resolution limited to 1999 counts on the digital display
- Measuring leads must be inspected regularly for insulation damage to ensure safety
Product Specification
Measurement range
max. 200A, max. 100V, max. 20MΩ
Product Description
Benning CM 1-3 Clamp Meter-Multimeter: A Comprehensive Review
The Benning CM 1-3 is a robust digital clamp meter designed for skilled electricians and electrotechnically trained personnel who require precision in dry environments. This versatile tool combines the functionality of a standard multimeter with a fixed jaw current sensor, allowing for efficient AC current measurements without breaking the circuit. The device features a clear 3½-digit liquid crystal display that presents readings up to 1999, along with automatic polarity indication and a decimal point for easy interpretation.
Equipped with a rotary switch, users can seamlessly toggle between various measurement modes including AC voltage, DC voltage, resistance, diode testing, continuity checks with an audible buzzer, and AC current. The unit operates safely within overvoltage categories III and IV, supporting up to 1000 V DC and 750 V AC. Safety is paramount, with the device built to meet strict DIN VDE and EN standards, ensuring protection against electrical hazards when used correctly. The included VoltSensor function allows for non-contact detection of phase voltages, indicated by a red LED and an acoustic signal, which is particularly useful for tracing cable breaks or identifying live phases quickly.
Powering the instrument are two integrated 1.5 V micro batteries, offering an approximate lifespan of 250 hours under normal conditions. The package includes safety measuring leads rated for CAT III 1000 V, a compact protective pouch, and a multilingual operating manual available on an included CD. The meter automatically powers off after ten minutes of inactivity to conserve energy. Its compact dimensions of 190 x 60 x 40 mm and lightweight design make it portable for field work, while the open fork opening of 16 mm accommodates single conductors effectively. Regular calibration is recommended annually to maintain accuracy, and the device must be handled with care to avoid damage from moisture or extreme temperatures.
Search for 67,706 Manuals online


Type-in Brand or Model