
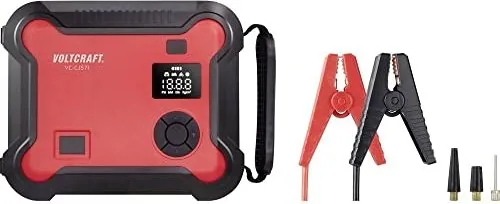
Voltcraft VC-CJS71 Manual
PDF manual · 16 Pages
English



Quick check
Incorrect answer, please try again.
Chat with your Voltcraft VC-CJS71 manual using AI
Get instant AI answers from your Voltcraft VC-CJS71 manual
Ask anything about the Voltcraft VC-CJS71. Answers come from this manual, with the pages they are based on.
VC-CJS71 Maintenance Schedule
To prolong battery life, fully charge the rechargeable battery every 3 to 6 months even if the product is not used.
Check that the valve and air hose are not damaged before inflating any object.
Free maintenance reminders
Timed to your purchase date. Always free, unsubscribe anytime.
Ask a Question
Do you recommend VC-CJS71?
Yes NoFrequently Asked Questions
The VC-CJS71 is designed for 12 V vehicle systems and can jump-start petrol engines up to 8.0 L and diesel engines up to 6.0 L. It delivers a peak start current of 600 A (1200 A peak), but actual performance depends on temperature and engine condition.
Is this answer helpful?
Use only the supplied starter cables. Turn off vehicle electronics, place the vehicle in park/neutral and engage the handbrake. Attach red clamp to battery + and black clamp to battery -, check the status LED, attempt starts of max 3 seconds with 30 seconds cooling between attempts and max three attempts within two minutes.
Is this answer helpful?
Charging via the USB-CTM input takes approximately 8–9 hours. To prolong battery life and ensure readiness, fully charge the unit every 3–6 months during storage and avoid leaving it discharged for extended periods.
Is this answer helpful?
The compressor reaches up to 10 bar (150 psi) with preset modes for car, motorcycle, bicycle and ball. Observe the duty cycle: 8 minutes continuous use, then 5 minutes cooling. Do not use in wet conditions, avoid bending the hose while operating, and verify correct pressure units to prevent overinflation.
Is this answer helpful?
Avoid jump-starting vehicles while charging the unit. The powerbank function and USB outputs are intended for device charging, but simultaneous heavy loads can affect performance; follow safety guidance in the manual and prioritize jump-start safety.
Is this answer helpful?
The device includes protections against short-circuit, overload, under-voltage, over-voltage, overcharge, reverse charging, reverse polarity and over-temperature. Status LEDs indicate normal readiness, force-start mode and various fault or protection states.
Is this answer helpful?
Store in a dry, temperate environment (-20 to +60 °C). Clean with a dry, lint-free cloth; do not use aggressive chemicals or immerse in water. Keep the product out of children’s reach and recharge periodically to maintain battery health.
Is this answer helpful?
Advantages and Disadvantages
Advantages

- All-in-one solution: jump starter, powerbank, compressor and LED light in one compact unit.
- High-capacity 16,000 mAh Li-ion pack supports multiple jump starts and fast USB charging.
- Compressor with presets and digital display for accurate inflation up to 10 bar (150 psi).
- Comprehensive safety features: short-circuit, reverse polarity, over-temperature and reverse-charge protection.
- Lightweight and portable (approx. 1.5 kg) with stored hose and carry handle for easy transport.
Disadvantages

- Compressor duty cycle limits continuous operation to 8 minutes, then requires 5 minutes cooling.
- Not waterproof — exposure to moisture or rain is prohibited.
- Requires USB-CTM input for proper charging; charging via computer USB-A ports is not recommended.
- Jump-start capability limited to 12 V systems and petrol ≤8.0 L / diesel ≤6.0 L engines.
- Internal battery is non-removable, complicating end-of-life replacement or servicing.
Product Specification
Suitable for
Petrol engines up to 2.11 gal, Diesel engines up to 1.58 gal
Battery voltage
12V
Starting current
600A, 1200A (after charging time)
Connections
2x USB-A
Capacity
16Ah
Additional functions
Lighting (LED), Compressor
Dimensions
8.15x6.69x3.39in
Weight
3.37lb
Product Description
Voltcraft VC-CJS71 4in1 Jump Starter / Boost Starter Manual
The Voltcraft VC-CJS71 is a compact, multi-function emergency power tool designed for motorists and outdoor users. Combining a 16,000 mAh Li-ion powerpack, a 12 V jump starter, an integrated air compressor and an LED light, this 4in1 device covers common roadside needs: jump-starting petrol engines up to 8.0 L and diesel engines up to 6.0 L, inflating tires and inflatable items, and powering or charging USB devices. Lightweight at about 1.5 kg and sized for easy storage, it includes smart starter cables, valve adapters, a USB-CTM charging input and two USB-A outputs for fast charging.
Built with safety protections for short-circuit, overload, reverse polarity, over-temperature and reverse-charging, the VC-CJS71 also provides status LEDs and a force-start function for difficult starts. The jump starter delivers a peak start current of 600 A (1,200 A peak) and supports up to roughly 15 quick starts depending on conditions. The compressor offers preset modes (car, motorcycle, bicycle, ball) and manual control, with a duty cycle of 8 minutes on and 5 minutes cool-down, and a maximum pressure of 10 bar (150 psi). The LED lamp supports multiple modes — white, SOS, red and strobe — for illumination and signaling.
Charging and battery care are straightforward: recharge the unit via the USB-CTM input (5 V/2 A) in about 8–9 hours, monitor the four-segment battery indicator (25% increments), and recharge every 3–6 months during storage. The powerbank outputs include fast-charge profiles (Output 1 up to 18 W) and a second 5 V/3 A USB-A port. The manual emphasizes avoiding moisture, not modifying the device, using only supplied cables for jump starts, and following polarity and safety checks before use.
Practical features include a carry handle, stored air hose, multiple valve connectors, and a clear display for compressor pressure. The product is suited for drivers who want an all-in-one emergency kit that fits in a trunk or garage and reduces reliance on roadside assistance for dead batteries or low tire situations.
Notes
- Do not expose the device to moisture or direct sunlight. Allow condensation to dissipate before use.
- Use only the supplied starter cables; do not short the clamps or connect to incompatible vehicle systems.
- Observe compressor duty cycle to avoid overheating; the unit needs 5 minutes cool-down after 8 minutes continuous operation.
- Recharge the unit periodically to maintain battery health and ensure readiness.
Search for 67,706 Manuals online


Type-in Brand or Model
Laura Becker
10 months ago
Does the device stay ready for the next use after I recharge the battery, or do I need to wait a long time?
Manual.ly
10 months ago
After you finish using the start aid or the compressor, you simply recharge the built-in battery. Once it is fully charged, it is ready for the next use again, without any special waiting beyond the normal charging time. We recommend charging it right after use and following the charging instructions and LED status indicators in the manual so you know when charging is complete. This helps ensure the unit reliably provides power the next time you need it.