


Vitavia Meridian 1 6700 Manual
PDF manual · 40 Pages
English



Quick check
Incorrect answer, please try again.
Chat with your Vitavia Meridian 1 6700 manual using AI
Get instant AI answers from your Vitavia Meridian 1 6700 manual
Ask anything about the Vitavia Meridian 1 6700. Answers come from this manual, with the pages they are based on.
Meridian 1 6700 Maintenance Schedule
Thoroughly wash the greenhouse occasionally using a mild detergent that does not react aggressively with aluminium or glass fixing clips.
Ensure that the upper and lower door tracks are cleaned regularly to avoid a build-up of debris which can hinder movement.
In the event of heavy snowfall, clear the roof of the building or take suitable measures to support the roof against the weight.
Ask a Question
Do you recommend Meridian 1 6700?
Yes NoFrequently Asked Questions
You will need screwdrivers (flat and PH2), a 10mm socket spanner, a combination spanner, a knife, a measuring stick, a spirit level, and an accu-drill with adjustable torque.
Is this answer helpful?
No, the greenhouse must be anchored to a solid foundation. You can use a stone or concrete base or purchase an optional galvanized steel base accessory.
Is this answer helpful?
Wash the greenhouse occasionally with a gentle detergent. Ensure the cleaner does not react aggressively with the aluminum or glass fixing clips.
Is this answer helpful?
The maximum tightening torque for the nuts is 3Nm. Over-tightening can damage the aluminum profiles.
Is this answer helpful?
No, the door can be assembled to the left or right of the middle bar depending on your preference and space availability.
Is this answer helpful?
Advantages and Disadvantages
Advantages

- Durable aluminum frame resistant to rust and weather
- 4mm polycarbonate glazing offers superior insulation
- Sliding door allows flexible placement options
- Includes roof vent for natural temperature control
- Easy to clean surfaces require minimal maintenance
Disadvantages

- Requires two people for safe assembly
- Foundation must be perfectly level and square
- Max bolt torque is low at 3Nm requiring care
- Silicone sealant not included for edge sealing
- Manual pages may vary slightly by production batch
Product Specification
Glazing
Polycarbonate 4mm (hollow chamber sheets)
Frame
Aluminum
Color
silver
Area
72.06 sq ft
Features
2 roof windows, 1 hinged window, gutter, lockable
Door
Sliding door
Dimensions (LxWxH)
84.65x84.32x76.12 inches
Product Description
Growing with Vitavia Meridian 1
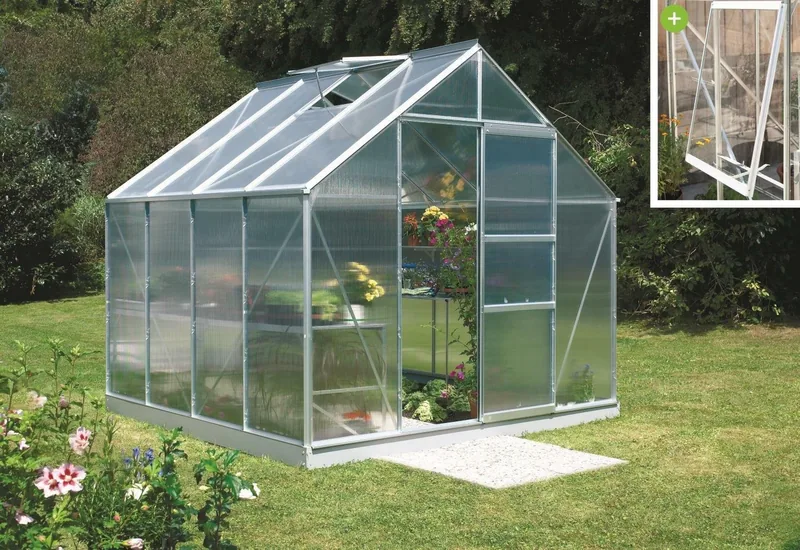
The Vitavia Meridian 1 6700 HKP 4mm Greenhouse alu is a robust and spacious structure designed for serious gardeners who demand durability and style. This greenhouse features a high-quality aluminum frame that ensures longevity while resisting corrosion from the elements. The 4mm polycarbonate glazing provides excellent insulation, protecting your plants from harsh winds and cold temperatures while allowing ample sunlight to penetrate for optimal growth.
Assembly of this unit requires careful planning and two people to ensure structural integrity. The manual guides you through selecting a sunny, wind-sheltered location and preparing a perfectly level foundation. Whether you choose a concrete base or an optional galvanized steel foundation, stability is key. The assembly process involves connecting side elements, gable ends, and roof bars, ensuring all bolts are tightened to the specified torque of 3Nm to prevent damage to the profiles.
One of the standout features is the sliding door, which can be configured on either the left or right side to suit your garden layout. The roof vent system allows for natural ventilation, crucial for maintaining healthy humidity levels during hot summer days. Regular maintenance, such as cleaning the tracks and washing the frame with mild detergent, will keep your greenhouse looking pristine and functioning smoothly for years.
This model is ideal for extending your growing season, offering a protected environment for delicate seedlings, exotic flowers, or even small vegetable patches. With its sleek design and practical features, the Vitavia Meridian 1 becomes a functional centerpiece in any garden.
Search for 67,706 Manuals online


Type-in Brand or Model