

Manual.ly Logo

Vitavia Meridian 1 6700 Manual

0.0 · 0 Ratings

PDF manual · 40 Pages

English

M: QW-35-FL
page

/ 40

Loading...
5c13d1920c0277bc6d51c3f814547ae4fd3d page 4
4
SITE SELECTION
Always try to select a sunny location, sheltered
from the wind as much as possible.
IMPORTANT
Before assembling your new greenhouse,
please check that all parts in the provided list
are included. Please take each bundle out of
the packaging in order to identify the parts
better.
It is important that the opened bundles do not
get mixed with one another.
If something is missing please contact your
retailer.
Nuts (1002) - Max. tightening torque 3Nm.
NECESSARY TOOLS
Screw drivers (Normal and Crosshead PH2),
10 mm socket spanner or wrench, 10 mm
combination spanner, knife, measuring stick,
spirit level, Accu-drill with adjustable torque.
MAINTENANCE
The greenhouse should be thoroughly washed
with a gentle detergent occasionally. Please
check that the detergent used does not react
aggressively with aluminium or the glass xing
clips.
Ensure that the upper and lower door tracks
are cleaned regularly to avoid a build-up of
debris.
0. BASE
Important! The base must be exactly square
and level. A zinc-coated steel base is available
as an accessory for all greenhouse models.
(Attention! Only when the greenhouse has to
be located in a very windy and unprotected
location: Drill through both the prole at the
base of the greenhouse and the steel base,
and connect them with nuts and bolts.)
If you would rather construct your own stone
or concrete foundation, please follow the
dimensions specied in diagram 0. Treated
wooden beams at least 18 mm high and not
more than 32 mm wide should be positioned
between the stone/concrete foundation and
the aluminium frame, and connected to the
foundation with 50 mm long bolts (not pro-
vided).
Foundations must extend down below the frost
level.
Diagrams in a single frame show the view
from inside the greenhouse. Those enclo-
sed in a double frame show the view from
outside the greenhouse.
1. SIDE ELEMENTS
Lay all of the parts on the oor and connect
them loosely.
At this stage it is necessary with each vertical
aluminium bar (3032) to include an extra
connecting bolt, to later connect corner braces
(2056) (1.5). On the outside bars (3032) in-
clude one additional bolt, to also connect cross
braces (3095) (1.2).
Loosely connect the corner plate (1092) (1.1).
In step 4 the corner plate bolts must also be
connected to the gable ends.
2. PLAIN GABLE END
Lay all of the parts on the oor and connect
them loosely.
Include two extra connecting bolts in the
vertical bars (3041 and 3042) to connect the
cross braces (2.2) & (2.6). In the vertical bar
(3101) please include only one extra bolt.
3. DOOR GABLE END
Lay all of the parts on the oor and connect
them loosely.
Attention: The door can be assembled to the
left or the right of the middle bar.
The door runner bar (1347) will be connected
to the horizontal bar (2048). Connect these
loosely from the outside with three nuts and
bolts (3.10).
Connect (5001) and (5002) as shown in (3.8)
(3.9) with a nut and bolt.
Please include two extra bolts in the vertical
bars (3041), (3042) and (3101).
4A. CONNECTING THE SEPARATE
ELEMENTS
Bolt the side elements to the end elements.
(4.1) & (4.2).
Loosely connect the corner plate (1092) above
the eaves (4.3).
Assemble the ridge bar and then the corner
plates (1092) on the gable ends (4.4) (4.5).
4B. CONNECTING THE SEPARATE
ELEMENTS
Connect the roof glazing bars (2055) between
the eaves (4.6) and the ridge bar (4.7). Insert
extra bolts into each glazing bar depending on
which house you have bought. The number is
indicated in a circle on each bar and to be
read beginning from both ends.
The corner braces (2056) (4.6), the roof bra-
ces (3057) (4.8) and the cross braces (2033)
(4.6) (4.11) (4.12) (4.13) can now be con-
nected.
Now position your greenhouse on the pre-
pared base/foundation and connect loosely.
Adjust the greenhouse until it is completely
square and tighten all bolts.
Please do not over tighten. (max. 3Nm)
Press the end protectors (1017) and (1018)
onto the prole ends (4.9).
5. DOOR
Attention: Do not stand the assembled
Assembly Instructions
Safety Warning
EN
1. PLEASE READ THESE INSTRUCTIONS CAREFULLY AND COMPLETELY BEFORE ASSEMBLING YOUR GREENHOUSE.
2. Sharp edges and corners can cause injury. Always wear protective glasses, gloves, shoes and headgear when handling the aluminium proles, glass and
polycarbonate sheets. Broken glass is a safety hazard – always clear up immediately and dispose of with care.
3. The product you have purchased is intended only for growing plants and should only be used for this purpose. When used for other purposes we will take
no responsibility.
4. It is recommended that this greenhouse is assembled by two people.
5. Should you encounter difculties constructing this house, or in tting the glass or polycarbonate sheets, please contact your retailer
– do not use force!
6. The greenhouse must always be anchored.
002.01.1806

Chat with your Vitavia Meridian 1 6700 manual using AI

Get instant AI answers from your Vitavia Meridian 1 6700 manual

Ask anything about the Vitavia Meridian 1 6700. Answers come from this manual, with the pages they are based on.

Meridian 1 6700 Maintenance Schedule

Occasionally
Wash the greenhouse with a gentle detergent

Thoroughly wash the greenhouse occasionally using a mild detergent that does not react aggressively with aluminium or glass fixing clips.

Regularly
Clean door tracks to remove debris

Ensure that the upper and lower door tracks are cleaned regularly to avoid a build-up of debris which can hinder movement.

Seasonally
Clear snow from the roof

In the event of heavy snowfall, clear the roof of the building or take suitable measures to support the roof against the weight.

M: qwen/qwen3.8-flash

Ask a Question

0/1000

Do you recommend Meridian 1 6700?

Yes No

Frequently Asked Questions

A

You will need screwdrivers (flat and PH2), a 10mm socket spanner, a combination spanner, a knife, a measuring stick, a spirit level, and an accu-drill with adjustable torque.

Is this answer helpful?

A

No, the greenhouse must be anchored to a solid foundation. You can use a stone or concrete base or purchase an optional galvanized steel base accessory.

Is this answer helpful?

A

Wash the greenhouse occasionally with a gentle detergent. Ensure the cleaner does not react aggressively with the aluminum or glass fixing clips.

Is this answer helpful?

A

The maximum tightening torque for the nuts is 3Nm. Over-tightening can damage the aluminum profiles.

Is this answer helpful?

A

No, the door can be assembled to the left or right of the middle bar depending on your preference and space availability.

Is this answer helpful?

M: QW-35-FL

Advantages and Disadvantages

Advantages

  • Durable aluminum frame resistant to rust and weather
  • 4mm polycarbonate glazing offers superior insulation
  • Sliding door allows flexible placement options
  • Includes roof vent for natural temperature control
  • Easy to clean surfaces require minimal maintenance
VS

Disadvantages

  • Requires two people for safe assembly
  • Foundation must be perfectly level and square
  • Max bolt torque is low at 3Nm requiring care
  • Silicone sealant not included for edge sealing
  • Manual pages may vary slightly by production batch
M: QW-35-FL

Product Specification

Glazing

Polycarbonate 4mm (hollow chamber sheets)

Frame

Aluminum

Color

silver

Area

72.06 sq ft

Features

2 roof windows, 1 hinged window, gutter, lockable

Door

Sliding door

Dimensions (LxWxH)

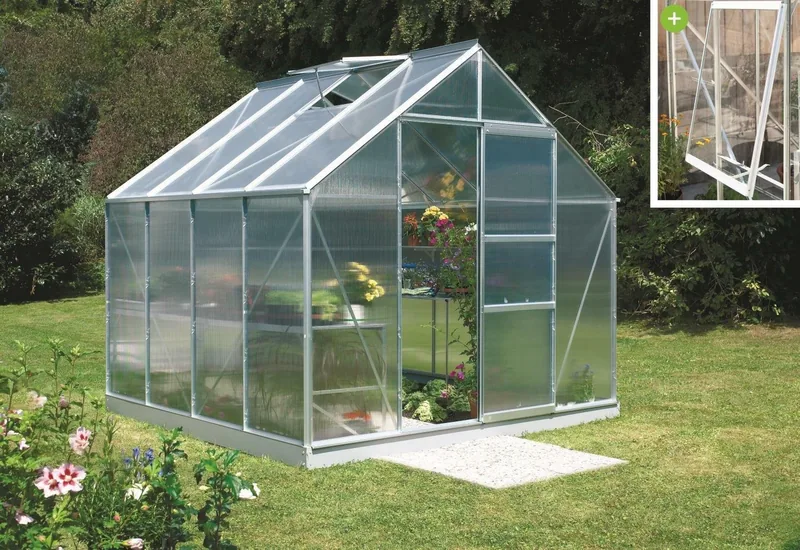
84.65x84.32x76.12 inches

M: QW-35-FL

Product Description

Growing with Vitavia Meridian 1

The Vitavia Meridian 1 6700 HKP 4mm Greenhouse alu is a robust and spacious structure designed for serious gardeners who demand durability and style. This greenhouse features a high-quality aluminum frame that ensures longevity while resisting corrosion from the elements. The 4mm polycarbonate glazing provides excellent insulation, protecting your plants from harsh winds and cold temperatures while allowing ample sunlight to penetrate for optimal growth.

Assembly of this unit requires careful planning and two people to ensure structural integrity. The manual guides you through selecting a sunny, wind-sheltered location and preparing a perfectly level foundation. Whether you choose a concrete base or an optional galvanized steel foundation, stability is key. The assembly process involves connecting side elements, gable ends, and roof bars, ensuring all bolts are tightened to the specified torque of 3Nm to prevent damage to the profiles.

One of the standout features is the sliding door, which can be configured on either the left or right side to suit your garden layout. The roof vent system allows for natural ventilation, crucial for maintaining healthy humidity levels during hot summer days. Regular maintenance, such as cleaning the tracks and washing the frame with mild detergent, will keep your greenhouse looking pristine and functioning smoothly for years.

This model is ideal for extending your growing season, offering a protected environment for delicate seedlings, exotic flowers, or even small vegetable patches. With its sleek design and practical features, the Vitavia Meridian 1 becomes a functional centerpiece in any garden.

M: QW-35-FL

© Copyright 2026 Manual.ly
