Manual.ly Logo

Tokina SZ 300mm F7.1 PRO Reflex MF CF Manual

0.0 · 0 Ratings

PDF manual · 2 Pages

English

M: OA-GPT-5-NAN
page

/ 2

Loading...
541b36d268eed6086c59c58f3757263574d2 page 1
Instruction Manual
1. Part Names
2. Attaching the Lens to the Camera
Please refer to your camera's manual
for further information on attaching
and removing. Check that the lens is
attached securely.
Camera
① Focus ring ② Distance scale (in feet)
③
Distance scale (in meters) ④ Macro magnification scale
⑤
Distance scale indicator mark ⑥Mount attachment mark
3. Setting Up the Camera
Focal distance
Brightness
Format
Lens construction
Angle of view (SONY E、FUJIFILM X)
Angle of view (CANON EF-M)
Minimum focus distance
Macro magnification factor
Focus method
Filter diameter (front of the lens)
Filter diameter (rear of the lens)
Maximum diameter
Overall length
Weight (without cap)
Lens Hood
Corresponding mount
300 mm
F7.1 (fixed)
8 groups, 8 lenses
5.4°
5.1°
0.92 m
1:2.5
φ 46 mm
φ 61 mm
78.5 mm
235 g
MH-461
6. Performance Table
5. Taking Photographs
* Before attaching a filter to the front of the lens, be sure the filter won't touch the reflective part (black circle) at the center
of the front surface of the lens.
Specifications and exterior views are subject to change without notice for the purpose of product improvement.
• This lens is small and light but still has a long focal length. Telephoto lenses like
this product are associated with small angle of views, and higher probabilities
of blurry images due to magnification of camera shake. It is recommended that
you set your camera to high sensitivity, increase shutter speed, and use a
stable tripod or monopod.
●
Preventing Blurry Images
You can prevent blurry images by using a cable release or self-timer function.
In this case, be sure to use a stable, sturdy tripod. If your camera has a
mirror-up function, use the function to further reduce the possibility of blurring.
Tip
• When a telephoto lens is used, the magnification factor increases and
therefore dust, water vapor and other matter suspended in the air will affect
the image quality. To capture sharp images, ideally photographs should be
taken on a fine day with minimum wind following several consecutive clear
days, in a location not subject to exhaust gases, smoke from chimneys, etc.
●
Photographing Conditions with a Telephoto Lens
It is difficult to capture sharp images in mountains and coastal areas during
the summer, because the air contains a considerable amount of gas and
water vapor. However, your photography can be more enjoyable if you take
advantage of unfavorable conditions to create works of your own, such as
capturing the sea through vibrating air or shooting the ridgelines of moun-
tains veiled in haze.
Tip
• This lens isn't linked to the auto focus function, so the focus must be adjusted
manually. To bring the subject into focus, simply turn the focus ring.
• With a telephoto lens, the depth of field (the range in which the subject can be
brought into focus) becomes shallow (focus range is small), so it's difficult to
adjust the focus. Use a stable tripod or monopod to adjust the focus carefully.
●
Adjusting the Focus
Generally, a super-telephoto lens with a range of 300 mm or more will have
some allowance in the position of the infinitely symbol
∞
. This is because
the refractive index of light in air changes as the temperature in the mirror
cylinder changes, and the focus position may shift slightly as a result. Be
sure to adjust the focus carefully by checking the image on the finder
screen, even when capturing distant objects.
If you're using a digital camera with a live view feature, you can use the
zoom-in function to fine-tune the focus.
• This lens employs reflective optics, so the aperture is fixed. The amount of
light must be adjusted by changing the shutter speed (if you are using a digital
camera, you can achieve this by changing ISO sensitivity). A slower shutter
speed tends to cause blurry images, so it is recommended that you set your
camera to high sensitivity, and use a high-sensitivity film (ISO400 or better).
• Auto exposure is possible on nearly any camera that offers an AE function with
aperture priority (except for certain Nikon and Sony models) (program AE and
shutter priority AE are not possible). Set the camera without lens to the
aperture priority AE mode, and then try taking photographs in a bright area
and a dark area. If you notice that the shutter speed differs from one condition
to the next, auto exposure is enabled.
●
Adjusting the Exposure
This lens has no electrical contacts, so signals aren't exchanged electrically
between the camera and lens. The camera's finder display or LCD screen
may not come on, but this will not affect the camera or lens function.
Tip
Tip
Tip
A lens hood is designed to prevent flares and ghost
images caused by strong side rays that strike the front
of the lens. We recommend that you use a lens good
to ensure clear photographs, and to protect the lens.
The lens has no electrical contacts, so signals aren't exchanged between
camera and lens. Therefore, you will need to turn 'release shutter without lens'
ON in your camera settings. For further details, please refer to your camera
manual.
3. Paramètres du boîtier de l'appareil photo
Étant donné que ce produit n
'
a pas de contacts électroniques, l
'
appareil
photo ne reconnaît pas l
'
objectif.
Il est donc nécessaire de régler l
'
appareil photo sur « ON sans déclencheur
d
'
objectif ». Pour plus de détails, consultez le manuel d
'
instructions de votre
appareil photo.
The lens hood is a screw type hood. To set the hood
securely, screw it according to the arrows shown in
the diagram. To remove the hood, turn it the opposite
way.
4. Lens Hood
●
How to attach the lens hood
7. Troubleshooting
Taking photographs
❶
,
❷
Set the necessary items beforehand by referring to 3,
''Setting Up the Camera'', and your camera's manual.
❸
Set the camera’s focus mode to “MF” (manual focus).
❶
The shooting mode doesn't
support the attached lens.
❷
The camera isn't set correctly, or
the camera is set to disable the
shutter release when a lens without
electrical contacts is used.
❸
The camera’s focus mode is set to
“AF” (auto focus). In the AF mode
the camera may not be able to
detect the focus position of this
lens, in which case the shutter
doesn't release.
The shutter doesn't release.
❶
Neither the camera nor the lens function is affected.
❶
This lens has no electrical contacts,
so it doesn't send or receive
electrical signals to/from the
camera.
The camera’s finder display or
LCD screen doesn't come on.
❶
Turn the focus ring and manually adjust the focus.
[Refer to 5, “Taking Photographs.”]
❶
This lens is a manual focus lens.
Auto focus doesn't work.
❶
Firmly secure the camera when taking photographs.
* The use of a tripod or monopod is recommended.
❷
Increase the distance from the subject.
❸
Take photographs in a place with less airborne dust, water vapor,
exhaust gases, etc.
❹
Wipe clean the lens using a soft cloth.
[Refer to 5, “Taking Photographs.”]
❶
The hand shakes when photo-
graphs are taken.
❷
The distance to the subject is too
close.
❸
Effects of dust and water vapor in
the air.
❹
The lens is dirty.
Images become blurry.
❶
Adjust the exposure by changing the shutter speed.
[Refer to 5, “Taking Photographs.”]
❶
This lens has a fixed aperture.
The aperture can't be adjusted.
This lens is a mono-focal lens.The camera doesn't zoom in.
Condition Remedial action
❶
Do not remove the black object. It's okay to take a photograph as is.
❶
This is the part of the lens structure
that is used to reflect images.
What appears to be a black cap
at the center of the object lens
(lens on the subject side) doesn't
come off.
❶
On cameras with aperture priority mode, this problem can be
compensated to some extent by correcting the exposure. On models
that only have the “M (manual)” mode, the lens is linked neither to the
AE function nor to the exposure meter in the camera.
When using such a camera, refer to the instruction manual for
information on the appropriate shutter speed.
❶
The exposure is significantly off.
Photographs are all white or all
black.
Cause
Manuel d'instructions
1. Nomenclature
2. Fixation au boîtier de l'appareil photo
Pour l'installation et le retrait,
reportez-vous aux rubriques «
Installation de l'objectif » et « Retrait
de l'objectif » dans le manuel
d'instructions de l'appareil photo. Puis
vérifiez qu'il n'est pas desserré après
l'installation.
Si vous pensez « Est-ce un dysfonctionnement ? », vérifiez et inspectez à nouveau.
Appareil
photo
① Bague de mise au point ② Échelle de distance (en pieds)
③ Échelle de distance (en mètres) ④ Échelle de grossissement macro
⑤ Indicateur de l
'
échelle de distance ⑥ Repère de montage de l’objectif
Distance focale
Ouverture
Format
Construction optique
Angle de champ (SONY E、FUJIFILM X)
Angle de champ (CANON EF-M)
Distance minimale de MAP
Ratio de grossissement macro
Méthode de mise au point
Diamètre du filtre arrière (de face)
Diamètre du filtre arrière (extrémité arrière)
Diamètre maximal
Longueur totale
Poids (sans bouchon)
Pare-soleil
Monture correspondante
300 mm
F7.1 (fixe)
8 éléments en 8 groupes
5,4°
5,1°
0.92 m
1:2,5
φ 46 mm
φ 61 mm
78,5 mm
235 g
MH-461
600 mm
F8 (fixe)
APS-C
8 éléments en 8 groupes
2,7°
2,6°
1,77 m
1:2,5
Mise au point manuelle
φ 77 mm
φ 34 mm
φ 88.6 mm
133 mm
545 g
MH-775
900 mm
F11 (fixe)
7 éléments en 7 groupes
1,8°
1,7°
2.61 m
1:2,5
φ 86 mm
φ 96,1 mm
175,5 mm
725 g
MH-861
6. Spécifications techniques
5.
À
propos de la prise de vue
* Avant d'installer le filtre à l'avant de l'objectif, assurez-vous que celui-ci n'interfère pas avec la partie réfléchissante (partie avec le
cercle noir) au centre de l'avant de l'objectif. Veuillez noter que les spécifications et l'apparence sont susceptibles d'être modi-
fiées sans préavis suite à l'amélioration du produit.
•
Cet objectif est un téléobjectif compact et léger avec une longue focale.
En règle générale, lors de la prise de vue avec un téléobjectif, l'angle de
champ devient plus étroit et la probabilité d'un bougé de l'appareil photo
augmente. Nous vous recommandons de régler une sensibilité élevée et de
déclencher l'obturateur à grande vitesse, ou de prendre des photos avec un
trépied ou un monopode solide.
●
Pour éviter le bougé
Vous pouvez éviter le flou de bougé en utilisant un déclencheur à câble ou en
prenant des photos avec le retardateur. Dans ce cas, veillez à utiliser un
trépied solide et robuste. De plus, si l'appareil photo dispose d'une fonction
de verrouillage miroir, vous pouvez éviter le flou de bougé en utilisant celui-ci.
• À cause du grossissement important pendant la prise de vue au téléobjectif, la
poussière et la vapeur d'eau affectent la qualité de l'image.
Afin de prendre des photos nettes, il est idéal de l'utiliser par une journée sans
vent avec plusieurs jours ensoleillés, dans un endroit qui n'est pas facilement
affecté par les gaz d'échappement ou la fumée.
●
Conditions de prise de vue lors de l'utilisation d'un téléobjectif
Dans les zones montagneuses et sur la côte en été, il est difficile de pren-
dre des photos nettes en raison de la présence de gaz et de vapeur d'eau.
Cependant, l'un des plaisirs de la photographie est de profiter de ces
conditions défavorables, comme prendre des photos de l'océan depuis un
air trouble, ou encore des crêtes des montagnes dans la brume.
• Cet objectif ne fonctionne pas en mode autofocus. La mise au point est
manuelle. Tournez la bague de mise au point pour l'effectuer.
• Avec un téléobjectif, la profondeur de champ (zone pour laquelle le sujet est
net) devient faible (cette zone devient plus étroite), rendant la mise au point
difficile. Veuillez utiliser un trépied ou un monopode solide pour faire la mise au
point avec soin.
●
Mise au point
En général, un super téléobjectif de 300 mm ou plus possède une marge à
la position du repère infini (∞). L'indice de réfraction de la lumière dans l'air
change en raison de la température à l'intérieur du barillet de l'objectif, et la
position de mise au point peut légèrement bouger. Par conséquent, même
lors d'une prise de vue d'un objet éloigné tel qu'une vue éloignée ou un
ciel étoilé, vérifiez l'image sur l'écran du viseur pendant la mise au point.
Si vous possédez un appareil photo numérique doté d'une fonction de
visualisation en direct, vous pouvez utiliser la fonction d'agrandissement
pour obtenir une mise au point précise.
• Cet objectif utilise un système optique réfléchissant, l
'
ouverture est donc fixe.
Par conséquent, réglez la quantité de lumière en modifiant la vitesse
d
'
obturation (dans le cas d
'
un appareil photo numérique, vous pouvez
également régler la sensibilité ISO). Cependant, il est recommandé d
'
utiliser un
film à haute sensibilité (400 ISO ou plus) sans réglage de sensibilité élevée, pour
éviter que des tremblements apparaissent lorsque l
'
obturateur lent est relâché.
• La prise de vue avec exposition automatique est possible avec la plupart des
modèles d
'
appareils photo dotés de la fonction AE à priorité d
'
ouverture (à
l
'
exception de certains modèles de Nikon et Sony) (l
'
AE au programme et l
'
AE à
priorité vitesse ne sont pas disponibles). Si vous réglez l
'
AE à priorité
d
'
ouverture sur le boîtier de l
'
appareil photo avec l
'
objectif retiré et que vous
relâchez l
'
obturateur dans un endroit lumineux et un endroit sombre,
l
'
exposition automatique est possible si la vitesse d
'
obturation est différente.
●
Réglage de l’exposition
Cet objectif peut avoir un filtre fixé à l'arrière.
Les objectifs miroir ont généralement un filtre fixé à l'arrière de l'objectif.
Étant donné que cet objectif n'a pas de contacts électroniques, il n'y a pas
d'échange de signaux électroniques avec le boîtier de l'appareil photo. Par
conséquent, l'affichage du viseur ou l'affichage de l'écran LCD du côté de
l'appareil photo peuvent ne pas s'afficher, mais il n'y a pas de problème
particulier lors de la prise de vue (les conditions sont les mêmes que lors
d'une prise de vue avec un télescope astronomique ou une lunette
attachée à l'appareil photo).
Le pare-soleil est destiné à empêcher une forte
lumière venant en diagonale vers l'avant ou sur le
côté d'entrer directement dans l'objectif et de
provoquer des reflets sur la photo. Utilisez le
pare-soleil pour prendre des photos claires et nettes
et pour protéger l'objectif.
Le pare-soleil est de type vissant. Tournez-le dans
le sens indiqué sur le schéma de droite pour le fixer
solidement.
Lors du retrait, faites-le pivoter dans le sens opposé
au sens indiqué à droite.
4. Pare-soleil
●
Méthode d’installation
7. En cas de problème
À propos de la prise de vue
❶
,
❷
[Référence : 3 Réglages du boîtier de l'appareil photo] et [Manuel
d'instructions de l'appareil photo], et effectuez les réglages néces
saires avant la prise de vue.
❸
Régler la mise au point sur le côté du boîtier de l'appareil photo sur MF
(mise au point manuelle).
❶
Le réglage du mode de prise de
vue ne correspond pas à l'objectif
fixé.
❷
Le réglage sur le côté du boîtier de
l'appareil photo est tel que
l'obturateur ne peut pas être
déclenché lorsqu'un objectif sans
contacts électroniques est fixé.
❸
Le réglage de la mise au point sur
le côté du boîtier de l'appareil
photo est AF (autofocus). Avec le
réglage AF, le boîtier de l'appareil
photo peut ne pas être en mesure
de détecter la position de mise au
point de cet objectif et l'obturateur
peut ne pas être déclenché.
Je ne peux pas déclencher
l'obturateur.
❶
Il n'y a aucun problème avec la prise de vue.
❶
Cet objectif n'a pas de signal
électronique, il n'y a donc pas de
communication de signal électrique
avec l'appareil photo.
L'affichage du viseur de l'appareil
photo et l'écran LCD ne
s'affichent pas.
❶
Tournez la bague de mise au point et effectuez la mise au point
manuellement. [Référence : 5 À propos de la prise de vue]
❶
Cet objectif a une mise au point
manuelle.
Ne peut pas être utilisé avec
l'autofocus.
❶
Fixez solidement l'appareil photo avant la prise de vue.
* Nous vous recommandons d'utiliser un trépied ou un monopode.
❷
Photographiez à distance du sujet.
❸
Prenez une photo dans un endroit où il y a peu d'influence de la
poussière, de la vapeur d'eau, des gaz d'échappement, etc.
❹
Essuyez la lentille avec un chiffon doux.
[Référence : 5 À propos de la prise de vue]
❶
Présence d’un bougé de l'appareil
photo pendant la prise de vue.
❷
La distance de prise de vue par
rapport au sujet est courte.
❸
Influence de la poussière et de la
vapeur d’eau dans l'air.
❹
L'objectif est sale.
L'image est floue.
❶
Réglez l'exposition en modifiant la vitesse d'obturation.
[Référence :5 À propos de la prise de vue]
❶
L'ouverture de cet objectif est fixe.
L'ouverture ne peut pas être
ajustée.
Cet objectif est un objectif à focale
fixe.
Je ne peux pas zoomer.
Symptôme Contre-mesures
❶
Veuillez l'utiliser tel quel.
❶
C'est une partie de la structure de
l'objectif pour refléter l'image.
Le capuchon noir au centre de
l'objectif (objectif sur le sujet) ne
se détache pas.
❶
Pour les appareils photo qui peuvent utiliser le mode AE (priorité à
l'ouverture), la compensation d'exposition peut fonctionner dans une
certaine mesure, mais pour les modèles qui ne peuvent prendre des
photos qu'en mode « M », non seulement l'AE mais également le
posemètre intégré à l'appareil photo ne fonctionnent pas.
Réglez la vitesse d'obturation en vous référant au manuel d'instructions et
prenez la photo.
❶
L'exposition est trop élevée.
C'est blanc et noir et aucune
image n'apparaît.
Cause
Astuces
Astuces
Astuces
Astuces
Astuces
Astuces
Astuces
Astuces
Astuces
Astuces
Astuces
Astuces
https://tokinalens.com/
SONY E、FUJIFILM X、CANON EF-M
SZ 300mmPRO Reflex
F7.1 MF CF
SZ 600mmPRO Reflex
F8 MF CF
SZ 900mmPRO Reflex
F11 MF CF
SZ 300mmPRO Reflex
F7.1 MF CF
SZ 600mmPRO Reflex
F8 MF CF
24 30 40 60 100 300 ft
8 10 14 20 40 100 m
24 30 40 60 100 300 ft
8 10 14 20 40 100 m
(0.92m)
1:2.5
15 20 30 50 150 ft
5 7 10 20 50 m
24 30 40 60 100 300 ft
8 10 14 20 40 100 m
36 45 60 90 150 450 ft
10 12 15 21 30 60 150 m
④ ⑤ ⑥
⑥
⑥
①
⑤①
⑤①
② ③
② ③
② ③
■SZ300mmPROReflexF7.1MFCF
■SZ600mmPROReflexF8MFCF
■SZ900mmPROReflexF11MFCF
(0.92m)
1:2.5
15 20 30 50 150 ft
5 7 10 20 50 m
24 30 40 60 100 300 ft
8 10 14 20 40 100 m
36 45 60 90 150 450 ft
10 12 15 21 30 60 150 m
④ ⑤ ⑥
⑥
⑥
①
⑤①
⑤①
② ③
② ③
② ③
■SZ300mmPROReflexF7.1MFCF
■SZ600mmPROReflexF8MFCF
■SZ900mmPROReflexF11MFCF
300mmPROReflexF7.1MFCF
600mmPROReflexF8MFCF
900mmPROReflexF11MFCF
300mmPROReflexF7.1MFCF
600mmPROReflexF8MFCF
900mmPROReflexF11MFCF
Repère de
montage
de l’objectif
(0.92m)
1:2.5
15 20 30 50 150 ft
5 7 10 20 50 m
(0.92m)
1:2.5
15 20 30 50 150 ft
5 7 10 20 50 m
Modèle
Mount
attachment mark
Model
SONYE、FUJIFILMX、CANONEF-M
600 mm
F8 (fixed)
APS-C
8 groups, 8 lenses
2.7°
2.6°
1.77 m
1:2.5
Manual focus
φ 77 mm
φ 34 mm
φ 88.6 mm
133 mm
545 g
MH-775
SZ 900mmPRO Reflex
F11 MF CF
900 mm
F11 (fixed)
7 groups, 7 lenses
1.8°
1.7°
2.61 m
1:2.5
φ 86 mm
φ 96.1 mm
175.5 mm
725 g
MH-861

Chat with your Tokina SZ 300mm F7.1 PRO Reflex MF CF manual using AI

Get instant AI answers from your Tokina SZ 300mm F7.1 PRO Reflex MF CF manual

Ask anything about the Tokina SZ 300mm F7.1 PRO Reflex MF CF. Answers come from this manual, with the pages they are based on.

SZ 300mm F7.1 PRO Reflex MF CF Maintenance Schedule

Remind me when maintenance is due
Every 1-2 years
Have the lens inspected

The manual recommends periodic inspection of the lens.

Every 3-5 years
Have the lens overhauled

The manual recommends an overhaul at this interval.

Free maintenance reminders

Timed to your purchase date. Always free, unsubscribe anytime.

By submitting you agree to the privacy policy. Unsubscribe with one click in any email.
M: gpt-5.6-terra

Ask a Question

0/1000

Do you recommend SZ 300mm F7.1 PRO Reflex MF CF?

Yes No

Frequently Asked Questions

A

Yes if your camera uses Sony E, Fujifilm X, or Canon EF-M mounts. Because the lens has no electronic contacts, set the camera to allow shutter release without lens recognition and use manual focus (MF).

Is this answer helpful?

A

Focus manually by rotating the focus ring while viewing through the finder or using live view magnification. Use a tripod or monopod to minimize shake and fine-tune focus, especially given the shallow depth of field at telephoto distances.

Is this answer helpful?

A

No. The SZ 300mm is a fixed-aperture mirror lens (F7.1). Adjust exposure through shutter speed and ISO; using aperture-priority AE on many bodies can allow auto exposure, but program and shutter-priority AE are typically unsupported.

Is this answer helpful?

A

This lens supports rear-mounted filters. Before installing any front filter, confirm it won’t touch the central reflective area. The front reflective structure may prevent standard front filters from mounting safely.

Is this answer helpful?

A

Telephoto magnification amplifies camera shake and atmospheric disturbances (dust, water vapor, heat shimmer). Use faster shutter speeds, higher ISO, stable support (tripod/monopod), and shoot on calm, clear days for sharper results.

Is this answer helpful?

A

Confirm the camera is set to allow shutter release without lens electronics and that the body is in MF focus mode. Some shooting modes may be incompatible; consult your camera manual and the lens instructions for the proper settings.

Is this answer helpful?

A

Avoid immersion and excessive humidity; wipe with a soft cloth and use a blower for sand or dust. Use the screw-in lens hood to reduce flare and protect the front element. Store and transport the lens in stable temperatures and service periodically.

Is this answer helpful?

M: OA-GPT-5-NAN

Advantages and Disadvantages

Advantages

  • Compact, lightweight 300mm reach (235 g) ideal for travel and handheld convenience with tripod support.
  • High macro reproduction (1:2.5) and 0.92 m minimum focus distance for close telephoto work.
  • Simple, reliable reflective optical design with screw-on hood and rear filter capability.
  • Fully manual operation gives precise control and strong compatibility with many mirrorless bodies.
  • Affordable and distinctive bokeh/contrast rendering characteristic of mirror lenses.
VS

Disadvantages

  • Fixed F7.1 aperture limits low-light performance and depth-of-field control.
  • No electronic contacts: requires camera setting changes and disables on-body lens communication.
  • Manual focus only—challenging for fast-moving subjects without experience or stabilization.
  • Higher susceptibility to camera shake and atmospheric distortion; tripod/monopod often required.
  • Front reflective element and central obstruction restrict some filter options and produce unique optical artifacts.
M: OA-GPT-5-NAN

Product Specification

Type

Telephoto lens

Aperture

F7.1

Optical construction (Elements/Groups)

8/8

Focus motor

no

Image stabilizer

no

Minimum focusing distance

36.22 in

Minimum aperture

F7.1

Maximum magnification

1:2.50

Sensor compatibility

APS-C

Filter thread

1.81 in screw filter

Special features

Catadioptric lens

Color

black

Dimensions

2.40x2.93 in (DxL)

Weight

0.52 lb

M: OA-GPT-54-NAN

Product Description

Tokina SZ 300mm 7.1 PRO Reflex MF CF Manual

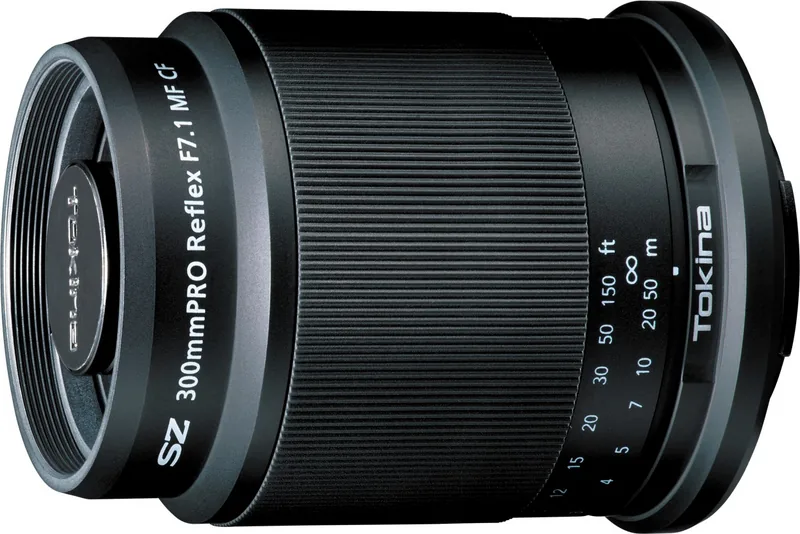
The Tokina SZ 300mm F7.1 PRO Reflex MF CF is a compact, lightweight reflex (mirror) telephoto lens designed for APS-C mirrorless systems (Sony E, Fujifilm X, Canon EF-M). With a fixed F7.1 aperture and a 300mm focal length, this mirror lens delivers long reach in a small package—78.5 mm diameter, 235 g weight, and a minimum focus distance of 0.92 m with a macro reproduction ratio of 1:2.5. The lens is fully manual: focusing is achieved via a tactile focus ring with distance scales in feet and meters and a macro magnification scale for close work.

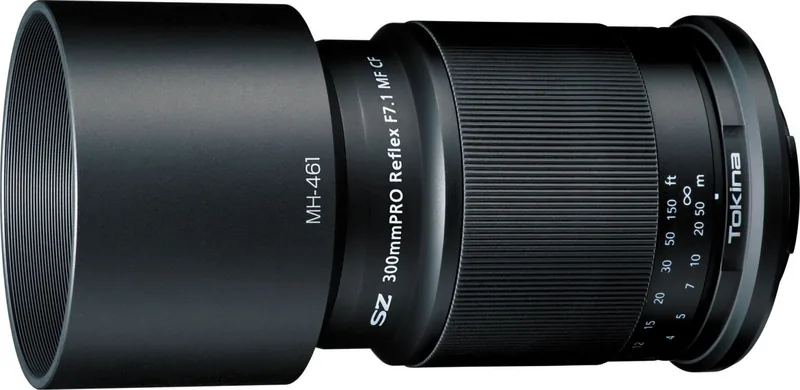
Optically the lens uses an 8-group, 8-element reflective construction that produces a narrow angle of view (about 5.4° on APS-C). Because it is a mirror design, the aperture is fixed and the characteristic central obstruction (the black reflective disc) is part of the optical system. Rear filter mounting is supported for those who need to add density or effects without interfering with the front reflective surface. The screw-type lens hood (MH-461) helps reduce flare and protects the front surface.

Shooting with the SZ 300mm requires attention to camera settings and technique: enable "release shutter without lens" or equivalent setting on bodies that require electrical lens recognition because this lens has no electronic contacts. Use manual focus mode on the camera and, when available, live view magnification to achieve critical focus. Because the aperture is fixed, exposure control comes from shutter speed and ISO. Telephoto magnification amplifies camera shake and atmospheric disturbances, so higher ISO, faster shutter speeds, and a solid tripod or monopod are recommended. Cable release, self-timer, and mirror-up (if available) further reduce blur.

Practical tips include shooting on calm, clear days for maximum sharpness, cleaning the lens carefully with soft cloths, and avoiding extreme humidity or salt exposure. The lens can produce unique imagery when atmospheric conditions (haze, heat shimmer) are embraced creatively, but for sharp results pick stable days and locations away from exhaust or heavy moisture.

This lens is ideal for photographers seeking extreme reach and portability for wildlife, distant landscapes, or experimental telephoto work who are comfortable with manual focus and exposure. Its small size and distinctive reflex rendering make it an attractive tool for creative telephoto imagery.

Notes

  • The black central reflector is integral and must not be removed.
  • No electronic contacts: enable shutter release without lens and use manual focus.
  • Use rear filters only after checking interference with the front reflective element.
  • Recommended tripod/monopod use and higher ISO to counteract slow shutter blur.
M: OA-GPT-5-NAN

© Copyright 2026 Manual.ly