Manual.ly Logo

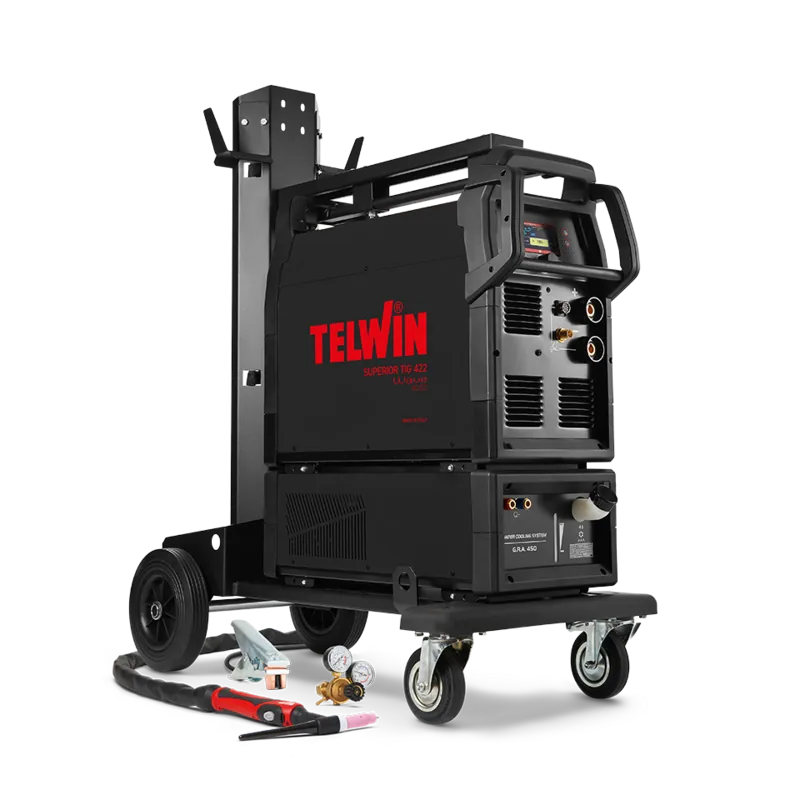
Telwin Superior TIG 422 AC/DC AQUA Manual

0.0 · 0 Ratings

PDF manual · 156 Pages

English

M: QW-35-FL
page

/ 156

Loading...
e161bcc67b445dc396f916526252b81a2f65 page 8
- 8 -
Upon switching off of the welding machine, the ”OFF” signalling could continue for
several seconds
N.B.:ALARMSSTORINGANDDISPLAY
With every alarm the machine’s settings are recorded. It is possible to recall the
last 10 alarms as follows:
Press pushbutton (6a) “REMOTE COMMAND” for a few seconds.
Code “AY.X” is displayed, where “Y” indicates the alarm number (A0 most recent,
A9 oldest) and “X” indicates the type of alarm recorded (from 1 to 9, see AY.1 ...
AY.9).
4.3STORINGANDRECALLINGOFPERSONALISEDPROGRAMS
Introduction
The welding machine allows the storing (SAVE) of personalised work programs relative
to a set of parameters applicable to a dened welding process. Each personalised
program can be accessed (RECALL) at any time thus allowing the user to have the
welding machine “ready for use” for a specic work cycle optimised previously. The
welding machine allows the saving of up to 9 personalised programs.
Storing procedure (SAVE)
After having adjusted the welding machine with an optimal set-up for a specic type of
welding job, proceed as follows (FIG.D2):
a) Press the “SAVE” button (8) for 3 seconds.
b) Code “S_ ” is displayed (10) together with a number ranging between 1 and 9.
c) By rotating knob (9), select the number with which the program is going to be
stored.
d) Press the “SAVE” button (8) again:
- if the “SAVE” button is pressed for more than 3 seconds, the program is correctly
stored and caption “YES” is displayed;
- if the “SAVE” button is pressed for less than 3 seconds, the program does not get
stored and caption “no” is displayed.
Recalling procedure (RECALL)
Proceed as follows (see FIG.D2):
a) Press the “RECALL” button (8) for 3 seconds.
b) “r_ ” appears on display (10) together with a number between 1 and 9.
c) By rotating knob (9), select the number with which the program that we now intend
using was stored.
d) Press “RECALL” button (8) again:
- if the “RECALL” button is pressed for more than 3 seconds, the program is
correctly recalled and caption “YES” is displayed;
- if the “RECALL” button is pressed for less than 3 seconds, the program does not
get recalled correctly and caption “no” is displayed.
NOTES:
- DURING OPERATIONS WITH THE “SAVE” AND “RECALL” BUTTONS, LED
“PRG”ISSWITCHEDON.
- ARECALLEDPROGRAMCAN BE MODIFIEDATWILLBYTHE OPERATOR,
BUTTHEMODIFIEDVALUESARENOTAUTOMATICALLYSTORED.SHOULD
THE NEW VALUES ON THE SAME PROGRAM HAVE TO BE STORED, THE
STORINGPROCEDUREMUSTBEPERFORMED.
- RECORDING OF PERSONALISED PROGRAMS RELATIVE TO THE
SCHEDULING (SAVING) OF ASSOCIATED PARAMETERS, IS THE USER’S
RESPONSIBILITY.
4.4G.R.A. watercooling unitENABLING andDISABLING instructions(where
applicable)
Disablingprocedure:
1- Press the main switch (2-FIG. C) simultaneously with the right button on the front
panel to turn the machine on (6e-FIG. D2).
2- The code "G.r.a - on" will appear on the display after the machine is turned on
(factory settings: cooling unit disabled).
3- Turn the encoder knob (9-FIG. D2) until the code "G.r.a - OFF" appears on the
display.
4- Press the button once to conrm the selection (7-FIG. D2).
The cooling unit will thereby be disabled, the welding machine can be used without
G.R.A. and without the polarised plug.
ATTENTION! IF THE WELDING MACHINE IS USED IN “G.r.a - OFF”
MODE WITH THE COOLING UNIT CONNECTED, THE COOLINGUNIT IS NOT
COMPLETELYPROTECTEDFROMMALFUNCTIONING.
Enablingprocedure:
Repeat the same sequence conrming the code "G.r.a. - on" to enable the unit.
NB: If the welding machine is set to "G.r.a. - on" mode, but no cooling unit has been
connected, the cooling circuit malfunction protection will be triggered after a couple of
seconds of operation (code "A. 9").
Factory setting: "G.r.a - on".
5.INSTALLATION
WARNING! CARRY OUT ALL INSTALLATION OPERATIONS AND
ELECTRICAL CONNECTIONS WITH THE WELDING MACHINE COMPLETELY
SWITCHEDOFFANDDISCONNECTEDFROMTHEPOWERSUPPLYOUTLET.
THEELECTRICALCONNECTIONSMUSTBEMADEONLYANDEXCLUSIVELY
BYAUTHORISEDORQUALIFIEDPERSONNEL.
5.1PREPARATION
Unpack the welding machine, assemble the separate parts contained in the package.
5.1.1Assemblingthereturncable-clamp(FIG.E)
5.1.2Assemblingtheweldingcable-electrodeholderclamp(FIG.E)
5.2POSITIONOFTHEWELDINGMACHINE
Choose the place to install the welding machine so that the cooling air inlets and
outlets are not obstructed (forced circulation by fan, if present); at the same time make
sure that conductive dusts, corrosive vapours, humidity etc. will not be sucked into
the machine.
Leave at least 250mm free space around the welding machine.
WARNING! Position the welding machine on a at surface with
sufcientcarryingcapacityforitsweight,topreventitfromtippingormoving
hazardously.
5.3CONNECTIONTOTHEMAINPOWERSUPPLY
- Before making any electrical connection, make sure the rating data of the welding
machine correspond to the mains voltage and frequency available at the place of
installation.
- The welding machine should only be connected to a power supply system with the
neutral conductor connected to earth.
- To ensure protection against indirect contact use residual current devices of the
following types:
- Type A (
) for single phase machines;
- Type B (
) for 3-phase machines.
- To comply with the requirements of the EN 61000-3-11 (Flicker) standard we
recommend connecting the welding machine to interface points of the power supply
that have an impedance of less than Zmax = 0.228ohm (1~), Zmax = 0.283ohm
(3~).
- The welding machine falls within the requisites of IEC/EN 61000-3-12 standard.
5.3.1Plugandoutlet
Connect a normalised plug (2P + P.E) (1~); (3P + P.E) (3~) - having sufcient capacity-
to the power cable and prepare a mains outlet tted with fuses or an automatic circuit-
breaker; the special earth terminal should be connected to the earth conductor (yellow-
green) of the power supply line. Table (TAB.1) shows the recommended delayed fuse
sizes in amps, chosen according to the max. nominal current supplied by the welding
machine, and the nominal voltage of the main power supply.
WARNING!Failuretoobservetheaboveruleswillmakethe(Class1)
safetysysteminstalledbythemanufacturerineffectivewithconsequentserious
riskstopersons(e.g.electricshock)andobjects(e.g.re).
5.4CONNECTIONOFTHEWELDINGCABLES
WARNING!BEFOREMAKINGTHEFOLLOWINGCONNECTIONSMAKE
SURETHEWELDINGMACHINEISSWITCHEDOFFANDDISCONNECTEDFROM
THEPOWERSUPPLYOUTLET.
Table (TAB. 1) gives the recommended values for the welding cables (in mm
2
)
depending on the maximum current supplied by the welding machine.
5.4.1TIGwelding
Connectingthetorch
- Insert the torch current cable into the appropriate quick terminal (-)/~. Connect the
three-pin connector (torch button) to the appropriate socket. Connect the torch gas
pipe to the appropriate connector.
Connectingtheweldingcurrentreturncable
- This is connected to the piece to be welded or to the metal bench on which it rests,
as close as possible to the joint being made.
This cable is connected to the terminal with the (+) symbol (~ for TIG machines
designed for AC welding).
Connectingthegasbottle
- Screw the pressure reducing valve to the gas bottle valve, rst inserting the special
reduction accessory supplied when argon gas is used.
- Connect the gas inow hose to the pressure reducing valve and tighten the hose
clamp supplied.
- Loosen the ringnut for adjusting the pressure reducing valve before opening the
valve on the bottle.
- Open the valve on the bottle and adjust the quantity of gas (l/min) according to the
suggestions for use given in the table (TAB.4); if it is necessary to adjust the gas
ow during welding this should always be done by adjusting the ring nut on the
pressure reduction valve. Make sure there are no leaks in the piping and connectors.
WARNING!Alwaysclosethegasbottlevalveattheendofthejob.
5.4.2MMAWELDING
Almost all coated electrodes are connected to the positive pole (+) of the power
source; as an exception to the negative pole (-) for acid coated electrodes.
Connectingtheelectrode-holderclampweldingcable
On the end take a special terminal that is used to close the uncovered part of the
electrode.
This cable is connected to the terminal with the symbol (+)
Connectingtheweldingcurrentreturncable
This is connected to the piece being welded or to the metal bench supporting it, as
close as possible to the join being made.
This cable is connected to the terminal with the symbol (-)
Warnings:
- Turn the welding cable connectors right down into the quick connections (if present),
to ensure a perfect electrical contact; otherwise the connectors themselves will
overheat, resulting in their rapid deterioration and loss of efciency.
- The welding cables should be as short as possible.
- Do not use metal structures which are not part of the workpiece to substitute the
return cable of the welding current: this could jeopardise safety and result in poor
welding.
6.WELDING:DESCRIPTIONOFTHEPROCEDURE
6.1TIGWELDING
TIG welding is a welding procedure that exploits the heat produced by the electric arc
that is struck, and maintained, between a non-consumable electrode (tungsten) and
the piece to be welded. The tungsten electrode is supported by a torch suitable for
transmitting the welding current to it and protecting the electrode itself and the weld
pool from atmospheric oxidation, by the ow of an inert gas (usually argon: Ar 99.5)
which ows out of the ceramic nozzle (FIG.G).
To achieve a good weld it is absolutely necessary to use the exact electrode diameter
with the exact current, see the table (TAB.3).
The electrode usually protrudes from the ceramic nozzle by 2-3mm, but this may reach
8mm for corner welding.
Welding is achieved by fusion of the edges of the joint. For properly prepared thin
pieces (up to about 1mm) weld material is not needed (FIG.H).
For thicker pieces it is necessary to use ller rods of the same composition as the base
material and with an appropriate diameter, preparing the edges correctly (FIG.I). To
achieve a good weld the pieces should be carefully cleaned and free of oxidation, oil,
grease, solvents etc.
6.1.1HFandLIFTstrike
HFstrike:
The electric arc is struck without contact between the tungsten electrode and the piece
being welded, by means of a spark generated by a high frequency device. This strike
mode does not entail either tungsten inclusions in the weld pool or electrode wear and
gives an easy start in all welding positions.
Procedure:

Chat with your Telwin Superior TIG 422 AC/DC AQUA manual using AI

Get instant AI answers from your Telwin Superior TIG 422 AC/DC AQUA manual

Ask anything about the Telwin Superior TIG 422 AC/DC AQUA. Answers come from this manual, with the pages they are based on.

Superior TIG 422 AC/DC AQUA Maintenance Schedule

After use
Close the gas bottle valve

Always close the gas bottle valve at the end of the job to ensure safety and prevent leaks.

As needed
Clean internal dust deposits

If alarm A.7 triggers due to excessive dust, perform inner cleaning of the machine and reset via the control panel display button.

M: qwen/qwen3.8-flash

Ask a Question

0/1000

Do you recommend Superior TIG 422 AC/DC AQUA?

Yes No

Frequently Asked Questions

A

No, this Class A equipment is designed exclusively for industrial and professional use. It does not guarantee compliance with electromagnetic compatibility limits for domestic environments.

Is this answer helpful?

A

It handles low-carbon steels, stainless steel, aluminum, copper, nickel, titanium, and their alloys using TIG DC, TIG AC, and MMA processes.

Is this answer helpful?

A

You can save up to nine personalized programs by adjusting parameters and pressing the SAVE button for three seconds, then selecting a number slot.

Is this answer helpful?

A

Check the display code (e.g., A.1 for thermal protection). Reset is often automatic once the cause is fixed, but some alarms require manual cleaning or button resets.

Is this answer helpful?

A

Remote controls are optional accessories. The machine has a connector for one-potentiometer, two-potentiometer, or pedal remote controls.

Is this answer helpful?

A

Yes, it supports G.R.A. water cooling units. You must enable this mode in the settings if a cooling unit is connected.

Is this answer helpful?

M: QW-35-FL

Advantages and Disadvantages

Advantages

  • Advanced inverter technology ensures high efficiency and precise control
  • Versatile capabilities support both TIG AC/DC and MMA welding processes
  • Microprocessor control allows for extensive parameter customization and storage
  • Compact and lightweight design facilitates easy transport and handling
  • Comprehensive safety features include thermal protection and alarm memory
VS

Disadvantages

  • Not recommended for domestic use due to electromagnetic field emissions
  • Requires qualified personnel for installation and electrical connections
  • Water cooling system requires additional setup and monitoring if used
  • Complex parameter settings may require a learning curve for beginners
  • Strict adherence to safety protocols is mandatory for operator health
M: QW-35-FL

Product Specification

Power

14kW (400V)

Open Circuit Voltage

64V

Regulation Range

5-350A (MMA/WIG)

Electrodes

1.6-6mm (MMA)

Protection Class

IP23

Dimensions

47x36.8x19.7in (HxWxD)

Weight

156.52lbs

M: QW-35-FL

Product Description

Telwin Superior TIG 422 AC/DC AQUA: The Professional Inverter Welding Solution

The Telwin Superior TIG 422 AC/DC AQUA MMA/WIG Inverter Welding Machine stands as a pinnacle of modern welding technology, designed specifically for demanding industrial and professional environments. This versatile unit combines the precision of Tungsten Inert Gas (TIG) welding with the robustness of Manual Metal Arc (MMA) welding in a single, compact chassis. Utilizing advanced inverter technology, the machine achieves high-speed and precise adjustments, ensuring excellent weld quality across various materials including steel, stainless steel, aluminum, copper, nickel, and titanium.

Its innovative design significantly reduces the volume of internal components like transformers and reactors, resulting in a lighter and more portable device without compromising power. The machine features a microprocessor-controlled system that allows for extensive parameter customization, making it suitable for complex welding tasks ranging from thin sheet metal to heavy structural components. Operators can choose between High Frequency (HF) or Lift start methods for TIG welding, offering flexibility depending on the specific application requirements.

Safety is paramount in the design of this equipment. It includes comprehensive protection systems against thermal overload, over-voltage, under-voltage, and phase failure. The unit also incorporates an alarm memory feature that records the last ten operational errors, aiding in quick troubleshooting and maintenance. For users requiring water-cooled torches, the machine supports G.R.A. units, with easy enabling and disabling protocols to ensure safe operation.

The interface is user-friendly, featuring a clear alphanumeric display and intuitive controls for setting parameters such as main current, arc force, hot start, post-gas time, and pulse frequencies. Users can save up to nine personalized programs, allowing for instant recall of optimized settings for repetitive jobs, thereby increasing productivity and consistency.

Important Safety Notes

Always wear appropriate protective clothing, including gloves, eye protection, and masks to guard against ultraviolet radiation, fumes, and sparks. Ensure the machine is connected to a properly earthed power supply and avoid using it in damp conditions. Do not use the handle for hanging the machine, and keep unauthorized personnel away during operation.

Pros and Cons

Pros

  • Advanced inverter technology ensures high efficiency and precise control.
  • Versatile capabilities support both TIG AC/DC and MMA welding processes.
  • Microprocessor control allows for extensive parameter customization and storage.
  • Compact and lightweight design facilitates easy transport and handling.
  • Comprehensive safety features include thermal protection and alarm memory.

Cons

  • Not recommended for domestic use due to electromagnetic field emissions.
  • Requires qualified personnel for installation and electrical connections.
  • Water cooling system requires additional setup and monitoring if used.
  • Complex parameter settings may require a learning curve for beginners.
  • Strict adherence to safety protocols is mandatory for operator health.
M: QW-35-FL

© Copyright 2026 Manual.ly