Manual.ly Logo

SpeaKa Professional SP-MM-900 Manual

0.0 · 0 Ratings

PDF manual · 4 Pages

English

M: QW-35-FL
page

/ 4

Loading...
9570562c1ce6ad72412b9a4a80c88998b845 page 2
2
Safety Instructions
Monitor Arm
Item no: 2731200 (SP-MM-900)
Item no: 2731201 (SP-MM-910)
Item no: 2731202 (SP-MM-920)
Item no: 2731203 (SP-MM-930)
1 Intended use
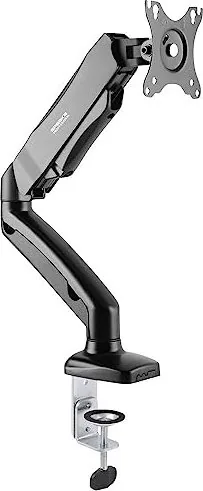
The product is a spring loaded three monitor arm with integrated hub. It secures to your table using a
clamp.
The product is intended for indoor use only. Do not use it outdoors.
Contact with moisture must be avoided under all circumstances.
If you use the product for purposes other than those described, the product may be damaged.
Improper use can result in hazards.
The product complies with the statutory national and European requirements.
For safety and approval purposes, you must not rebuild and/or modify the product.
Read the operating instructions carefully and store them in a safe place. Make this product available to
third parties only together with the operating instructions.
All company names and product names are trademarks of their respective owners. All rights reserved.
2 Delivery contents
■
Product
■
Operating instructions
3 Latest product information
Download the latest product information at www.conrad.com/downloads or scan the QR code shown. Fol-
low the instructions on the website.
4 Description of symbols
The symbol warns of hazards that can lead to personal injury.
5 Safety instructions
Read the operating instructions carefully and especially observe the safety informa-
tion. If you do not follow the safety instructions and information on proper handling,
we assume no liability for any resulting personal injury or damage to property. Such
cases will invalidate the warranty/guarantee.
5.1 General
■
The product is not a toy. Keep it out of the reach of children and pets.
■
Do not leave packaging material lying around carelessly. This may become dangerous playing mater-
ial for children.
■
If you have questions which remain unanswered by this information product, contact our technical
support service or other technical personnel.
■
Maintenance, modifications and repairs must only be completed by a technician or an authorised re-
pair centre.
5.2 Handling
■
Handle the product carefully. Jolts, impacts or a fall even from a low height can damage the product.
5.3 Operating environment
■
Do not place the product under any mechanical stress.
■
Protect the appliance from extreme temperatures, strong jolts, flammable gases, steam and solvents.
■
Protect the product from high humidity and moisture.
■
Protect the product from direct sunlight.
5.4 Operation
■
Consult an expert when in doubt about the operation, safety or connection of the product.
■
If it is no longer possible to operate the product safely, take it out of operation and protect it from any
accidental use. DO NOT attempt to repair the product yourself. Safe operation can no longer be guar-
anteed if the product:
– is visibly damaged,
– is no longer working properly,
– has been stored for extended periods in poor ambient conditions or
– has been subjected to any serious transport-related stresses.
5.5 Connected devices
■
Also observe the safety and operating instructions of any other devices which are connected to the
product.
5.6 Installation location
■
Select an installation location for the monitor holder and any supplied accessories that facilitates safe
and ergonomic use.
5.7 Before assembly and installation
■
Verify that the delivery content is complete before assembling the monitor holder and accessories. Do
not assemble if any parts are missing.
■
Prevent damage to the monitor. Refer to the manufacturer instructions that came with the monitor to
find out how and where to attach a monitor holder or monitor mount.
■
Handle the monitor and screen with care. Always lay the monitor flat and use a pad or cloth to protect
the table surface and monitor from damage.
■
Risk of injury and/or damage when unpacking the spring loaded arm! Hold each spring arm together
while someone else cuts the zip tie. Slowly release the pressure on the spring arms and open slowly
to full length.
5.8 Table mounting
If you mount the monitor holder on a table:
■
Attach the monitor holder only to a sufficiently stable, horizontal table top. Tables made of glass,
ceramic or stone slabs or thin plastic-coated wooden-fibre slabs, are categorically unsuitable for at-
tachments. Furthermore, you must not attach the monitor holder to shelves or similar unstable or un-
steady surfaces.
■
Attach the monitor holder only at a position on the table top that is suitable for this purpose. Consider
the significant lever action involved!
■
The weight of the monitor and monitor holder as well as its fixed position and significant lever action
can all cause pressure marks on the table top. For this reason, we do not recommend that you mount
it on valuable furniture items!
■
For safety reasons, the monitor holder and the monitor that is attached to it should be situated only
above the table surface. The design of many monitor holders means that it is not suitable for the mon-
itor arm to be situated anywhere other than above the table surface. There is also a danger of it top-
pling over in certain circumstances!
■
Ensure that the monitor holder is fixed to the table top securely. Otherwise it could slip off the table
top when you are moving the monitor and the monitor holder. As well as causing material damage,
this poses a danger of personal injury!
5.9 Removing a monitor
■
Risk of injury and/or damage from spring loaded arm! Before removing an attached monitor, always
set the front arm to the highest position so it cannot "spring up" after the monitor is removed.
6 Maintenance
■
Adjusting the positions of the monitor and the monitor mount can cause the screws to become loose
over time. Check all the screw fittings from time to time.
7 Cleaning and care
Important:
– Do not use aggressive cleaning agents, rubbing alcohol or other chemical solutions. They damage
the housing and can cause the product to malfunction.
– Do not immerse the product in water.
1. Disconnect the product from the power supply.
2. Clean the product with a dry, fibre-free cloth.
8 Technical data
8.1 Base
Item No.:
2731200 2731201 2731202
Model No.: SP-MM-900 SP-MM-910 SP-MM-920
Grommet* 10 – 85 mm 10 – 83 mm 10 – 85 mm
C-Clamp* 10 – 85 mm 10 – 83 mm 10 – 80 mm
*These values indicate the min./max. table thickness the grommet and c-clamp can fit.
8.2 Monitor arm
Item No.:
2731200 2731201 2731202 2731203
Model No.: SP-MM-900 SP-MM-910 SP-MM-920 SP-MM-930
Number of monit-
ors
1 2 1 2
Capacity per
monitor
2 - 9 kg 1 - 9 kg
VESA
compatible
75 x 75, 100 x 100
Monitor size 43.2 – 81.3 cm (17 - 32") 33.02 – 81.3 cm (13 - 32")
8.3 General
Item No.:
2731200 2731201 2731202 2731203
Model No.: SP-MM-900 SP-MM-910 SP-MM-920 SP-MM-930
Dimensions 117 x 468 x 570
mm
942 x 112 x 570
mm
115 x 590 x 665
mm
1100x 125 x 670
mm
Weight* 2.05 kg 3.57 kg 3.1 kg 6.03 kg
This is a publication by Conrad Electronic SE, Klaus-Conrad-Str. 1, D-92240 Hirschau (www.conrad.com).
All rights including translation reserved. Reproduction by any method (e.g. photocopying, microfilming or the capture in
electronic data processing systems) requires prior written approval from the editor. Reprinting, also in part, is prohibited.
This publication reflects the technical status at the time of printing.
Copyright by Conrad Electronic SE.
*2731200, 2731201, 2731202, 2731203_V2_0323_dh_ss_en 18014399307966475-2 I3/O2 en

Chat with your SpeaKa Professional SP-MM-900 manual using AI

Get instant AI answers from your SpeaKa Professional SP-MM-900 manual

Ask anything about the SpeaKa Professional SP-MM-900. Answers come from this manual, with the pages they are based on.

SP-MM-900 Maintenance Schedule

Periodically
Check all screw fittings

Adjusting the monitor positions can cause screws to loosen over time. Check all screw fittings from time to time.

As needed
Clean the product

Disconnect power and clean with a dry, fibre-free cloth. Do not use aggressive cleaners or immerse in water.

M: qwen/qwen3.8-flash

Ask a Question

0/1000

Do you recommend SP-MM-900?

Yes No

Frequently Asked Questions

A

No, this product is intended for indoor use only. Exposure to moisture and weather can damage the mechanism.

Is this answer helpful?

A

Use stable, horizontal table tops. Avoid glass, ceramic, stone, or thin plastic-coated wood.

Is this answer helpful?

A

Use a dry, fibre free cloth. Do not use aggressive detergents or water immersion.

Is this answer helpful?

A

Yes, the SpeaKa Professional SP-MM-900 Manual is part of the delivery contents.

Is this answer helpful?

A

No, do not attempt to repair the product yourself. Consult a technician for maintenance.

Is this answer helpful?

A

VESA 75x75 and 100x100 compatible monitors between 17 and 32 inches fit.

Is this answer helpful?

A

Yes, the spring load depends on monitor weight. Check the manual for limits.

Is this answer helpful?

M: QW-35-FL

Advantages and Disadvantages

Advantages

  • Integrated hub provides seamless cable management and stability
  • Spring loaded design allows for effortless monitor repositioning
  • Sturdy clamp fits various table thicknesses securely
  • VESA compatibility works with standard monitor mounting patterns
  • Compact design saves valuable desk real estate
VS

Disadvantages

  • Indoor use only prevents outdoor durability
  • Heavy monitors may impact tension balance
  • Requires stable table to prevent tipping hazards
  • Spring tension adjustment must be done carefully
  • Not suitable for glass or ceramic tables
M: QW-35-FL

Product Specification

Type

Desk

Number of Monitors

1

Screen Size

17-32"

Adjustability

Tilt (-45°, +90°), Rotate (180°), Swivel (180°), Height Adjustable

Max Load

19.84 lbs

VESA

75x75, 100x100

Features

Gas spring, Cable management

Color

Black

Dimensions (WxHxD)

18.43x22.44x4.61 in

Weight

4.52 lbs

M: QW-35-FL

Product Description

Elevate Your Workspace with the SpeaKa Professional SP-MM-900

Transform your office setup with the SpeaKa Professional SP-MM-900 Monitor Arm. This spring loaded arm is designed for seamless integration into your daily workflow. It features an integrated hub and secures to your table using a sturdy clamp. Whether you are managing complex data sets or creating visual content, having your display at the perfect height reduces neck strain significantly. This product is intended for indoor use only and is built to withstand daily operational demands within an office environment. It provides flexibility without compromising stability.

Why Choose This Monitor Arm?

Ergonomics are key to long term productivity and health. The SpeaKa Professional SP-MM-900 allows for smooth vertical adjustment while keeping your desktop clutter free. The VESA compatibility ensures you can mount most standard monitors securely. You will find detailed installation steps in the SpeaKa Professional SP-MM-900 Manual. Reading this guide ensures you maximize the lifespan of your equipment and avoid potential injury during setup. Proper handling prevents accidental drops or structural damage to the table surface. The clamping mechanism adapts to various table thicknesses effectively.

Safety and Maintenance Guidelines

Safety is paramount when using spring loaded mechanisms on furniture. Before unpacking, ensure the arms are held together to prevent the spring from releasing unexpectedly and causing injury. Always attach the unit to a stable, horizontal table top. Avoid glass or ceramic surfaces that may slip under pressure or break. The product must be kept away from moisture and direct sunlight to maintain durability. Regular maintenance involves checking screw fittings to ensure stability over time. Cleaning requires a dry, fibre free cloth to protect the finish. Never use chemical solutions or immerse the unit in water. Disconnect power if attached devices require it. Protect it from extreme temperatures.

Final Thoughts on Setup

Organizing your visual space improves focus and professional comfort. This arm supports monitors within specific weight limits, ensuring safe operation for years. Remember to consult the provided instructions for specific weight capacities and VESA patterns. By following proper installation protocols, you maintain warranty validity and user safety. Your workstation deserves a professional upgrade that combines style with practical function for modern offices. Invest in a solution that grows with your needs and keeps you comfortable throughout long workdays. Prioritize safety and enjoy the freedom of adjustable viewing angles to enhance your daily work routine effectively.

Important Notes

Keep packaging materials away from children and pets as they can be dangerous. Verify delivery contents before beginning assembly to ensure all components are present. Contact technical support for unresolved questions regarding installation or usage. The warranty may be voided if unauthorized modifications are attempted.

M: QW-35-FL

© Copyright 2026 Manual.ly
