a. Verwijder eerst de drukknop en dan het frame van de montageplaat
1
.
b. Bevestig de montageplaat op de gewenste plek op de muur met de meegeleverde schroeven. Let
op de pijl omhoog
2
.
c. Activeer de batterij door het lipje eruit te trekken
3
.
d. Plaats het frame terug op de montageplaat, let op de montagenokjes
4
.
e. Plaats de drukknop terug op de montageplaat, let op de pijl omhoog
5
.
De zender met een ontvanger koppelen of ontkoppelen
a. Druk 3 seconden op de knop op de ontvanger en laat deze vervolgens los. Bij deze handeling gaat de
LED knipperen. Uw ontvanger bevindt zich nu in de koppelmodus.
Let op! De LED mag pas knipperen na het loslaten. Als de LED gaat knipperen tijdens indrukken dan
wordt er niet gekoppeld.
b. Druk op “I” / ”ON”
6
op de zender om deze te koppelen. Bij deze handeling gaat de LED op
de ontvanger branden. Druk op “0” / “OFF”
6
op de zender om deze te ontkoppelen. Bij deze
handeling dooft de LED op de ontvanger.
Een ontvanger bedienen
6
a. Druk op “I” / ”ON” op de zender om de ontvanger in te schakelen.
b. Druk op “0” / “OFF” op de zender om de ontvanger uit te schakelen.
Dimmer ontvangers bedienen
a. Druk op de zender op “I” / ”ON” om de dimmer in te schakelen op de laatst ingestelde dimstand.
b. Druk op de zender op “0” / “OFF” om de dimmer uit te schakelen.
c. Wanneer de dimmer is ingeschakeld: druk op de zender kort op “I” / “ON” om het licht te dimmen;
druk nogmaals op “I” / “ON” om het dimmen te stoppen.
Alle koppelingen ongedaan maken
a. Druk 10 seconden op de knop op de ontvanger.
b. Bij deze handeling gaat de LED knipperen.
c. Zodra de LED dooft zijn alle koppelingen ongedaan gemaakt.
NL
FR
ON
OFF
1
2
3
4
5
6
Installing the transmitter (SH5-TSW-A)
a. First remove the push button and the frame from the mounting plate
1
.
b. Attach the mounting plate to the desired spot on the wall, using the supplied screws. Note the
up arrow
2
.
c. Activate the battery by pulling out the tab
3
.
d. Place the frame back on the mounting plate, note the mounting tabs
4
.
e. Place the push button back on the mounting plate, note the up arrow
5
.
Pairing/disconnecting the transmitter with/from a receiver
a. Press and hold the button on the receiver for 3 seconds and then release it. During this operation
the LED starts to blink. Your receiver is now switched into the pairing mode.
Attention: the LED should blink only after releasing the button. If the LED starts to blink while
holding the button, there will be no pairing.
b. Press the “I” / ”ON” button on the transmitter
6
to pair it with a receiver. During this operation
the LED on the receiver will light up. Press the “0” / ”OFF” button on the transmitter
6
to
disconnect it from a receiver. During this operation the LED on the receiver turns o.
Operating receivers
6
a. Press the “I” / ”ON” button on the transmitter to turn on the receiver.
b. Press the “0” / “OFF” button on the transmitter to turn o the receiver.
Operating a dimmer receiver.
a. Press the “I” / ”ON” button on the transmitter to turn on the dimmer on the last set dim level.
b. Press the “0” / “OFF” button on the transmitter to turn o the dimmer.
c. When the dimmer is turned on: briey press the “ON” button to dim the light; press the “ON”
button again to stop the dimming.
Disconnecting all links
a. Press and hold the button on the receiver for 10 seconds.
b. During this operation the LED starts to blink.
c. When the LED on the receiver turns o, all links will be disconnected.
DE
Sender (SH5-TSW-A) installieren
a. Nehmen Sie zunächst die Tastäche und den Blendrahmen von der Montageplatte ab
1
.
b. Installieren Sie die Montageplatte mit den mitgelieferten Schrauben an der gewünschten Stelle an
der Wand. Beachten Sie den Aufwärtspfeil
2
.
c. Aktivieren Sie die Batterie, indem Sie den Trennstreifen herausziehen
3
.
d. Setzen Sie den Blendrahmen auf die Montageplatte zurück, beachten Sie die Befestigungsnasen
4
.
e. Setzen Sie die Tastäche auf die Montageplatte zurück, beachten Sie den Aufwärtspfeil
5
.
Verbindung/Trennung des Empfängers mit einem/von einem Transmitter
a. Drücken und halten Sie die Taste am Empfänger 3 Sekunden lang und lassen Sie sie wieder
los. Während dieses Vorgangs beginnt die LED zu blinken. Ihr Empfänger wurde jetzt in den
Verbindungsmodus geschaltet.
Achtung: Die LED darf erst nach der Freigabe blinken. Wenn die LED beginnt zu blinken, während
die Taste noch gedrückt wird, wird keine Verbindung aufgebaut.
b. Drücken Sie die „I“ / „EIN“-Taste am Transmitter,
6
um ihn mit dem Empfänger zu verbinden. Bei
diesem Vorgang leuchtet die LED am Empfänger auf. Drücken Sie am Transmitter die „0“ / „AUS“-
Taste,
6
um ihn vom Empfänger zu trennen. Bei diesem Vorgang erlischt die LED am Empfänger.
Bedienung der Empfänger
6
a. Drücken Sie die „I“ / „EIN“-Taste am Transmitter, um den Empfänger einzuschalten.
b. Drücken Sie die „O“ / „AUS“-Taste am Transmitter, um den Empfänger auszuschalten.
Bedienung eines Dimmer-Empfängers.
a. Drücken Sie die „I“ / „EIN“-Taste am Transmitter, um den Dimmer auf dem zuletzt eingestellten
Dimm-Niveau einzuschalten.
b. Drücken Sie die „O“ /„AUS“-Taste am Transmitter, um den Dimmer auszuschalten.
c. Wenn der Dimmer eingeschaltet wurde: Drücken Sie kurz die „EIN“-Taste, um das Licht zu dimmen,
drücken Sie die „EIN“-Taste erneut, um den Dimmvorgang zu stoppen.
Pairing löschen (alle)
a. Drücken und halten Sie die Taste am Empfänger 10 Sekunden lang.
b. Während dieses Vorgangs beginnt die LED zu blinken.
c. Wenn die LED am Empfänger erlischt, werden alle Verbindungen getrennt.
Installation de l’émetteur (SH5-TSW-A)
a. Retirez d’abord le bouton-poussoir puis le cadre de la plaque de montage
1
.
b. Fixez la plaque de montage à l’endroit voulu sur le mur avec les vis fournies. Remarquez la èche
Haut
2
.
c. Activez la batterie en tirant sur la languette
3
.
d. Remettez le cadre en place sur la plaque de montage, remarquez les pattes de xation
4
.
e. Remettez le bouton-poussoir en place sur la plaque de montage, remarquez la èche Haut
5
.
Liaison/dissociation de l’émetteur à un récepteur
a. Maintenez le bouton du récepteur enfoncé pendant 3 secondes avant de le relâcher. Pendant cette
opération, la DEL commence à clignoter. Votre récepteur est à présent en mode de connexion.
Attention : la DEL doit clignoter uniquement une fois le bouton relâché. Si la DEL commence à
clignoter lorsque le bouton est enfoncé, aucune connexion ne se produira.
b. Appuyez sur le bouton “I” / “ON” de l’émetteur
6
pour le connecter à un récepteur. Pendant cette
opération, la DEL du récepteur s’allumera. Appuyez sur le bouton “0” / “OFF” de l’émetteur
6
pour
le déconnecter d’un récepteur. Pendant cette opération, la DEL du récepteur s’éteindra.
Utiliser les récepteurs
6
a. Appuyez sur le bouton “I” / “ON” de l’émetteur pour mettre le récepteur en marche.
b. Appuyez sur le bouton “0” / “OFF” de l’émetteur pour éteindre le récepteur.
Utiliser un récepteur gradateur.
a. Appuyez sur le bouton “I” / “ON” de l’émetteur pour mettre le gradateur en marche au dernier niveau
de gradation.
b. Appuyez sur le bouton “0” / “OFF” de l’émetteur pour éteindre le gradateur.
c. Lorsque le gradateur est en marche : appuyez brièvement sur le bouton “ON” pour baisser la lumière;
appuyez à nouveau sur le bouton “ON” pour interrompre la gradation.
Déconnecter tous les liens
a. Maintenez le bouton du récepteur enfoncé pendant 10 secondes .
b. Pendant cette opération, la DEL commence à clignoter.
c. Lorsque la DEL du récepteur s’éteint, tous les liens seront déconnectés.
IT
Installazione del trasmettitore (SH5-TSW-A)
a. Prima rimuovere il pulsante e il telaio dalla piastra di montaggio
1
.
b. Collegare la piastra di montaggio nella posizione desiderata sulla parete con le viti in dotazione.
Porre attenzione alla freccia su
2
.
c. Attivare la batteria estraendo la linguetta
3
.
d. Ricollocare il telaio sulla piastra di montaggio facendo attenzione alle linguette di montaggio
4
.
e. Ricollocare il pulsante sulla piastra di montaggio facendo attenzione alla freccia su
5
.
Associazione del trasmettitore al ricevitore o relativa disconnessione
a. Tenere premuto il pulsante sul ricevitore per 3 secondi e rilasciarlo. Durante questa operazione il LED
inizia a lampeggiare. Il ricevitore a questo punto è in modalità di associazione.
Attenzione: il LED deve lampeggiare solo dopo il rilascio del pulsante. Se il LED inizia a
lampeggiare tenendo premuto il pulsante, l’associazione non sarà eettuata.
b. Premere il pulsante “I” / “ON” sul trasmettitore
6
per associarlo al ricevitore. Durante questa
operazione il LED sul ricevitore si accende. Premere il pulsante “0” / “OFF” sul trasmettitore
6
per
scollegarlo dal ricevitore. Durante questa operazione il LED sul ricevitore si spegne.
Utilizzo dei ricevitori
6
a. Premere il pulsante “I” / “ON” sul trasmettitore per attivare il ricevitore.
b. Premere il pulsante “0” / “OFF” sul trasmettitore per disattivare il ricevitore.
Utilizzo di un ricevitore con variatore
a. Premere il pulsante “I” / “ON” sul trasmettitore per attivare il variatore sull’ultimo livello di
luminosità.
b. Premere il pulsante “0” / “OFF” sul trasmettitore per disattivare il variatore.
c. Quando il variatore è attivo: premere brevemente il pulsante “ON” per abbassare la luce, premere di
nuovo il pulsante “ON” per interrompere l’abbassamento.
Scollegamento di tutti i collegamenti
a. Tenere premuto il pulsante sul ricevitore per 10 secondi.
b. Durante questa operazione il LED inizia a lampeggiare.
c. Quando il LED sul ricevitore si disattiva, tutti i collegamenti saranno scollegati.
Specifications:
Remote control battery: 3VDC, type CR 2032 (incl.)
Maximum distance: 30 m.
Warranty: 2 years
10.037.12 | SH5-TSW-A
433.92MHz.
ENWireless wall switch
NLDraadloze muurschakelaar
DE Funk-Wandschalter
FRCommutateur mural sans fil
ESInterruptor de pared inalámbrico
IT Interruttori wireless
ES
Instalación del transmisor (SH5-TSW-A)
a. En primer lugar, extraiga el botón, y a continuación el marco, de la placa de montaje
1
.
b. Coloque la placa de montaje en el lugar de la pared que desee y fíjela con los tornillos
proporcionados. Observe la echa hacia arriba
2
.
c. Active la pila tirando de la pestaña
3
.
d. Vuelva a colocar el marco en la placa de montaje observando las pestañas de montaje
4
.
e. Vuelva a colocar el botón en la placa de montaje observando la echa hacia arriba
5
.
Conectar/desconectar el transmisor a un receptor
a. Presione y mantenga el botón del receptor durante 3 segundos y suéltelo. Durante esta operación el
LED comenzará a parpadear. El receptor pasará a modo conexión.
Atención: el LED solamente debe parpadear tras soltar el botón. Si el LED comienza a parpadear
durante la pulsación no se producirá la conexión.
b. Pulse el botón “I” / “ON” del transmisor
6
para conectarlo a un receptor. Durante la operación se
encenderá el LED del receptor. Pulse el botón “0” / “OFF” del transmisor
6
para desconectarlo de
un receptor. Durante la operación se apagará el LED del receptor.
Uso de receptores
6
a. Pulse el botón “I” / “ON” en el transmisor para encender el receptor.
b. Pulse el botón “0” / “OFF” en el transmisor para apagar el receptor.
Uso de un receptor regulador.
a. Pulse el botón “I” / “ON” en el transmisor para encender el regulador con el último nivel de
regulación establecido.
b. Pulse el botón “0” / “OFF” en el transmisor para apagar el receptor.
c. Cuando esté encendido el regulador: pulse brevemente el botón “ON” para suavizar la luz; pulse de
nuevo el botón “ON” para detener el suavizado.
Desconectar todas las conexiones
a. Presione y mantenga el botón del receptor durante 10 segundos.
b. Durante esta operación el LED comenzará a parpadear.
c. Cuando el LED del receptor se apague se desconectarán todas las conexiones.
/2
%
Quick check
I'm not a robot
Incorrect answer, please try again.
Chat with your Smartwares SmarthomeBasic SH5-SET-BS manual using AI
Get instant AI answers from your Smartwares SmarthomeBasic SH5-SET-BS manual
Ask anything about the Smartwares SmarthomeBasic SH5-SET-BS. Answers come from this manual, with the pages they are based on.
Ask a Question
0/1000
Do you recommend SmarthomeBasic SH5-SET-BS?
YesNo
0
sit_qui
6 months ago
Is this smart plug set easy to install for beginners without technical experience?
0
Manual.ly
6 months ago
Yes, the Smartwares SmartHome SH5-SET-BS is designed for ease of use. Multiple customers confirm that installation is simple and straightforward, making it suitable even for those with no prior technical experience. The set includes all necessary components, and the wireless functionality allows for quick setup without complex wiring.
M: QW-35-FL
M: QW-35-FL
0
Marco Rossi
6 months ago
Does the package include everything needed to start using the plugs immediately?
M: QW-35-FL
Frequently Asked
Questions
A
Remove the button and frame, screw the mounting plate to the wall aligning the arrow, pull the battery tab, then reattach the frame and button ensuring tabs line up.
Is this answer helpful?
A
Hold the receiver button for 3 seconds until the LED blinks after release. Then press the ON button on the transmitter. The receiver LED will stay lit to confirm connection.
Is this answer helpful?
A
Yes. Press ON to turn on at the last setting. Briefly press ON to dim the light. Press ON again to stop the dimming process.
Is this answer helpful?
A
If the LED blinks while you are still holding the button, the pairing process has failed. Release the button first, wait for the blink, then try pressing the transmitter.
Is this answer helpful?
A
Press and hold the button on the receiver for 10 seconds. The LED will blink, and when it turns off, all links are disconnected.
Is this answer helpful?
A
The transmitter uses a 3VDC CR2032 battery, which is included in the package.
Is this answer helpful?
M: QW-35-FL
Advantagesand
Disadvantages
Advantages
Simple installation requiring no professional electrician
Supports both standard switching and smooth dimming control
Includes CR2032 battery and covers up to 30 meters range
Easy pairing and unpairing process with clear LED indicators
VS
Disadvantages
Requires separate receiver units for each light fixture
Battery replacement needed periodically for the transmitter
Limited to specific Smartwares compatible receivers
M: QW-35-FL
Product
Specification
Type
Set
Standard
Radio frequency (433.92MHz)
Function
Switch (on/off)
Topology
Star
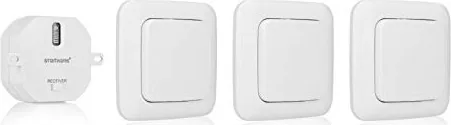
Set includes
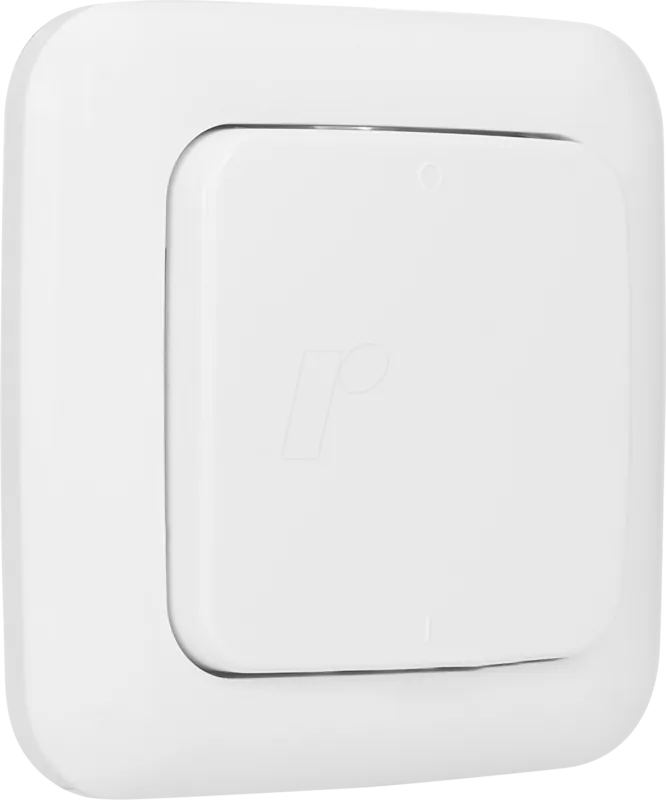
1x recessed switch, 3x light switches
M: QW-35-FL
Product
Description
Transform Your Bedroom with Smart Lighting Control
The Smartwares SmarthomeBasic SH5-SET-BS Bedroom Light Switch Set offers a seamless way to modernize your home lighting without the need for complex wiring. This wireless wall switch set is designed specifically for bedrooms, providing effortless control over your lights and dimmers from anywhere in the room. By integrating this system into your daily routine, you gain the convenience of smart home technology while maintaining the simplicity of traditional switches.
Installation is straightforward and requires no electrician. The process begins by removing the push button and frame from the mounting plate. You then secure the mounting plate to your desired wall location using the provided screws, ensuring the up arrow is aligned correctly. Once the plate is fixed, activate the battery by pulling out the tab inside the unit. Reattach the frame and the push button, making sure the tabs and arrows align properly for a snug fit.
Pairing the transmitter with your receiver is an intuitive process. To enter pairing mode, press and hold the button on the receiver for three seconds until the LED blinks. It is crucial to release the button before the light starts blinking; otherwise, the pairing will fail. Once the receiver is ready, simply press the ON button on the transmitter to establish a connection, indicated by the receiver's LED turning solid. You can also easily disconnect links or reset all connections by holding the receiver button for ten seconds.
This set supports both standard on/off switching and dimming functionality. When controlling a dimmer receiver, pressing the ON button activates the light at the last remembered brightness level. A short press dims the light gradually, while another press stops the dimming action. This flexibility allows you to create the perfect ambiance for reading, relaxing, or sleeping. With a maximum range of 30 meters and a long-lasting CR2032 battery included, this switch set provides reliable performance for years.
Important Notes
Ensure the battery tab is removed only after the mounting plate is securely attached to avoid accidental activation.
The LED on the receiver must blink only after releasing the button during pairing; blinking while holding indicates a failure.
All links can be cleared simultaneously by holding the receiver button for ten seconds until the LED turns off.




sit_qui
6 months ago
Is this smart plug set easy to install for beginners without technical experience?
Manual.ly
6 months ago
Yes, the Smartwares SmartHome SH5-SET-BS is designed for ease of use. Multiple customers confirm that installation is simple and straightforward, making it suitable even for those with no prior technical experience. The set includes all necessary components, and the wireless functionality allows for quick setup without complex wiring.