Manual.ly Logo

Shimano PD-M324 Pedals Manual

0

PDF manual · 4 Pages

English

page

/ 4

Search
Loading...
1839-shimano-pd-m324-manual page 1
R
1
2
3 mm Allen key
Adjustment bolt
Decrease
If the tension indicator is at the strongest or the weakest
position, do not turn the adjustment bolt any further.
R
Tension indicator
1
2
Adjustment bolt
Tension
indicator
Spring plate
Cleat replacement
Cleats wear out over time and should be replaced periodically. Cleats
should be replaced when it becomes difficult to release, or it starts to
release with much less effort than the when it was in new condition.
Note:
In order to prevent accidental release from occurring, make
sure all the spring tensions are properly adjusted.
The spring tensions should be adjusted equally for both right
and left pedals. If they are not adjusted equally, it can cause
the rider difficulty to engage or release from the pedals.
If the adjustment bolt is completely withdrawn from the spring
plate, disassembly and reassembly will be required. If this
occurs, ask a professional dealer for assistance.
The spring force is adjusted by means of adjustment bolts. The
adjustment bolts are located behind each of the bindings, and there is
one adjustment bolt on each pedal. Equalize the spring tensions by
referring to the tension indicators and by counting the number of turns
of the adjustment bolts. The spring tension can be adjusted in three
steps for each turn of the adjustment bolt.
Mounting the reflectors (optional)
Adjusting the spring tension of the binding
R
BS612/2
TPP30
1
B
4048
CATEYERR-0223
BS612/2
TPP30
1
B
4048
CATEYERR-0223
Reflector
Reflector
Strongest position Weakest position
Increase
Sockliner
Waterproof seal
15
R
NOTE:
BE SURE TO READ AND FOLLOW THE ABOVE WARNINGS
CAREFULLY.
If the warnings are not followed, your shoes may not come
out of the pedals when you intend or they may come out
unexpectedly or accidentally, and severe injury may result.
Before riding the bicycle, check that there is no play or looseness
in the connection. Also, be sure to retighten the crank arms and
pedals at periodic intervals.
In addition, if pedaling performance does not feel normal, check
this once more.
Parts are not guaranteed against natural wear or deterioration
resulting from normal use.
For maximum performance we highly recommend Shimano
lubricants and maintenance products.
General Safety Information
SPD pedals are designed so that you release them only when
you intend to release. They are not designed to release
automatically at times such as when falling off the bicycle. This
is a safety measure to prevent you from losing balance and
falling off the bicycle as a result of your feet becoming
accidentally released from the pedals.
Use only SPD shoes with this product. Other types of shoes
may not release from the pedals, or may release unexpectedly.
Use only Shimano cleats (SM-SH51/ SM-SH52 / SM-SH55 / SM-
SH56) and tighten the mounting bolts securely to the shoes.
Before attempting to ride with these pedals and shoes, make
sure you understand the operation of the engagement /release
mechanism for the pedals and cleats (shoes).
Before you attempt to ride with these pedals and shoes, apply
the brakes, then place one foot on the ground and practice
engaging and releasing each shoe from its pedal until you can
do so naturally and with minimal effort.
Ride on level ground first until you become adept at engaging
and releasing your shoes from the pedals.
Before riding, adjust the spring tension of the pedals to your
liking.
When riding at low speed or when there is a possibility that you
might need to stop riding, (for example, when doing a U-turn,
nearing an intersection, riding uphill or turning a blind curve),
release your shoes from the pedal beforehand so that you can
quickly put your feet onto the ground at any time.
Use a lighter spring tension for attaching the pedal cleats when
riding in adverse conditions.
Keep cleats and bindings clear of dirt and debris to ensure
engagement and release.
Remember to check the cleats periodically for wear. When the
cleats are worn, replace them. Always check the spring tension
after replacing the pedal cleats and before riding. If you do not
maintain both your shoes and cleats in good condition, release
and engagement to the pedals could become unpredictable or
difficult, which could result in severe injury.
Be sure to attach reflectors to the bicycle when riding at night.
Do not continue riding the bicycle if the reflectors are dirty or
damaged, otherwise it becomes more difficult for oncoming
vehicles to see you.
Obtain and read the service instructions carefully prior to
installing the parts. Loose, worn, or damaged parts may cause
serious injury to the rider.
We strongly recommend only using genuine Shimano
replacement parts.
If you have any questions concerning your pedals, contact a
professional dealer.
Read these Technical Service Instructions carefully, and keep
them in a safe place for later reference.
Tightening torque:
5 – 6 N·m {43 – 52 in. lbs.}
Engaging the cleats with the pedals
Releasing the cleats from the pedals
The waterproof seal is
supplied with Shimano
shoes which require this
step to be carried out.
Note:
A 6 mm Allen key cannot provide a sufficient tightening torque.
Always be sure to use a 15 mm spanner.
Note:
This step may not be necessary
depending on the type of shoes.
Note:
Remove the sockliner and position a cleat nut over the oval holes.
Waterproof seal
Remove the sockliner and attach the waterproof seal.
Adjusting the cleat position
The cleat has an adjustment range of 20 mm front to
back and 5 mm right to left.
After provisionally tightening the cleat, practice
engaging and releasing, one shoe at a time.
Readjust to determine the best cleat position.
After you have determined the best cleat position,
firmly tighten the cleat mounting bolts with a 4 mm
Allen key.
From the bottom of the shoe, position a cleat and then a cleat
adapter over the cleat holes. The cleats are compatible with both
left and right pedals. Provisionally tighten the cleat mounting bolts.
Provisional tightening torque
for cleat mounting bolts:
2.5 N·m {22 in. lbs.}
Position the triangular
portion of the cleat toward
the front of the shoe.
Front
Press the cleats into the pedals with a forward and downward
motion.
Do not use the pedals and cleats in any way other than
as described in these Service Instructions. The cleats
are designed to engage and release from the pedals
when the cleats and pedals are facing forward.
See below for instructions on how to install the cleats.
FAILURE TO FOLLOW THESE INSTRUCTIONS MAY
RESULT IN SERIOUS PERSONAL INJURY.
Single release mode cleats (SM-SH51 / SM-SH52) and
multiple release mode cleats (SM-SH55 / SM-SH56) are
available for use with these pedals.
Each type of cleat has its own distinctive features, so
be sure to read the Service Instructions carefully and
select whichever type of cleat best suits your riding
style and the terrain and riding conditions which you
will encounter.
The method of release varies according to the type of cleats you are using.
(Check the model number and color of your cleats to determine the proper method of release.)
In multiple release mode, it is
necessary to practice releasing
until you become accustomed to
the technique. Releasing by lifting
your heel requires particular
practice.
Note:
It is necessary to practice
releasing until you become
accustomed to the technique.
Note:
Release the cleats from the pedals by twisting
your heels outward.
Release the cleats from the pedals by twisting
your heels in any direction.
The cleats can be released by twisting in any direction.
Because the cleats can also be released by lifting your heel, they
may become accidentally released when applying upward force on
the pedals.
These cleats should not be used for riding style which may involve
pulling up on the pedals or for activities, such as jumping, in which
pulling forces are applied to the pedals causing possible release
from the pedals.
Although the cleats can be released by twisting your heels in any
direction or by lifting, they will not necessarily release if you lose
your balance.
Accordingly, for places and conditions where it looks as though you
may lose balance, make sure that you have sufficient time to release
the cleats beforehand.
If the cleats release by accident, you may fall off the bicycle and
serious injury may result.
If the features of multiple release mode cleats are not sufficiently
understood and if they are not used correctly, then they may release
accidentally with a greater frequency than for single release mode
cleats.
You can help to prevent this by adjusting the amount of force
required to release the cleats in any direction, and you should
practice until you are accustomed to the amount of force and the
angle required to release.
You are able to apply upward force to the pedal, since they will not
release unless the foot is twisted outward.
The cleats will not necessarily release if you lose your balance.
Accordingly, for places and conditions where it looks as though you
may lose balance, make sure that you have sufficient time to release
the cleats beforehand.
When you are pedaling vigorously, your heel may inadvertently twist
outward and this may cause the cleat to release accidentally. If the
cleat releases by accident, you may fall off the bicycle and serious
injury may result.
You can help to prevent this by adjusting the amount of force
required to release the cleats, and you should practice until you are
accustomed to the amount of force and the angle required to release
the cleats.
These cleats only release when the heel is twisted outward.
They will not release if the heel is twisted in any other direction.
SM-SH51/ SM-SH52 (black /Optional accessory)
Single release mode cleats:
SM-SH55 (silver) / SM-SH56 (gold /silver)
Multiple release mode cleats:
Single release modeMultiple release mode
Rubber cover for cleat
mounting holes
SPD shoe
Sockliner
SM-SH51
SM-SH51
4 mm Allen key
Cleat mounting bolts
Cleat adapter
Cleat
SM-SH51
15 mm spanner
Mounting the pedals on the crank arms
Use a 15 mm spanner to mount the pedals on the crank arms. The
right pedal has a right-hand thread; the left pedal has a left-hand
thread.
Pay attention to
the mark
R: right pedal
L : left pedal
This step may not be necessary
depending on the type of shoes.
Note:
Tightening torque:
35 – 55 N·m {304 – 477 in. lbs.}
Cleat types and using the pedals
Dec. 2008 by Shimano Inc. PIT. IZM. Printed in Malaysia
C
These service instructions are printed on recycled paper.
Please note: Specifications are subject to change for improvement without notice.
(English)
3-77 Oimatsu-cho, Sakai-ku, Sakai, Osaka 590-8577, Japan
One Holland, Irvine, California 92618, U.S.A. Phone: +1-949-951-5003 Industrieweg 24, 8071 CT Nunspeet, The Netherlands Phone: +31-341-272222
These pedals can be fitted with toe clips, but the toe clips should
be removed when using the pedals as SPD pedals.
These pedals have an SPD-type face on one side and a standard
face on the other side.
R
R
With a pair of pliers or a similar tool, pull off the rubber
cover to expose the cleat mounting holes.
Attaching the cleats
WARNING
– To avoid serious injuries:
WARNING
CAUTION
– To avoid serious injuries:
1.
2.
2.
1.
3.
SI-41N0G-001
PD-M324
SPD Pedals
Technical Service Instructions
Cleat nut

Advantages and Disadvantages

Advantages

  • Dual-sided design: SPD engagement on one side and flat platform on the other for versatility.
  • Accepts multiple Shimano cleat types (single and multi-release) to suit rider preference.
  • Adjustable spring tension and cleat position for personalized fit and improved safety.
  • Durable construction with simple maintenance: waterproof seal and replaceable cleats.
  • Affordable, user-friendly option for commuters and recreational cyclists.
VS

Disadvantages

  • Multi-release cleats can disengage unexpectedly if not properly understood and adjusted.
  • Requires practice to master engagement and release; not ideal for beginners who won’t train.
  • Some installations or full disassembly may need professional assistance.
  • Cleat wear leads to unpredictable release if not inspected and replaced regularly.
  • Proper mounting needs a 15 mm spanner; 6 mm Allen key is insufficient for pedal mounting.

Ask a Question

Manual.ly information here
0/1000

Do you recommend PD-M324?

Frequently Asked Questions

A

PD-M324 accepts Shimano cleats SM-SH51, SM-SH52 (single-release) and SM-SH55, SM-SH56 (multi-release). Choose single-release for predictable retention or multi-release for easier, multi-directional disengagement, and practice whichever you select.

Is this answer helpful?

A

Use a 15 mm spanner to mount pedals: right pedal has right-hand thread, left pedal has left-hand thread. Tightening torque for mounting is 5–6 N·m (43–52 in·lbs). Always confirm threads and torque to avoid loosening while riding.

Is this answer helpful?

A

Position cleats within a 20 mm fore-aft and 5 mm lateral range. Provisionally tighten mounting bolts, practice clipping in/out, refine position, then torque bolts with a 4 mm Allen key. Adjust spring tension via the under-plate adjustment screws and equalize left/right using tension indicators.

Is this answer helpful?

A

Replace cleats when release becomes difficult or noticeably easier than new (indicating wear). Keep cleats and bindings free of dirt, inspect regularly, and retighten mounting bolts periodically. Use genuine Shimano replacement parts and recommended lubricants for best performance.

Is this answer helpful?

A

No. Multi-release cleats may disengage with upward forces; avoid using PD-M324 with styles that involve pulling up or jumping. Use single-release cleats if you need more secure retention and always practice release technique first.

Is this answer helpful?

A

Yes, these pedals can be fitted with toe clips, but toe clips must be removed when using the pedals as SPD. The PD-M324 is dual-faced (SPD and standard), so configuration depends on your riding needs.

Is this answer helpful?

A

You need a 15 mm spanner for mounting pedals to crank arms and a 4 mm Allen key to tighten cleat mounting bolts. Do not rely on a 6 mm Allen key for pedal mounting; it cannot achieve sufficient tightening torque.

Is this answer helpful?

Product Description

Product pic

Shimano PD-M324 Pedals Manual

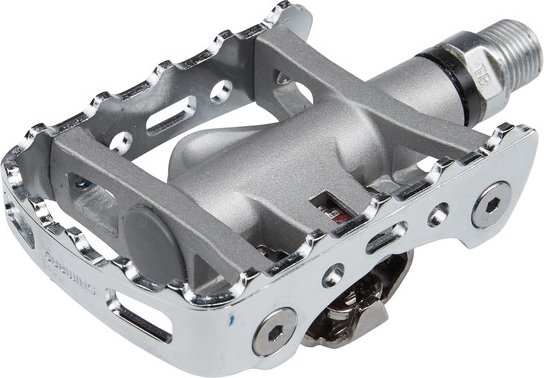
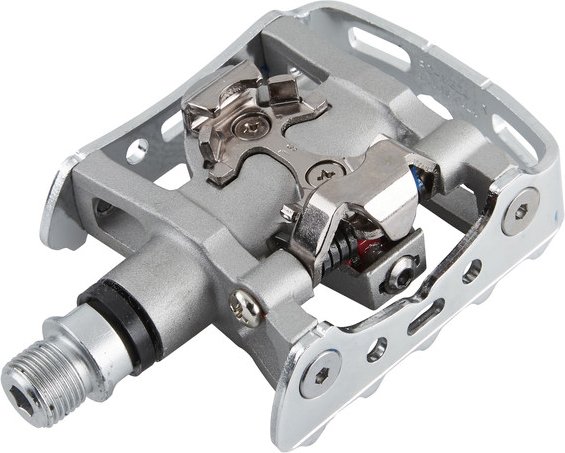
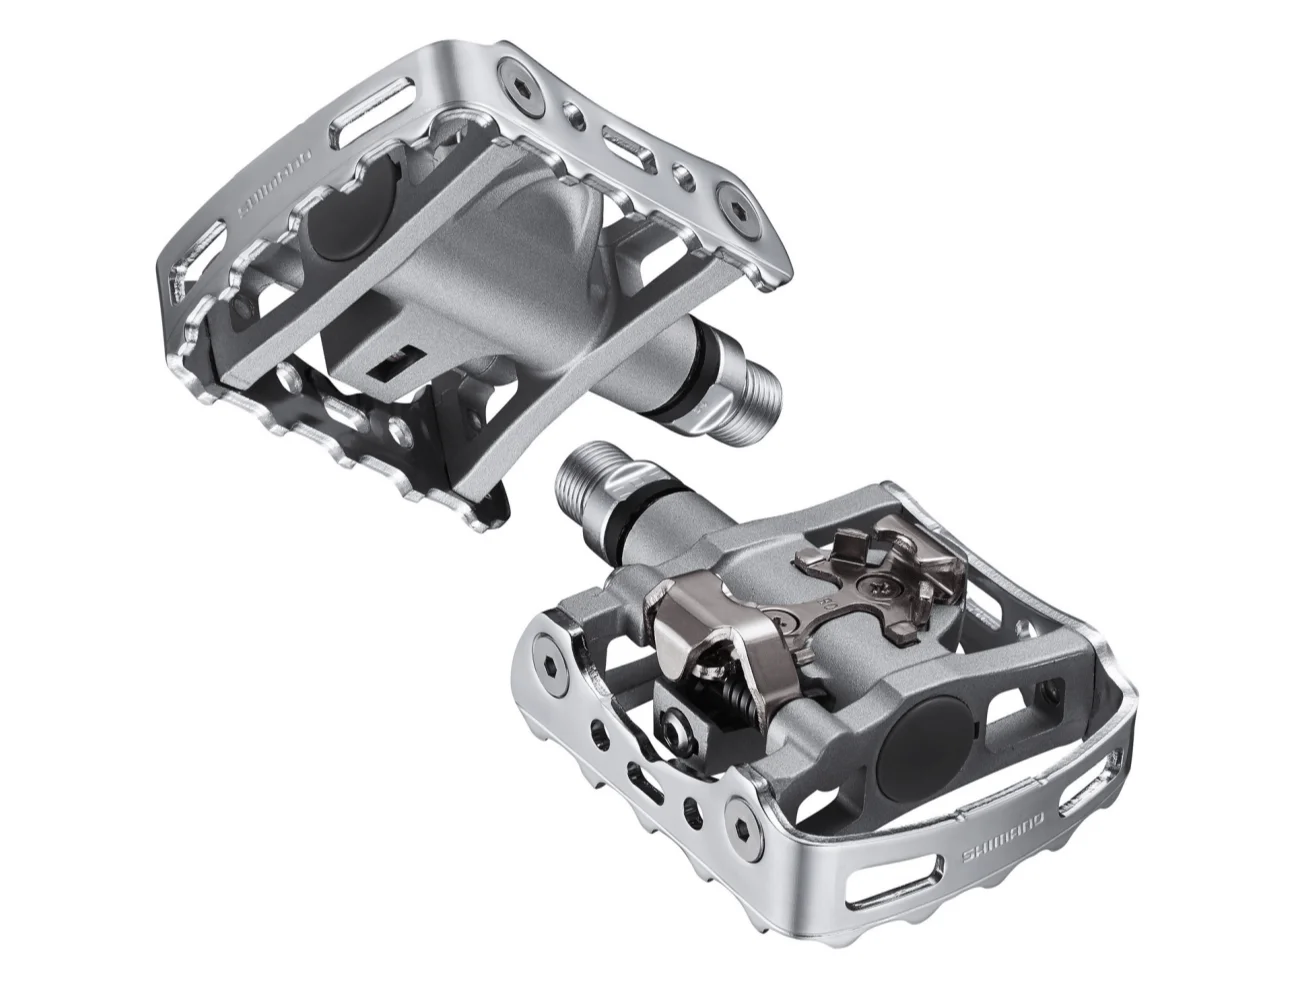
The Shimano PD-M324 pedals blend practical durability with reliable SPD performance for recreational riders and commuters. These dual-sided pedals feature an SPD engagement surface on one side and a flat platform on the other, offering versatility for cyclists who switch between clipped-in performance and casual riding. The PD-M324 emphasizes user safety, adjustability and ease of maintenance while remaining affordable and straightforward to use.

Design and Features

Constructed with a robust body and a standard threaded spindle (right pedal right-hand thread, left pedal left-hand thread), the PD-M324 accepts Shimano cleats (SM-SH51/SM-SH52/SM-SH55/SM-SH56) and can be fitted with optional toe clips when not used as SPD. Use a 15 mm spanner to mount the pedals and observe the specified tightening torque (5–6 N·m). A waterproof seal is provided for compatible shoes and simple maintenance steps are included for installing cleats and seals.

Cleat selection matters: single-release cleats (SM-SH51/SM-SH52) release only with an outward heel twist, while multi-release cleats (SM-SH55/SM-SH56) allow release in multiple directions and by heel lift. Each cleat type has trade-offs—single-release offers more predictable retention, multi-release offers easier disengagement but can release unintentionally if not understood and adjusted correctly.

Safety and Adjustment

Safety is a core focus. The manual stresses practicing engagement and release before riding, testing on level ground, and adjusting spring tension to suit riding conditions. Keep cleats, bindings and pedals clean and inspect for wear regularly—worn cleats should be replaced to avoid unpredictable release. Use Shimano genuine replacement parts and recommended lubricants for optimal performance.

Cleat position is adjustable: up to 20 mm fore-aft and 5 mm lateral movement. Provisionally tighten cleat bolts, practice clipping in/out, refine position, then torque the bolts securely with a 4 mm Allen key. Spring tension is adjusted with set screws under each binding; equalize tension between left and right using the indicators and countable turns.

Maintenance Tips

  • Remove rubber covers to access cleat mounting holes.
  • Replace cleats when release becomes difficult or noticeably loose compared to new.
  • Use the correct tools: 15 mm spanner for mounting pedals, 4 mm Allen key for cleat bolts.
  • Ensure reflectors are fitted and clean for night riding.

Notes:

  • Practice release repeatedly until natural and confident.
  • Do not use multi-release cleats for riding styles involving upward pulling or jumping.
  • If adjusting requires full disassembly (removal of spring plate bolt), consult a professional dealer.

© Copyright 2024 Manual.ly