Manual.ly Logo

Shelly Vintage A60 Manual

0.0 · 0 Ratings

PDF manual · 3 Pages

English

M: QW-35-FL
page

/ 3

Loading...
6af3c114c052cc6b23b0c9240eb112277576 page 1
WiFi DIMMING BULB А60/А19
USER GUIDE
The Shelly WiFi Dimming Bulb model A60/A19 by Allterco Robotics
is intended to be installed into a standard light socket E26/E27 in
order to dim the light. Shelly may work as a standalone device or as
an accessory to a home automation controller.
Specication
Power supply:
AC 220-240V/AC 110-130
Socket:
A60 - E27, A19 - E26
Power Rating:
7W
Brightness:
750 lm
Color Temperature:
2700K
Color Index:
Ra>80
Working temperature:
From -10°C to 40°C
Complies with EU standards:
• RED 2014/53/EU
• LVD 2014/35/EU
• EMC 2004/108/WE
• RoHS2 2011/65/UE
Radio signal power:
1mW
Radio protocol:
WiFi 802.11 b/g/n
Frequency:
2400 – 2500 MHz;
Operational range (depending
on local construction):
• up to 50 m outdoors
• up to 30 m indoors
Dimensions:
115 x 60 mm
Electrical consumption:
< 1 W
Protection class:
IP20
Life Time:
15,000 hours
Equal Incan:
60W
Filament:
Straight
Glass/Coating
Clear
Technical Information
• Control through WiFi from a mobile phone, tablet, PC, automa-
tion system or any other device supporting HTTP and/or UDP
protocol
• Microprocessor management
• Controlled elements: multiple LED diods
• Shelly may be controlled by an external switch
CAUTION! Danger of electrocution. Plugging the device to the
power grid has to be performed with caution.
CAUTION! Do not allow children to play with the device. Keep the
devices for remote control of Shelly (mobile phones, tablets, PCs)
away from children.
CAUTION! Please handle with care! The Shelly Vintage is FRAGILE!
Introduction to Shelly
Shelly® is a family of innovative devices, which allow remote
control of electric appliances through mobile phone, PC or home
automation system. Shelly® uses WiFi to connect to the devic-
es controlling it. They can be in the same WiFi network or they
can use remote access (through the internet). Shelly® may work
standalone, without being managed by a home automation con-
troller, in the local WiFi network, as well as through a cloud service,
from everywhere the User has Internet access.
Shelly® has an integrated web server, through which the User
may adjust, control and monitor the Device. Shelly® has two WiFi
modes - Access Point (AP) and Client Mode (CM). To operate in
Client Mode, a WiFi router must be located within the range of the
device. Shelly® devices can communicate directly with other WiFi
devices through HTTP protocol.
An API can be provided by the Manufacturer. Shelly® devices may
be available for monitor and control even if the User is outside
the range of the local WiFi network, as long as the WiFi router
is connected to the Internet. The Shelly Cloud function could be
used, which is activated through the web server of the Device or
through the settings in the Shelly Cloud mobile application. The
User can register and access the Shelly Cloud, using either An-
droid or iOS mobile applications, or any internet browser and the
web site: https://my.shelly.cloud/.
Installation Instructions
CAUTION! Danger of electrocution. Before installing the Device
into the light socket please check if it has been powered off.
CAUTION! Before beginning the installation please read the ac-
companying documentation carefully and completely. Failure to
follow recommended procedures could lead to malfunction, dan-
ger to your life or violation of the law. Allterco Robotics is not re-
sponsible for any loss or damage in case of incorrect installation
or operation of this device.
CAUTION! Use the Device only with power grid which comply with
all applicable regulations. Short circuit in the power grid connect-
ed to the Device may damage the Device.
CAUTION! Please check the working voltage of the device and the
supplied voltage of your power grid before installing the device!
Installing the device to a non recommended power supply may
lead to malfunction, danger to your life or violation of the law. All-
terco Robotics is not responsible for any loss or damage in case
of incorrect installation or operation of this device.
RECOMMENDATION! The Device may be connected to and may
control electric circuits and light sockets only if they comply with
the respective standards and safety norms.
Initial Inclusion
Install the Shelly to the light socket. Press the switch/button to
which Shelly is connected. The Shelly should turn on. Press the
switch/button again and Shelly will turn off.
You may choose if you want to use Shelly with the Shelly Cloud
mobile application and Shelly Cloud service. You can also famil-
iarize yourself with the instructions for Management and Control
through the embedded Web interface.
Factory Reset
You can return your Shelly Vintage to its Factory Settings by
• Pressing 5 consecutive times the button/switch connected to
Shelly.
• Switching on/off the power 5 consecutive times.
Upon successful factory reset Shelly will turn start ashing.
The Shelly Cloud mobile application
Shelly Cloud gives you the opportunity to control and adjust all
Shelly® devices from anywhere in the world. All you need is an
Internet connection and our mobile application, installed on your
smartphone or tablet. To install the application please visit Goo-
gle Play (Android - g. 1) or App Store (iOS - g. 2) and install the
Shelly Cloud app.
g. 3 g. 4
Registration
The rst time you load the Shelly Cloud mobile app, you have to
create an account which can manage all your Shelly® devices.
Forgotten Password
In case you forget or lose your password, just enter the e-mail
address you have used in your registration. You will then receive
instructions to change your password.
WARNING! Be careful when you type your e-mail address during
the registration, as it will be used in case you forget your pass-
word.
After registering, create your rst room (or rooms), where you are
going to add and use your Shelly devices.
Shelly Cloud gives you opportunity to create scenes for automat-
ic turning on or off of the Devices at predened hours or based
on other parameters like temperature, humidity, light etc. Shelly
Cloud allows easy control and monitoring using a mobile phone,
tablet or PC.
Device Inclusion
To add a new Shelly device, connect it to the power grid.
• Step 1 - Install your Shelly into the light socket and turn the
light on.
WARNING! In case the Device has not created its own WiFi net-
work with SSID like shellyvintage-764CF7 check if you have pow-
er connected to Shelly. If you do not see an active WiFi network
with SSID like shellyvintage-764CF7, reset the Device. If the De-
vice has been powered on, you have to power it off and on again
5 consecutive times*. Or if you have a switch/button connected
to the Device, press it 5 consecutive times*. When the light starts
to ash Shelly should return to AP Mode. If not, please repeat or
contact our customer support at support@shelly.cloud
*Upon each OFF state, please wait 2-3 seconds.
• Step 2 - Choose “Add Device”. In order to add more devices later,
use the app Menu at the top right corner of the main screen and
click “Add Device”. Type the name (SSID) and password for the
WiFi network, to which you want to add the Device.
•
Step 3 - WiFi inclusion
If using iOS: you will see the following screen:
Press the Home button of your iPhone/ iPad/iPod. Open Settings
> WiFi and connect to the WiFi network created by Shelly, e.g.
shellyvintage-764CF7.
If using Android: your phone/tablet will automatically scan and
include all new Shelly devices in the WiFi network that you are
connected to.
Upon successful Device Inclusion to the WiFi network you will see
the following pop-up:
• Step 4 - Approximately 30 seconds after discovery of any new
devices оn the local WiFi network, а list will be displayed by de-
fault in the “Discovered Devices” room.
•
Step 5 - Enter the Discovered Devices and choose the Device you
want to include in your account.
•
Step 6 - Enter a name for the Device (in the Device Name eld).
Choose a Room, in which the device has to be positioned. You can
choose an icon or add a picture to make it easier to recognize.
Press “Save Device”.
•
Step 7 - To enable connection to the Shelly Cloud service for
remote control and monitoring of the Device, press “yes” on the
following pop-up.
Shelly Device Settings
After your Shelly device is included in the app, you can control it,
change its settings and automate the way it works. To switch the
Device on and off, use the Power button. To enter at the details
menu of the Device, click on it’s name. From the details menu
you may control the Device, as well as edit its appearance and
settings.
Timer
Тo manage the power supply automatically, you may use:
• Auto OFF: After turning on, the power supply will automatically
shutdown after a predened time (in seconds). A value of 0 will
cancel the automatic shutdown.
• Auto ON: After turning off, the power supply will be automatical-
ly turned on after a predened time (in seconds). A value of 0 will
cancel the automatic power-on.
Weekly Schedule
This function requires an Internet connection. To use Internet,
your Shelly has to be connected to a local WiFi network with an
active internet connection.
Shelly may turn on/off automatically at a predened time, at sun-
rise/sunset, or at a specied time before or after sunrise/sunset.
Multiple schedules are possible.
Night Mode
With this mode you can set a period of time and level of bright-
ness, in which any turning on will set the brightness to the pre-
dened level. You must select a start & end time, with the bright-
ness level.
Internet/Security
• WiFi Mode - Client: Allows the device to connect to an avail-
able WiFi network. After typing the details in the respective elds,
press Connect.
• WiFi Client Backup: Add a backup WiFi network, in case your
primary one becomes unavailable.
• WiFi Mode - Acess Point: Congure Shelly to create a Wi-Fi Ac-
cess point. After typing the details in the respective elds, press
Create Access Point.
• Cloud: Enable or Disable connection to the Cloud service.
• Restrict Login: Restrict the web interface of Shely with a User-
name and Password. After typing the details in the elds, press
Restrict Shelly.
Settings
• Power on default mode: this sets the default output state when
shelly is powered.
- On: congure shelly to turn on, when it has power.
- Off: congure shelly to turn off, when it has power.
• Restore last mode: congure shelly to return to last state it was
in, when it has power.
• Transition time: set the time (in miliseconds), for which Shelly Vin-
tage goes from 0% to 100%. The value can be from 0 to 5000 ms.
• Firmware update: update the rmware of shelly, when a new
version is released.
• Time zone and geo-location: enable or disable the automatic
detection of time zone and geo-location.
• Factory reset: return shelly to its factory default settings.
• Device information: here you can see the:
- Device id - unique id of shelly
- Device ip - the ip of shelly in your wi- network
The embedded web interface
Even without the mobile app the Shelly device can be set and con-
trolled through a browser and WiFi connection of a mobile phone,
tablet or PC.
Abbreviations used
• Shelly-ID – the unique name of the device. It consists of 6 or
more characters. It may include numbers and letters, for example
35FA58.
• SSID – the name of the WiFi network, created by the device, for
example shellyvintage-35FA58.
• Access Point (AP) – the mode in which the device creates its
own WiFi connection point with the respective name (SSID).
• Client Mode (CM) – the mode in which the device is connected
to another WiFi network.
Installation/Initial inclusion
• Step 1 Install Shelly Vintage into the light socket and turn the light on.
WARNING! In case the Device has not created its own WiFi net-
work with SSID like shellyvintage-764CF7 check if you have pow-
er connected to Shelly. If you do not see an active WiFi network
with SSID like shellyvintage-764CF7, reset the Device. If the De-
vice has been powered on, you have to power it off and on again
5 consecutive times*. Or if you have a switch/button connected
to the Device, press it 5 consecutive times*. When the light starts
to ash Shelly should return to AP Mode. If not, please repeat or
contact our customer support at support@shelly.cloud
*Upon each OFF state, please wait 2-3 seconds.
• Step 2 - When the light turns on, Shelly has created an own
WiFi network (own AP), with name (SSID) such as shellyvin-
tage-764CF7. Connect to it with your phone, tablet or PC.
• Step 3 Type 192.168.33.1 into the address eld of your browser
to load the web interface of the Shelly device.
Home Page
This is the home page of the embedded web interface. If it has
been set up is correctly, you will see information about:
• Current power consumption, in Watts
• Current state (on/off)
• Current brightness level
• Current temperature of the light
• Power button
• Connection to Cloud
• Present time
• Settings
Internet/Security
• WiFi Mode - Client: Allows the device to connect to an available
WiFi network. After typing the details in the elds, press Connect.
• WiFi Client Backup: Add a backup WiFi network, in case your
primary one becomes unavailable.
• WiFi Mode - Acess Point: Congure Shelly to create a Wi-Fi
Access point. After typing the details in the elds, press Create
Access Point.
• Cloud: Enable or Disable connection to the Cloud service.
• Restrict Login: Restrict the web interface of Shely with a User-
name and Password. After typing the details in the elds, press
Restrict Shelly.
• SNTP Server: You can set a custom SNTP Server. Type the URL
address and press Save.
ATTENTION! If you have entered incorrect information (wrong set-
tings, usernames, passwords etc.), you will not be able to connect
to Shelly and you have to reset the Device.
Timer
Тo manage the power supply automatically, you may use:
• Auto OFF: After turning on, the power supply will automatically
shutdown after a predened time (in seconds). A value of 0 will
cancel the automatic shutdown.
• Auto ON: After turning off, the power supply will be automatical-
ly turned on after a predened time (in seconds). A value of 0 will
cancel the automatic power-on.
WARNING! In case the Device has not created its own WiFi net-
work with SSID like shellyvintage-764CF7 check if you have pow-
er connected to Shelly. If you do not see an active WiFi network
with SSID like shellyvintage-764CF7, reset the Device. If the De-
vice has been powered on, you have to power it off and on again 5
consecutive times*. Or if you have a switch/button connected to
the Device, press it 5 consecutive times*. When the light starts to
ash Shelly should return to AP Mode. If not, please repeat or con-
tact our customer support at: [email protected] *Upon each
OFF state, please wait 2-3 seconds.
Weekly Schedule
This function requires an Internet connection. To use Internet,
your Shelly has to be connected to a local WiFi network with an
active internet connection.
Shelly may turn on/off automatically at a predened time, at sun-
rise/ sunset, or at a specied time before or after sunrise/sunset.
Multiple schedules are possible.
Night Mode
With this mode you can set a period of time and level of bright-
ness, in which any turning on will set the brightness to the pre-
dened level. You must select a start & end time, with the bright-
ness level.
Settings
• Power On Default Mode - This sets the default output state
when Shelly is powered.
- ON: Congure Shelly to turn ON, when it has power.
- OFF: Congure Shelly to turn OFF, when it has power.
• Restore Last Mode: Congure Shelly to return to last state it was
in, when it has power.
• Transition Time - Set the time (in miliseconds), for which Shelly
Vintage goes from 0% to 100%. The value can be from 0 to 5000
ms.
• Time Zone and Geo-location - Enable or Disable the automatic
detection of Time Zone and Geo-location.
• Firmware Update - Update the rmware of Shelly, when a new
version is released.
• Factory Reset - Return Shelly to its factory default settings.
• Device Reboot - Reboots the device.
• Device Information - Here you can see the:
- Device ID - Unique ID of Shelly
- Device IP - The IP of Shelly in your Wi-Fi network
Additional Features
Shelly allows control via HTTP from any other device, home au-
tomation controller, mobile app or server. For more information
about the REST control protocol, please visit www.shelly.cloud or
send a request to developers@shelly.cloud.
Warranty Terms
1. The Device’s warranty term is 24 (twenty four) months, begin-
ning since the date of purchase by the End User. The Manufacturer
does is not responsible for extra warranty terms by the Еnd Seller.
2. The Warranty is valid for the territory of EU. The warranty is
applicable in compliance with all relevant laws and users’ rights
protections. The purchaser of the Device is entitled to exercise his/
her rights in accordance with all applicable laws and regulations.
3. Warranty terms are provided by Allterco Robotics EOOD (re-
ferred hereinafter as the Manufacturer), incorporated under the
Bulgarian law, with address of registration 109 Bulgaria Blvd, oor
8, Triaditsa Region, Soa 1404, Bulgaria, registered with the Com-
mercial Register kept by the Bulgarian Ministry of Justice’s Regis-
try Agency under Unied Identity Code (UIC) 202320104.
4. Claims regarding the Conformity of the Device with the terms
of the contract of sale shall be addressed to the Seller, in accor-
dance with its terms of sale.
5. Damages such as death or body injury, deterioration or damag-
es to objects different from the defective product, caused by a de-
fective product, are to be claimed against the Manufacturer using
the contact data of the Manufacturer’s company.
6. The User may contact the Manufacturer at support@shelly.
cloud for operational problems that may be resolved remotely. It
is recommended that the User contact the Manufacturer before
sending it for servicing.
7. The terms of removing defects depends on the commercial
terms of the Seller. The Manufacturer is not responsible for un-
timely servicing of the Device or for faulty repairs carried out by
unauthorized service.
8. When exercising their rights under this warranty, the User must
provide the Device with the following documents: receipt and valid
warranty card with date of purchase.
9. After a warranty repair has been carried out, the warranty peri-
od is extended only for that period.
10. The warranty does NOT cover any damages to the Device which
occur in the following circumstances:
• When the Device has been used or wired inappropriately, includ-
ing inappropriate fuses, overpassing maximal values of load and
current, electric shock, short circuit or other problems in the power
supply, the power grid or the radio network.
• When there is a non-compliance between warranty card and/or
without a purchase receipt, or attempted forgery of these docu-
ments, including (but not limited to) the warranty card or the docu-
ments proving the purchase.
• When there has been a self-repair attempt, (de)installation, modi-
cation, or adaptation of the Device by unauthorized persons.
• Intentional or negligent improper handling, storing or transporta-
tion of the Device, or in the event of non-observance of the instruc-
tions included in this warranty.
• When a non-standard power supply, network, or faulty Devices
have been used.
• When damages occur which were caused regardless of the Man-
ufacturer, including but not limited to: oods, storms, re, lightning,
natural disasters, earthquakes, war, civil wars, other force majeure,
unforeseen accidents, robbery, water damage, any damages made
by ingress of liquids, weather conditions, solar heating, any dam-
ages made by intrusion of sand, humidity, high or low temperature,
or air pollution.
• When there are other reasons beyond manufacturing defect, in-
cluding but not limited to: water damage, ingress of liquid into the
Device, weather conditions, solar overheating, intrusion of sand,
humidity, low or high temperature, air pollution.[u1]
• When there have been mechanical damages (forced opening,
breaking, cracks, scratches or deformations) caused by a hit, fall,
or from another object, wrong use, or caused by not following the
instructions for use.
• When damage has been caused by exposing the Device to se-
vere outdoor conditions such as: high humidity, dust, too low or
too high temperature. Terms of proper storage are specied in the
User Manual.
• When damage has been caused by lack of maintenance by the
User, as specied in the User manual.
• When damage has been caused by faulty accessories, or those
not recommended by the Manufacturer.
• When damage has been caused by the use of non-original spare
parts or accessories not suitable for the specied Device model,
or after repairs and changes carried out by an unauthorized service
or person.
Environmental Protection
This marking on the device, accessories, or documentation
indicates that the device and its electronic accessories
(charger, USB cable) must be disposed only in specially des-
ignated locations.
This marking on the battery, the instruction manual, the
safety instructions, the warranty card or the packaging in-
dicates that the battery in the device must be disposed only in
specially designated locations.
Please follow the instructions for environmental protection and
proper disposal of the Device, its accessories, and its packaging
for the recycling of the materials for their further usage and to
keep the environment clean!
You can nd the latest version of the Shelly Vintage user guide on
this address: https://shelly.cloud/support/user-manuals/
Or by scanning this QR code:
Manufacturer: Allterco Robotics EOOD
Address: Soa, 1407, 103 Cherni vrah blvd.
Tel.: +359 2 988 7435
E-mail: support@shelly.cloud
http://www.Shelly.cloud
The Declaration of Conformity is available at:
https://shelly.cloud/declaration-of-conformity/
Changes in the contact data are published by the Manufacturer at
the ocial website of the Device:
http://www.shelly.cloud
The User is obliged to stay informed for any amendments of these
warranty terms before exercising his/her rights against the Man-
ufacturer. All rights to trademarks Shelly®, and other intellectual
rights associated with this Device belong to Allterco Robotics
EOOD.

Chat with your Shelly Vintage A60 manual using AI

Get instant AI answers from your Shelly Vintage A60 manual

Ask anything about the Shelly Vintage A60. Answers come from this manual, with the pages they are based on.

Ask a Question

0/1000

Do you recommend Vintage A60?

Yes No

Frequently Asked Questions

A

Turn off the power supply to the light socket. Screw the bulb in carefully until secure. Turn the power back on and follow the app instructions to connect it to your WiFi network.

Is this answer helpful?

A

Yes, the Shelly Vintage works with external switches. However, for full smart functionality like scheduling, keep the switch in the ON position so the device remains powered.

Is this answer helpful?

A

It works locally within your WiFi network for basic control even if the internet is down. Remote access outside your home requires an active internet connection.

Is this answer helpful?

A

You can perform a factory reset by pressing the connected switch five times consecutively or cycling the power five times. This restores default settings allowing reconnection.

Is this answer helpful?

A

No, do not use traditional dimmer switches. The bulb has built-in dimming capabilities controlled via the app or web interface. Using external dimmers may damage the unit.

Is this answer helpful?

M: QW-35-FL

Advantages and Disadvantages

Advantages

  • Seamless integration with existing WiFi networks and home automation systems
  • Energy efficient 7W LED providing 750 lumens of warm light
  • Long lifespan of 15,000 hours reduces replacement frequency
  • Flexible control options including mobile app, web interface, and HTTP API
VS

Disadvantages

  • Fragile glass construction requires careful handling during installation
  • Requires stable WiFi signal for optimal remote performance
  • Limited to indoor use due to IP20 protection class
  • Initial setup may require technical knowledge for advanced configurations
M: QW-35-FL

Product Specification

Energy efficiency class old

A++ (A++ to E)

Rated power

7W

Energy consumption

7kWh/1000h

Base

E27

Rated voltage

110-230V

Luminous flux

750lm

Luminous efficacy (Lumen/Watt)

107.1

Energy efficiency index

0.12

Color temperature

Warm white (2700K)

Color rendering

Ra80

Shape

Pear

Finish

Clear

Outer bulb

A60

Lifetime

15000h

Diameter

2.36in

Length

4.53in

Features

Dimmable (only via app), Filament LED, programmable lighting settings

Smart home

App control (Wi-Fi), Voice assistant (Amazon Alexa, Google Assistant)

Note

For full functionality, a manufacturer gateway may be required. This may also change via firmware update. Please note the manufacturer-specific details!

M: QW-35-FL

Product Description

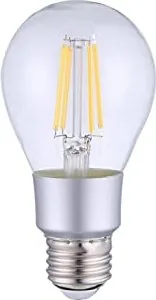
Shelly Vintage A60 Smart LED: The Future of Home Lighting

Transform your living space with the Shelly Vintage A60 Smart LED 7W/827 E27, a perfect blend of retro aesthetics and modern intelligence. This smart bulb is designed to fit seamlessly into standard E27 sockets while offering you complete control over your lighting environment from anywhere in the world. Whether you are at home or traveling, you can adjust brightness, color temperature, and scheduling through your smartphone or tablet using the intuitive Shelly Cloud application.

The Shelly Vintage series stands out for its ability to function as a standalone device or integrate effortlessly into complex home automation systems. Powered by robust WiFi technology, it connects to your local network or operates via remote access through the internet. The integrated web server allows for advanced configuration without needing any additional hardware hubs. You can set timers, create weekly schedules based on sunrise and sunset, and utilize Night Mode to automatically dim lights during specific hours.

Safety and reliability are paramount. The device complies with all major EU standards including RED, LVD, EMC, and RoHS. With a lifespan of 15,000 hours and an energy-efficient 7-watt rating equivalent to a traditional 60-watt incandescent bulb, it offers significant savings. The warm 2700K color temperature provides a cozy ambiance suitable for living rooms and bedrooms. Installation is straightforward; simply screw the bulb into place, power it on, and follow the guided setup in the app to connect it to your WiFi network.

Key Features

  • Remote control via mobile apps or web browser
  • Compatible with existing wall switches
  • Flexible scheduling and timer functions
  • Secure connection with optional password protection
  • Easy factory reset options for troubleshooting

Important Notes

Always ensure the power is off before installation to avoid electrocution risks. Handle the glass casing with care as the device is fragile. Keep control devices away from children.

M: QW-35-FL

© Copyright 2026 Manual.ly