Manual.ly Logo

Honeywell Comfort Control HTF1220BE4 Manual

3.0 · 1 Ratings

PDF manual · 19 Pages

English

M: QW-35-FL
page

/ 19

Loading...
fc7ec45bdae0d8de84b4059b445cfca1873a page 3
4 5
ENGLISHENGLISH
IMPORTANT SAFETY INSTRUCTIONS
Read through all the instructions before
starting to use the appliance. Keep this
manual in a safe place for future reference.
These instructions are also available on our
website. Please visit www.hot-europe.com.
• This appliance must only be operated
as instructed in this user manual.
• This appliance can be used by children
aged from 8 years and above and
persons with reduced physical, sensory
or mental capabilities or lack of
experience and knowledge if they have
been given supervision or instruction
concerning use of the appliance in a
safe way and understand the hazards
involved. Children shall not play with
the appliance. Cleaning and user
maintenance shall not be made by
children without supervision.
• Do not touch the rotating fan blades
with any part of the body. This can
cause personal injury and damage.
• Clean the appliance regularly by
following the “Cleaning” section.
• This appliance is only designed for
indoor use.
• Always switch the appliance off when
not in use, during cleaning or transport.
• If the supply cord is damaged, it must
be replaced by the manufacturer, its
service agent or similarly qualified
persons in order to avoid a hazard.
• Do not use this appliance if it is
damaged or shows any signs of possible
damage, or if it is not functioning
properly. Disconnect the power plug
from the power socket.
COMPONENTS (See page 3)
1. Front Grille
2. Blade
3. Plastic Nut
4. Rear Grille
5. Motor Shaft
6. Oscillation Knob
7. Fan Body
8. Blade Nut
9. Speed Control Buttons
10. Base
11. Grille Locking Ring
12. Fan Head Assembly
13. Prongs
ASSEMBLY INSTRUCTIONS (See page 3)
Base Assembly
1. Insert the Fan Body assembly into the base until it
clicks into place (Fig. 1).
Assembly of Blade and Grilles
1. Unscrew the blade nut clockwise and the plastic nut
counterclockwise and set aside (Fig. 2).
2. After removing the blade’s disposable shipping
retainer clip on the rear grille, position the grille
onto the fan head assembly making sure the three
alignment holes are aligned with the three prongs.
3. Screw on plastic nut tightly clockwise to attach rear
grille (Fig. 3).
4. Install the blade onto the shaft until the motor shaft
pin is seated in the blade.
5. Screw blade nut to the motor shaft counterclockwise
(tighten by turning to the left) (Fig. 4).
6. Place grille locking ring around rear grille and then
press front grille into locking ring. Tighten tension
screw with screw driver (Fig. 5).
OPERATING INSTRUCTIONS
• Place your fan on a level and dry surface.
• Plug the power cord into a polarized 220 Volt AC wall
outlet. Please make sure the speed control is in the
off position.
Speed Control
Speed is controlled by pressing the Control Pad button to
the desired setting:
= Off; = Low; = Medium; = High
Oscillation Control
To make the fan oscillate, push down on the oscillation
knob located on the top of the motor housing. To stop the
fan from oscillating, pull up on the oscillation knob when
the fan is in the desired position.
Tilt Control
The airflow can be adjusted upward or downward by
tilting the fan head as desired. To change the tilting angle
of the fan head assembly, simply move the fan head to
the desired angle.
CLEANING, STORAGE AND DISPOSAL
Cleaning
• Switch the appliance off and remove the power plug
from the socket.
• Clean the outer surfaces of the appliance with a soft,
damp cloth. Do not use petroleum, thinners or any
other chemicals. Use your vacuum cleaner with the
brush attachment to clean the grids.
• Do not plunge the appliance into water or any other
liquids and do not pour water or any other liquids over
the appliance.
Storage
• If you do not wish to use the appliance for a longer
period, clean it as described above.
• Store the appliance in a cool, dry location. Cover it up
to protect it from dust.
DISPOSAL
This appliance complies with EU legislation
2012/19/EU on end of life recycling. Products
showing the ‘Crossed Through’ wheeled bin
symbol on either the rating label, gift box or
instructions must be recycled separately from
household waste at the end of their useful life.
Please DO NOT dispose of appliance in normal
household waste. Your local appliance retailer may
operate a ‘take-back’ scheme when you are ready to
purchase a replacement product, alternatively contact
your local government authority for further help and
advice on where to take your appliance for recycling.
GUARANTEE
Please read all instructions before attempting to use this
device. Please retain the receipt as proof of and date of
purchase. The receipt must be presented when making
any claim within the relevant guarantee period. Any claim
under the guarantee will not be valid without a proof of
purchase.
Your device is guaranteed for three Years (3 Years) from
date of purchase.
This guarantee covers defects in materials or
workmanship that occur under normal use; defective
devices meeting these criteria will be replaced free of
charge.
The guarantee DOES NOT cover defects or damage
resulting from abuse or failure to follow the user
instructions. The guarantee becomes void if the device
is opened, tampered with or used with other parts or
accessories, or if repairs are undertaken by unauthorised
persons.
Accessories and consumables are excluded from any
warranty.
For support requests, please visit
www.hot-europe.com/support or find service contact
information at the end of this owner’s manual.
This Guarantee is applicable to Europe, Russia, Middle
East and Africa only.
UK Only: This does not affect your consumer statutory
rights.

Chat with your Honeywell Comfort Control HTF1220BE4 manual using AI

Get instant AI answers from your Honeywell Comfort Control HTF1220BE4 manual

Ask anything about the Honeywell Comfort Control HTF1220BE4. Answers come from this manual, with the pages they are based on.

Comfort Control HTF1220BE4 Maintenance Schedule

Regularly
Clean the outer surfaces and grilles

Switch off and unplug. Wipe outer surfaces with a soft damp cloth. Use a vacuum cleaner with brush attachment to clean the grids.

Before storage
Clean before long-term storage

If not using for a longer period, clean the appliance as described in the cleaning section before storing it in a cool, dry place.

M: qwen/qwen3.8-flash

Ask a Question

0/1000

Do you recommend Comfort Control HTF1220BE4?

Yes No
0
User Pic

Toby Walker

6 months ago

Is this fan loud on the lowest setting, and does it really cool well?

0
User Pic

Manual.ly

6 months ago

Thank you for your feedback. While our fans are designed to move significant air volume, we understand that noise levels can vary by unit and personal sensitivity. The cooling performance is effective as described in the specifications. We recommend checking if the fan is placed on a stable surface or if there is any obstruction causing vibration noise. If the issue persists, please contact us directly so we can assist with a replacement or further troubleshooting.

M: QW-35-FL
M: QW-35-FL
0
User Pic

Sarah Klein

4 months ago

Does anyone else find this fan too noisy even on the first speed?

M: QW-35-FL

Frequently Asked Questions

A

Insert the fan body into the base until it clicks. Remove the shipping clip, attach the rear grille, install the blade onto the shaft, secure the blade nut, and finally attach the front grille locking ring.

Is this answer helpful?

A

No, the Honeywell HTF1220BE is designed strictly for indoor use. Using it outside may damage the motor or electrical components due to moisture and dust.

Is this answer helpful?

A

This model operates on a polarized 220 to 240 Volt AC wall outlet at 50Hz. Ensure your power source matches these specifications before plugging it in.

Is this answer helpful?

A

Clean the grilles regularly using a vacuum cleaner with a brush attachment to remove dust buildup. Wipe the outer surfaces with a damp cloth as needed.

Is this answer helpful?

A

No, the Honeywell HTF1220BE does not include a built-in timer function. You must manually turn it off when you are done using it.

Is this answer helpful?

A

Yes, the device comes with a three-year guarantee from the date of purchase covering defects in materials and workmanship under normal use.

Is this answer helpful?

M: QW-35-FL

Advantages and Disadvantages

Advantages

  • Easy-to-use speed control with four distinct settings
  • Oscillation feature distributes air effectively across the room
  • Compact design suitable for desks and small tables
  • Tilt control allows precise airflow direction adjustment
  • Quiet operation ideal for office and bedroom environments
VS

Disadvantages

  • Plastic construction may feel less premium than metal models
  • No remote control included for operation
  • Limited to indoor use only
  • Cord length may be short for some setups
  • Base could be heavier for better stability on wobbly surfaces
M: QW-35-FL

Product Specification

Operation Mode

Mains operation (25W)

Color

black

Speed Settings

3

Swivel Range

90 degrees horizontal oscillating

Tilt Angle

30 degrees adjustable

Airflow Rate

62.88 cu ft/h

Noise Level

48 dB(A)

Dimensions

15.75x14.57x8.27 inches (WxHxD)

M: QW-35-FL

Product Description

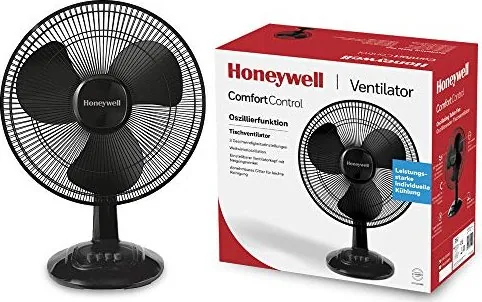
Cool Your Space with the Honeywell HTF1220BE Comfort Control Desk Fan

Staying comfortable during warm days is essential for productivity and relaxation. The Honeywell HTF1220BE Comfort Control Desk Fan offers a reliable solution for personal cooling in offices, bedrooms, or study areas. This sleek desk fan combines efficient airflow with user-friendly controls to create a pleasant environment without the noise of larger units.

The design focuses on functionality and ease of use. It features a compact footprint that fits easily on any desk or table surface. The unit includes a speed control pad allowing you to select between off, low, medium, and high settings instantly. Whether you need a gentle breeze or a strong gust of air, the controls provide precise management over your comfort level.

One of the standout features is the oscillation capability. By pushing down on the knob located on top of the motor housing, the fan head rotates automatically to distribute cool air across a wider area. If you prefer a fixed direction, simply pull the knob up to lock the head in place. Additionally, the tilt control allows you to adjust the angle of the fan head manually, directing airflow exactly where it is needed most.

Maintenance is straightforward. The outer surfaces can be wiped clean with a soft, damp cloth, while the grilles can be vacuumed using a brush attachment. Always ensure the unit is unplugged before cleaning. The fan is designed for indoor use only and should be stored in a dry, cool location when not in use for extended periods.

Important Notes

  • Always read safety instructions before first use.
  • Do not immerse the fan in water or liquids.
  • Keep the power cord away from heat sources.
  • The product carries a three-year guarantee covering material defects.
  • Dispose of the unit according to local recycling regulations.
M: QW-35-FL

© Copyright 2026 Manual.ly