Per dimmer it is only allowed to use max. 2 inductive (wound)
transformers of the same type, furthermore no-load operation
on the secondary part is not permitted. The dimmer might be de-
stroyed. Therefore do not permit load breaking on the seconda-
ry part. Operation in parallel of inductive (wound) and capacative
(electronic) transformers is not permitted!
3)
When calculating the load a loss of 20 % for inductive (wound)
transformers and a loss of 5 % for capacitive (electronic)
transformers must be considered in addition to the lamp load.
4)
Affects the max. switching capacity.
5)
Usually applies for dimmable energy saving lamps and dimmab-
le 230 V LED lamps. Due to differences in the lamps electronics,
there may be limited dimming range, switch on and off problems
dependent on the manufacturer and a restriction on the maxi-
mum number of lamps; especially if the connected load is very
low (for 5 W-LEDs).
Teaching-in wireless sensors in wirel-
ess actuators
All sensors must be taught-in in the
actuators so that they can detect and
execute commands.
Theteach-inmemoryisemptyondelivery
from the factory. To ensure that a device
was not previously taught-in, clear the
memorycompletely:
Press the left button LRN/CLR for
approximately 3 seconds, the LED ashes
exitedly. Press the right button ON/OFF
approximately 5 seconds, the LED goes
out. All taught-in sensors are cleared,
the repeater and the conrmation tele-
grams are switched off.
Clearindividualtaught-insensors:
Press the left button LRN/CLR for
approximately 3 seconds, the LED ashes
exitedly. Press the sensor which is to be
cleared, the LED goes out.
If all the functions of an encrypted sensor
are cleared, teach-in must be repeated as
describedunderTeach-inencrypted
sensors.
Teaching-insensors:
Teach-in universal pushbutton and PC
with Eltako Wireless Building Visuali-
sation and Control Software GFVS:
Press and hold the left button LRN/CLR
for approx. 0.5 seconds and then
release. The LED lights up. Press the
right button ON/OFF briey once.
The LED ashes once as conrmation.
Operate the sensor to be cleared.
The red LED goes out.
Teachindirectionpushbutton:
Press and hold the left button LRN/CLR
for approx. 0.5 seconds and then
release. The LED lights up. Press the
right button ON/OFF briey twice. The
LED ashes twice as conrmation. Operate
the sensor to be cleared. The red LED
goes out.
When you press a pushbutton, a rocker
is fully taught-in automatically. The side
where the pushbutton is rst pressed is
dened as switch-on and the other side
is then the switch-off side.
Teachincentralcontrolpushbutton'ON':
Press and hold the left button LRN/CLR
for approx. 0.5 seconds and then
release. The LED lights up. Press the
right button ON/OFF briey three times.
The LED ashes three times as conr-
mation. Operate the sensor to be clea-
red. The red LED goes out.
Teach in central control pushbutton 'OFF':
Press and hold the left button LRN/CLR
for approx. 0.5 seconds and then
release. The LED lights up. Press the
right button ON/OFF briey four times.
The LED ashes four times as conrmation.
Operate the sensor to be cleared. The
red LED goes out.
Exitthelearnandclearmodeimmediately
by briey pressing the LRN/CLR button.
The routine exits the learn and clear
mode automatically after 60 seconds.
!
Temperature at mounting location:
0°C up to +35°C.
Storage temperature: -25°C up to +70°C.
Relative humidity:
annual average value <75%.
valid for devices from production week
11/14 (see bottom side of housing)
Topreventunintentionalteach-in,teach
inpushbuttonsby„double-clicking“
(pressing rapidly twice in succession).
1.Briey press the left button LRN/CLR
button 2 times, the LED blinks 2 times
forconrmation.
2.Select the desired teaching-in function
with the right button.
3.Press the taught-in button with 'double
click'. The LED goes out.
Unencrypted and encrypted sensors can
be taught-in.
Teachinencryptedsensors:
1.Press the left button LRN/CLR for
approximately 0.5 seconds and then
release, the LED lights up.
2.Briey press the right button ON/OFF
5 times, the LED ashes very excitedly.
3.Enable encryption of the sensor within
120 seconds. The LED goes out.
Attention! The power supply should not
be turned off.
4.Now teach-in the encrypted sensor as
described among teaching-in sensors.
If further encrypted sensors should be
taught-in, go back to point 1.
With encrypted sensors, use the 'rolling
code', i.e. the code changes in each tele-
gram, both in the transmitter and in the
receiver.
If a sensor sends more than 50 tele-
grams when the actuator is not enabled,
the sensor is no longer recognised by the
enabled actuator and you must repeat
teach-in as 'encrypted sensor'. It is not
necessary to repeat the function teach-
in.
Save minimum brightness (fully dimmed):
Switch on light with a wireless pushbutton.
Mutually hold the left button LRN/CLR and
the right button ON/OFF for 2 seconds, set
the desired minimum brightness with the
wireless pushbutton and then release both
buttons. The LED lights up briey for conr-
mation.
PC with Eltako Wireless Building Visuali-
sation and Control Software GFVS:
The percentage brightness can be adjusted
at the PC between 0 and
100 percent and then be retrieved.
Switch memory on/off:
Hold the left button LRN/CLR and insert the
FSUD-230V into the socket.
The memory function will be switched on or
off. For status indication the LED ashes for
2 seconds = memory off or 0.5 seconds =
memory on (as-delivered state).
Switch on/off repeater:
Press and hold the right button ON/OFF and
plug the FSUD-230V into the socket. Switch
repeater on or off. The LED lights up for 2
seconds to indicate the status = repeater
off (as-delivered state) or for
5 seconds = repeater on.
Switch on/off conrmation telegrams:
Press and hold down the left button LRN/
CLR and the right button ON/OFF together
and plug the FSUD-230V in the socket.
Conrmation telegrams are switched on
and off. The LED lights up for 0.5 seconds =
conrmation telegrams OFF (as-delivered
state) or for
2 seconds = conrmation telegrams ON to
indicate the status.
Conrmationtelegrams:
The FSUD-230V transmits a feedback into
the Eltako wireless network with its own ID.
After switching on 0x70 and the dimming
value in % will be sent. After switching off
0x50 and the dimming value in % will be
sent. After dimming the dimming value in %
will be sent.
Teach in conrmation telegrams in other
actuators on in the Wireless Building
Visualisation and Control Software GFVS:
Press the right button ON/OFF to change
the switch position and send the con rmation
telegram at the same time.
May only be used in closed dry
rooms. The socket must be easily
accessible. Don’t insert in a row.
GB
Frequency 868.3 MHz
Transmit power max. 10 mW
Hereby, Eltako GmbH declares that the radio
equipment type FSUD-230 V is in com-
pliance with Directive 2014/53/EU.
The full text of the EU declaration of
conformity is available at the following
internet address: eltako.com
WEEE registration number DE 30298319
Must be kept for later use!
Eltako GmbH
D-70736 Fellbach
Technical Support English:
+49 711 94350025
technical-support@eltako.de
eltako.com
03/2021 Subject to change without notice.
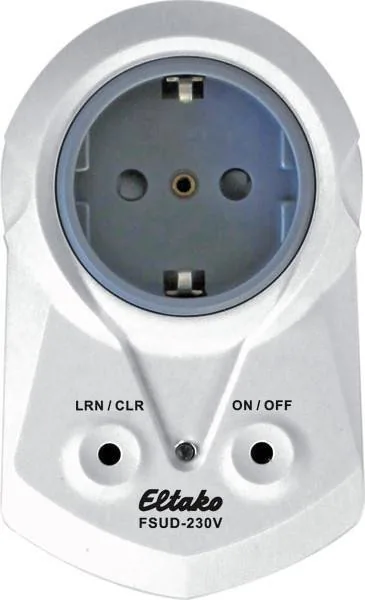
Wireless actuator
Socket universal dimmer switch
FSUD-230V
30 100 002 -2
Universal dimmer switch, 300 W power
MOSFET. Automatic lamp detection. Only 0.7
watt standby loss. With adjustable minimum
brightness.
With switching operation for children‘s
rooms and snooze function.
Encrypted wireless, bidirectional wireless
and repeater function are switchable.
Adapter for German fused safety socket.
With increased shock protection.
Supply and switching voltage 230 V.
Universal dimmer switch for lamps up to
300W. Dimmable energy saving lamps ESL
and dimmable 230 V-LEDlamps,dependent
on the lamps electronics.
Zero passage switching with soft ON and
soft OFF to protect lamps.
No minimum load.
This dimmer switch is activated by wireless
pushbuttonsFTandFFT,handheldwireless
transmitters FHS and FMH, and remote
controls FF8 and UFB.
The set brightness level is stored when
switched off (memory), but can be switched
off for ESL lamps.
In case of a power failure the switch
position and the brightness stage are
stored and may be switched on when the
power supply is restored.
Automatic electronic overload protection
and overtemperature switch-off.
Starting in production week 11/14, you can
teachinencryptedsensors.Bidirectional
wirelessand/or a repeaterfunction can be
switched on.
Every change in state and incoming central
command telegrams are then conrmed by
a wireless telegram.This wireless telegram
can be taught into other actuators, the soft-
ware GFVS, and universal displays FUA55.
The current dimming value is also displayed
in % in the software GFVS.
Up to 35 wireless pushbuttons are assigned
with the left button LRN, either as a univer-
sal pushbutton, direction push button or
central pushbutton.
It can be switched on and off manually with
the right button.
The pushbuttons can be either taught-in
as direction pushbuttons or universal
pushbuttons:
As direction button 'switch on and dim up'
is on one side and 'switch off and dim down'
on the other side. A double-click on the
switch on side triggers the automatic dimming
up to full brightness.
A double-click on the switch off side
triggers the snooze function. The children‘s
room function is triggered on the switch on
side. As a universal pushbutton the direction
change is made by briey releasing the
pushbutton.
Central control pushbutton on:
Switching on with memory value when active.
Central control pushbutton off:
Switching off.
Switching operation for children‘s rooms
(universal switch or direction switch on the
switch-on side): If the light is switched on
by holding down the pushbutton, it starts at
the lowest brightness level after approx. 1
second and dims up slowly as long as the
pushbutton is held down. The last saved
brightness level is not modied.
Snooze function (universal switch or
direction switch on the switch-off side):
With a double impulse the lighting is dimmed
down from the current dimming position to
the minimum brightness level and switched
off. The current dimming position as well as
the adjustable minimum brightness level
determine the dimming time (max. = 60
minutes) which can be reduced as required.
It can be switched off at any time by short-
time control commands during the lighting
is dimmed down.
The LED performs during the teach-in pro-
cess according to the operation manual. It
shows wireless control commands by short
ickeringduringoperation.
Technical data
Incandescent and halogen lamps
1)
up to 300 W 230V (R)
Inductiveup to 300 W
2)3
transformers (L)
)
Electronicup to 300 W
2)3
transformers (C)
)
Electronicup to 300 W
5)
transformers (C)
Dimmable 230 V LEDs up to 300 W
5)
Ambienttemperaturerange0-35°C
4)
Standby loss (activ power) 0,7W
1)
Applies to lamps of max. 150 W.
2)
Per dimmer it is only allowed to use max. 2 inductive (wound)
transformers of the same type, furthermore no-load operation
on the secondary part is not permitted. The dimmer might be de-
stroyed. Therefore do not permit load breaking on the seconda-
ry part. Operation in parallel of inductive (wound) and capacative
(electronic) transformers is not permitted!
3)
When calculating the load a loss of 20 % for inductive (wound)
transformers and a loss of 5 % for capacitive (electronic)
transformers must be considered in addition to the lamp load.
4)
Affects the max. switching capacity.
5)
Usually applies for dimmable energy saving lamps and dimmab-
le 230 V LED lamps. Due to differences in the lamps electronics,
there may be limited dimming range, switch on and off problems
dependent on the manufacturer and a restriction on the maxi-
mum number of lamps; especially if the connected load is very
low (for 5 W-LEDs).
Teaching-in wireless sensors in wirel-
ess actuators
All sensors must be taught-in in the
actuators so that they can detect and
execute commands.
Theteach-inmemoryisemptyondelivery
from the factory. To ensure that a device
was not previously taught-in, clear the
memorycompletely:
Press the left button LRN/CLR for
approximately 3 seconds, the LED ashes
exitedly. Press the right button ON/OFF
approximately 5 seconds, the LED goes
out. All taught-in sensors are cleared,
the repeater and the conrmation tele-
grams are switched off.
Clearindividualtaught-insensors:
Press the left button LRN/CLR for
approximately 3 seconds, the LED ashes
exitedly. Press the sensor which is to be
cleared, the LED goes out.
If all the functions of an encrypted sensor
are cleared, teach-in must be repeated as
describedunderTeach-inencrypted
sensors.
Teaching-insensors:
Teach-in universal pushbutton and PC
with Eltako Wireless Building Visuali-
sation and Control Software GFVS:
Press and hold the left button LRN/CLR
for approx. 0.5 seconds and then
release. The LED lights up. Press the
right button ON/OFF briey once.
The LED ashes once as conrmation.
Operate the sensor to be cleared.
The red LED goes out.
Teachindirectionpushbutton:
Press and hold the left button LRN/CLR
for approx. 0.5 seconds and then
release. The LED lights up. Press the
right button ON/OFF briey twice. The
LED ashes twice as conrmation. Operate
the sensor to be cleared. The red LED
goes out.
When you press a pushbutton, a rocker
is fully taught-in automatically. The side
where the pushbutton is rst pressed is
dened as switch-on and the other side
is then the switch-off side.
Teachincentralcontrolpushbutton'ON':
Press and hold the left button LRN/CLR
for approx. 0.5 seconds and then
release. The LED lights up. Press the
right button ON/OFF briey three times.
The LED ashes three times as conr-
mation. Operate the sensor to be clea-
red. The red LED goes out.
Teach in central control pushbutton 'OFF':
Press and hold the left button LRN/CLR
for approx. 0.5 seconds and then
release. The LED lights up. Press the
right button ON/OFF briey four times.
The LED ashes four times as conrmation.
Operate the sensor to be cleared. The
red LED goes out.
Exitthelearnandclearmodeimmediately
by briey pressing the LRN/CLR button.
The routine exits the learn and clear
mode automatically after 60 seconds.
!
Temperature at mounting location:
0°C up to +35°C.
Storage temperature: -25°C up to +70°C.
Relative humidity:
annual average value <75%.
valid for devices from production week
11/14 (see bottom side of housing)
Topreventunintentionalteach-in,teach
inpushbuttonsby„double-clicking“
(pressing rapidly twice in succession).
1.Briey press the left button LRN/CLR
button 2 times, the LED blinks 2 times
forconrmation.
2.Select the desired teaching-in function
with the right button.
3.Press the taught-in button with 'double
click'. The LED goes out.
Unencrypted and encrypted sensors can
be taught-in.
Teachinencryptedsensors:
1.Press the left button LRN/CLR for
approximately 0.5 seconds and then
release, the LED lights up.
2.Briey press the right button ON/OFF
5 times, the LED ashes very excitedly.
3.Enable encryption of the sensor within
120 seconds. The LED goes out.
Attention! The power supply should not
be turned off.
4.Now teach-in the encrypted sensor as
described among teaching-in sensors.
If further encrypted sensors should be
taught-in, go back to point 1.
With encrypted sensors, use the 'rolling
code', i.e. the code changes in each tele-
gram, both in the transmitter and in the
receiver.
If a sensor sends more than 50 tele-
grams when the actuator is not enabled,
the sensor is no longer recognised by the
enabled actuator and you must repeat
teach-in as 'encrypted sensor'. It is not
necessary to repeat the function teach-
in.
Save minimum brightness (fully dimmed):
Switch on light with a wireless pushbutton.
Mutually hold the left button LRN/CLR and
the right button ON/OFF for 2 seconds, set
the desired minimum brightness with the
wireless pushbutton and then release both
buttons. The LED lights up briey for conr-
mation.
PC with Eltako Wireless Building Visuali-
sation and Control Software GFVS:
The percentage brightness can be adjusted
at the PC between 0 and
100 percent and then be retrieved.
Switch memory on/off:
Hold the left button LRN/CLR and insert the
FSUD-230V into the socket.
The memory function will be switched on or
off. For status indication the LED ashes for
2 seconds = memory off or 0.5 seconds =
memory on (as-delivered state).
Switch on/off repeater:
Press and hold the right button ON/OFF and
plug the FSUD-230V into the socket. Switch
repeater on or off. The LED lights up for 2
seconds to indicate the status = repeater
off (as-delivered state) or for
5 seconds = repeater on.
Switch on/off conrmation telegrams:
Press and hold down the left button LRN/
CLR and the right button ON/OFF together
and plug the FSUD-230V in the socket.
Conrmation telegrams are switched on
and off. The LED lights up for 0.5 seconds =
conrmation telegrams OFF (as-delivered
state) or for
2 seconds = conrmation telegrams ON to
indicate the status.
Conrmationtelegrams:
The FSUD-230V transmits a feedback into
the Eltako wireless network with its own ID.
After switching on 0x70 and the dimming
value in % will be sent. After switching off
0x50 and the dimming value in % will be
sent. After dimming the dimming value in %
will be sent.
Teach in conrmation telegrams in other
actuators on in the Wireless Building
Visualisation and Control Software GFVS:
Press the right button ON/OFF to change
the switch position and send the con rmation
telegram at the same time.
May only be used in closed dry
rooms. The socket must be easily
accessible. Don’t insert in a row.
GB
Frequency 868.3 MHz
Transmit power max. 10 mW
Hereby, Eltako GmbH declares that the radio
equipment type FSUD-230 V is in com-
pliance with Directive 2014/53/EU.
The full text of the EU declaration of
conformity is available at the following
internet address: eltako.com
WEEE registration number DE 30298319
Must be kept for later use!
Eltako GmbH
D-70736 Fellbach
Technical Support English:
+49 711 94350025
technical-support@eltako.de
eltako.com
03/2021 Subject to change without notice.
Wireless actuator
Socket universal dimmer switch
FSUD-230V
30 100 002 -2
Universal dimmer switch, 300 W power
MOSFET. Automatic lamp detection. Only 0.7
watt standby loss. With adjustable minimum
brightness.
With switching operation for children‘s
rooms and snooze function.
Encrypted wireless, bidirectional wireless
and repeater function are switchable.
Adapter for German fused safety socket.
With increased shock protection.
Supply and switching voltage 230 V.
Universal dimmer switch for lamps up to
300W. Dimmable energy saving lamps ESL
and dimmable 230 V-LEDlamps,dependent
on the lamps electronics.
Zero passage switching with soft ON and
soft OFF to protect lamps.
No minimum load.
This dimmer switch is activated by wireless
pushbuttonsFTandFFT,handheldwireless
transmitters FHS and FMH, and remote
controls FF8 and UFB.
The set brightness level is stored when
switched off (memory), but can be switched
off for ESL lamps.
In case of a power failure the switch
position and the brightness stage are
stored and may be switched on when the
power supply is restored.
Automatic electronic overload protection
and overtemperature switch-off.
Starting in production week 11/14, you can
teachinencryptedsensors.Bidirectional
wirelessand/or a repeaterfunction can be
switched on.
Every change in state and incoming central
command telegrams are then conrmed by
a wireless telegram.This wireless telegram
can be taught into other actuators, the soft-
ware GFVS, and universal displays FUA55.
The current dimming value is also displayed
in % in the software GFVS.
Up to 35 wireless pushbuttons are assigned
with the left button LRN,either as a univer-
sal pushbutton, direction pushbutton or
centralpushbutton.
It can be switched on and off manually with
the right button.
The pushbuttons can be either taught-in
asdirectionpushbuttonsoruniversal
pushbuttons:
Asdirectionbutton'switch on and dim up'
is on one side and 'switch off and dim down'
on the other side. A double-click on the
switch on side triggers the automatic dimming
up to full brightness.
A double-click on the switch off side
triggers the snooze function. The children‘s
room function is triggered on the switch on
side.As a universal pushbuttonthe direction
change is made by briey releasing the
pushbutton.
Centralcontrolpushbuttonon:
Switching on with memory value when active.
Centralcontrolpushbuttonoff:
Switching off.
Switching operation for children‘s rooms
(universal switch or direction switch on the
switch-on side): If the light is switched on
by holding down the pushbutton, it starts at
the lowest brightness level after approx. 1
second and dims up slowly as long as the
pushbutton is held down. The last saved
brightness level is not modied.
Snoozefunction(universal switch or
direction switch on the switch-off side):
With a double impulse the lighting is dimmed
down from the current dimming position to
the minimum brightness level and switched
off. The current dimming position as well as
the adjustable minimum brightness level
determine the dimming time (max. = 60
minutes) which can be reduced as required.
It can be switched off at any time by short-
time control commands during the lighting
is dimmed down.
The LED performs during the teach-in pro-
cess according to the operation manual. It
shows wireless control commands by short
ickering during operation.
Technical data
Incandescent and halogen lamps
1)
up to 300 W 230 V (R)
Inductiveup to 300 W
2)3
transformers (L)
)
Electronic up to 300 W
2)3
transformers (C)
)
Electronicup to 300 W
5)
transformers (C)
Dimmable 230 V LEDs up to 300 W
5)
Ambient temperature range0-35°C
4)
Standby loss (activ power) 0,7 W
1)
Applies to lamps of max. 150 W.
2)
Per dimmer it is only allowed to use max. 2 inductive (wound)
transformers of the same type, furthermore no-load operation
on the secondary part is not permitted. The dimmer might be de-
stroyed. Therefore do not permit load breaking on the seconda-
ry part. Operation in parallel of inductive (wound) and capacative
(electronic) transformers is not permitted!
3)
When calculating the load a loss of 20 % for inductive (wound)
transformers and a loss of 5 % for capacitive (electronic)
transformers must be considered in addition to the lamp load.
4)
Affects the max. switching capacity.
5)
Usually applies for dimmable energy saving lamps and dimmab-
le 230 V LED lamps. Due to differences in the lamps electronics,
there may be limited dimming range, switch on and off problems
dependent on the manufacturer and a restriction on the maxi-
mum number of lamps; especially if the connected load is very
low (for 5 W-LEDs).
Teaching-in wireless sensors in wirel-
ess actuators
All sensors must be taught-in in the
actuators so that they can detect and
execute commands.
The teach-in memory is empty on delivery
from the factory. To ensure that a device
was not previously taught-in, clear the
memory completely:
Press the left button LRN/CLR for
approximately 3 seconds, the LED ashes
exitedly. Press the right button ON/OFF
approximately 5 seconds, the LED goes
out. All taught-in sensors are cleared,
the repeater and the conrmation tele-
grams are switched off.
Clear individual taught-in sensors:
Press the left button LRN/CLR for
approximately 3 seconds, the LED ashes
exitedly. Press the sensor which is to be
cleared, the LED goes out.
If all the functions of an encrypted sensor
are cleared, teach-in must be repeated as
describedunderTeach-inencrypted
sensors.
Teaching-insensors:
Teach-in universal pushbutton and PC
with Eltako Wireless Building Visuali-
sation and Control Software GFVS:
Press and hold the left button LRN/CLR
for approx. 0.5 seconds and then
release. The LED lights up. Press the
right button ON/OFF briey once.
The LED ashes once as conrmation.
Operate the sensor to be cleared.
The red LED goes out.
Teachindirectionpushbutton:
Press and hold the left button LRN/CLR
for approx. 0.5 seconds and then
release. The LED lights up. Press the
right button ON/OFF briey twice. The
LED ashes twice as conrmation. Operate
the sensor to be cleared. The red LED
goes out.
When you press a pushbutton, a rocker
is fully taught-in automatically. The side
where the pushbutton is rst pressed is
dened as switch-on and the other side
is then the switch-off side.
Teachincentralcontrolpushbutton'ON':
Press and hold the left button LRN/CLR
for approx. 0.5 seconds and then
release. The LED lights up. Press the
right button ON/OFF briey three times.
The LED ashes three times as conr-
mation. Operate the sensor to be clea-
red. The red LED goes out.
Teach in central control pushbutton 'OFF':
Press and hold the left button LRN/CLR
for approx. 0.5 seconds and then
release. The LED lights up. Press the
right button ON/OFF briey four times.
The LED ashes four times as conrmation.
Operate the sensor to be cleared. The
red LED goes out.
Exitthelearnandclearmodeimmediately
by briey pressing the LRN/CLR button.
The routine exits the learn and clear
mode automatically after 60 seconds.
!
Temperature at mounting location:
0°C up to +35°C.
Storage temperature: -25°C up to +70°C.
Relative humidity:
annual average value <75%.
valid for devices from production week
11/14 (see bottom side of housing)
Topreventunintentionalteach-in,teach
inpushbuttonsby„double-clicking“
(pressing rapidly twice in succession).
1.Briey press the left button LRN/CLR
button 2 times, the LED blinks 2 times
forconrmation.
2.Select the desired teaching-in function
with the right button.
3.Press the taught-in button with 'double
click'. The LED goes out.
Unencrypted and encrypted sensors can
be taught-in.
Teachinencryptedsensors:
1.Press the left button LRN/CLR for
approximately 0.5 seconds and then
release, the LED lights up.
2.Briey press the right button ON/OFF
5 times, the LED ashes very excitedly.
3.Enable encryption of the sensor within
120 seconds. The LED goes out.
Attention! The power supply should not
be turned off.
4.Now teach-in the encrypted sensor as
described among teaching-in sensors.
If further encrypted sensors should be
taught-in, go back to point 1.
With encrypted sensors, use the 'rolling
code', i.e. the code changes in each tele-
gram, both in the transmitter and in the
receiver.
If a sensor sends more than 50 tele-
grams when the actuator is not enabled,
the sensor is no longer recognised by the
enabled actuator and you must repeat
teach-in as 'encrypted sensor'. It is not
necessary to repeat the function teach-
in.
Save minimum brightness (fully dimmed):
Switch on light with a wireless pushbutton.
Mutually hold the left button LRN/CLR and
the right button ON/OFF for 2 seconds, set
the desired minimum brightness with the
wireless pushbutton and then release both
buttons. The LED lights up briey for conr-
mation.
PC with Eltako Wireless Building Visuali-
sation and Control Software GFVS:
The percentage brightness can be adjusted
at the PC between 0 and
100 percent and then be retrieved.
Switch memory on/off:
Hold the left button LRN/CLR and insert the
FSUD-230V into the socket.
The memory function will be switched on or
off. For status indication the LED ashes for
2 seconds = memory off or 0.5 seconds =
memory on (as-delivered state).
Switch on/off repeater:
Press and hold the right button ON/OFF and
plug the FSUD-230V into the socket. Switch
repeater on or off. The LED lights up for 2
seconds to indicate the status = repeater
off (as-delivered state) or for
5 seconds = repeater on.
Switch on/off conrmation telegrams:
Press and hold down the left button LRN/
CLR and the right button ON/OFF together
and plug the FSUD-230V in the socket.
Conrmation telegrams are switched on
and off. The LED lights up for 0.5 seconds =
conrmation telegrams OFF (as-delivered
state) or for
2 seconds = conrmation telegrams ON to
indicate the status.
Conrmationtelegrams:
The FSUD-230V transmits a feedback into
the Eltako wireless network with its own ID.
After switching on 0x70 and the dimming
value in % will be sent. After switching off
0x50 and the dimming value in % will be
sent. After dimming the dimming value in %
will be sent.
Teach in conrmation telegrams in other
actuators on in the Wireless Building
Visualisation and Control Software GFVS:
Press the right button ON/OFF to change
the switch position and send the con rmation
telegram at the same time.
May only be used in closed dry
rooms. The socket must be easily
accessible. Don’t insert in a row.
GB
Frequency 868.3 MHz
Transmit power max. 10 mW
Hereby, Eltako GmbH declares that the radio
equipment type FSUD-230 V is in com-
pliance with Directive 2014/53/EU.
The full text of the EU declaration of
conformity is available at the following
internet address: eltako.com
WEEE registration number DE 30298319
Must be kept for later use!
Eltako GmbH
D-70736 Fellbach
Technical Support English:
+49 711 94350025
technical-support@eltako.de
eltako.com
03/2021 Subject to change without notice.
Wireless actuator
Socket universal dimmer switch
FSUD-230V
30 100 002 -2
Universal dimmer switch, 300 W power
MOSFET. Automatic lamp detection. Only 0.7
watt standby loss. With adjustable minimum
brightness.
With switching operation for children‘s
rooms and snooze function.
Encrypted wireless, bidirectional wireless
and repeater function are switchable.
Adapter for German fused safety socket.
With increased shock protection.
Supply and switching voltage 230 V.
Universal dimmer switch for lamps up to
300W. Dimmable energy saving lamps ESL
and dimmable 230 V-LEDlamps,dependent
on the lamps electronics.
Zero passage switching with soft ON and
soft OFF to protect lamps.
No minimum load.
This dimmer switch is activated by wireless
pushbuttonsFTandFFT,handheldwireless
transmitters FHS and FMH, and remote
controls FF8 and UFB.
The set brightness level is stored when
switched off (memory), but can be switched
off for ESL lamps.
In case of a power failure the switch
position and the brightness stage are
stored and may be switched on when the
power supply is restored.
Automatic electronic overload protection
and overtemperature switch-off.
Starting in production week 11/14, you can
teachinencryptedsensors.Bidirectional
wirelessand/or a repeaterfunction can be
switched on.
Every change in state and incoming central
command telegrams are then conrmed by
a wireless telegram.This wireless telegram
can be taught into other actuators, the soft-
ware GFVS, and universal displays FUA55.
The current dimming value is also displayed
in % in the software GFVS.
Up to 35 wireless pushbuttons are assigned
with the left button LRN,either as a univer-
sal pushbutton, direction pushbutton or
centralpushbutton.
It can be switched on and off manually with
the right button.
The pushbuttons can be either taught-in
asdirectionpushbuttonsoruniversal
pushbuttons:
Asdirectionbutton'switch on and dim up'
is on one side and 'switch off and dim down'
on the other side. A double-click on the
switch on side triggers the automatic dimming
up to full brightness.
A double-click on the switch off side
triggers the snooze function. The children‘s
room function is triggered on the switch on
side.As a universal pushbuttonthe direction
change is made by briey releasing the
pushbutton.
Centralcontrolpushbuttonon:
Switching on with memory value when active.
Centralcontrolpushbuttonoff:
Switching off.
Switching operation for children‘s rooms
(universal switch or direction switch on the
switch-on side): If the light is switched on
by holding down the pushbutton, it starts at
the lowest brightness level after approx. 1
second and dims up slowly as long as the
pushbutton is held down. The last saved
brightness level is not modied.
Snoozefunction(universal switch or
direction switch on the switch-off side):
With a double impulse the lighting is dimmed
down from the current dimming position to
the minimum brightness level and switched
off. The current dimming position as well as
the adjustable minimum brightness level
determine the dimming time (max. = 60
minutes) which can be reduced as required.
It can be switched off at any time by short-
time control commands during the lighting
is dimmed down.
The LED performs during the teach-in pro-
cess according to the operation manual. It
shows wireless control commands by short
ickeringduringoperation.
Technical data
Incandescent and halogen lamps
1)
up to 300 W 230V (R)
Inductiveup to 300 W
2)3
transformers (L)
)
Electronicup to 300 W
2)3
transformers (C)
)
Electronicup to 300 W
5)
transformers (C)
Dimmable 230 V LEDs up to 300 W
5)
Ambienttemperaturerange0-35°C
4)
Standby loss (activ power) 0,7W
1)
Applies to lamps of max. 150 W.
2)
Per dimmer it is only allowed to use max. 2 inductive (wound)
transformers of the same type, furthermore no-load operation
on the secondary part is not permitted. The dimmer might be de-
stroyed. Therefore do not permit load breaking on the seconda-
ry part. Operation in parallel of inductive (wound) and capacative
(electronic) transformers is not permitted!
3)
When calculating the load a loss of 20 % for inductive (wound)
transformers and a loss of 5 % for capacitive (electronic)
transformers must be considered in addition to the lamp load.
4)
Affects the max. switching capacity.
5)
Usually applies for dimmable energy saving lamps and dimmab-
le 230 V LED lamps. Due to differences in the lamps electronics,
there may be limited dimming range, switch on and off problems
dependent on the manufacturer and a restriction on the maxi-
mum number of lamps; especially if the connected load is very
low (for 5 W-LEDs).
Teaching-in wireless sensors in wirel-
ess actuators
All sensors must be taught-in in the
actuators so that they can detect and
execute commands.
Theteach-inmemoryisemptyondelivery
from the factory. To ensure that a device
was not previously taught-in, clear the
memorycompletely:
Press the left button LRN/CLR for
approximately 3 seconds, the LED ashes
exitedly. Press the right button ON/OFF
approximately 5 seconds, the LED goes
out. All taught-in sensors are cleared,
the repeater and the conrmation tele-
grams are switched off.
Clearindividualtaught-insensors:
Press the left button LRN/CLR for
approximately 3 seconds, the LED ashes
exitedly. Press the sensor which is to be
cleared, the LED goes out.
If all the functions of an encrypted sensor
are cleared, teach-in must be repeated as
described under Teach-in encrypted
sensors.
Teaching-in sensors:
Teach-in universal pushbutton and PC
with Eltako Wireless Building Visuali-
sation and Control Software GFVS:
Press and hold the left button LRN/CLR
for approx. 0.5 seconds and then
release. The LED lights up. Press the
right button ON/OFF briey once.
The LED ashes once as conrmation.
Operate the sensor to be cleared.
The red LED goes out.
Teach in direction pushbutton:
Press and hold the left button LRN/CLR
for approx. 0.5 seconds and then
release. The LED lights up. Press the
right button ON/OFF briey twice. The
LED ashes twice as conrmation. Operate
the sensor to be cleared. The red LED
goes out.
When you press a pushbutton, a rocker
is fully taught-in automatically. The side
where the pushbutton is rst pressed is
dened as switch-on and the other side
is then the switch-off side.
Teach in central control pushbutton 'ON':
Press and hold the left button LRN/CLR
for approx. 0.5 seconds and then
release. The LED lights up. Press the
right button ON/OFF briey three times.
The LED ashes three times as conr-
mation. Operate the sensor to be clea-
red. The red LED goes out.
Teach in central control pushbutton 'OFF':
Press and hold the left button LRN/CLR
for approx. 0.5 seconds and then
release. The LED lights up. Press the
right button ON/OFF briey four times.
The LED ashes four times as conrmation.
Operate the sensor to be cleared. The
red LED goes out.
Exit the learn and clear mode immediately
by briey pressing the LRN/CLR button.
The routine exits the learn and clear
mode automatically after 60 seconds.
!
Temperature at mounting location:
0°C up to +35°C.
Storage temperature: -25°C up to +70°C.
Relative humidity:
annual average value <75%.
valid for devices from production week
11/14 (see bottom side of housing)
Topreventunintentionalteach-in,teach
inpushbuttonsby„double-clicking“
(pressing rapidly twice in succession).
1.Briey press the left button LRN/CLR
button 2 times, the LED blinks 2 times
forconrmation.
2.Select the desired teaching-in function
with the right button.
3.Press the taught-in button with 'double
click'. The LED goes out.
Unencrypted and encrypted sensors can
be taught-in.
Teachinencryptedsensors:
1.Press the left button LRN/CLR for
approximately 0.5 seconds and then
release, the LED lights up.
2.Briey press the right button ON/OFF
5 times, the LED ashes very excitedly.
3.Enable encryption of the sensor within
120 seconds. The LED goes out.
Attention! The power supply should not
be turned off.
4.Now teach-in the encrypted sensor as
described among teaching-in sensors.
If further encrypted sensors should be
taught-in, go back to point 1.
With encrypted sensors, use the 'rolling
code', i.e. the code changes in each tele-
gram, both in the transmitter and in the
receiver.
If a sensor sends more than 50 tele-
grams when the actuator is not enabled,
the sensor is no longer recognised by the
enabled actuator and you must repeat
teach-in as 'encrypted sensor'. It is not
necessary to repeat the function teach-
in.
Save minimum brightness (fully dimmed):
Switch on light with a wireless pushbutton.
Mutually hold the left button LRN/CLR and
the right button ON/OFF for 2 seconds, set
the desired minimum brightness with the
wireless pushbutton and then release both
buttons. The LED lights up briey for conr-
mation.
PC with Eltako Wireless Building Visuali-
sation and Control Software GFVS:
The percentage brightness can be adjusted
at the PC between 0 and
100 percent and then be retrieved.
Switch memory on/off:
Hold the left button LRN/CLR and insert the
FSUD-230V into the socket.
The memory function will be switched on or
off. For status indication the LED ashes for
2 seconds = memory off or 0.5 seconds =
memory on (as-delivered state).
Switch on/off repeater:
Press and hold the right button ON/OFF and
plug the FSUD-230V into the socket. Switch
repeater on or off. The LED lights up for 2
seconds to indicate the status = repeater
off (as-delivered state) or for
5 seconds = repeater on.
Switch on/off conrmation telegrams:
Press and hold down the left button LRN/
CLR and the right button ON/OFF together
and plug the FSUD-230V in the socket.
Conrmation telegrams are switched on
and off. The LED lights up for 0.5 seconds =
conrmation telegrams OFF (as-delivered
state) or for
2 seconds = conrmation telegrams ON to
indicate the status.
Conrmationtelegrams:
The FSUD-230V transmits a feedback into
the Eltako wireless network with its own ID.
After switching on 0x70 and the dimming
value in % will be sent. After switching off
0x50 and the dimming value in % will be
sent. After dimming the dimming value in %
will be sent.
Teach in conrmation telegrams in other
actuators on in the Wireless Building
Visualisation and Control Software GFVS:
Press the right button ON/OFF to change
the switch position and send the con rmation
telegram at the same time.
May only be used in closed dry
rooms. The socket must be easily
accessible. Don’t insert in a row.
GB
Frequency 868.3 MHz
Transmit power max. 10 mW
Hereby, Eltako GmbH declares that the radio
equipment type FSUD-230 V is in com-
pliance with Directive 2014/53/EU.
The full text of the EU declaration of
conformity is available at the following
internet address: eltako.com
WEEE registration number DE 30298319
Must be kept for later use!
Eltako GmbH
D-70736 Fellbach
Technical Support English:
+49 711 94350025
technical-support@eltako.de
eltako.com
03/2021 Subject to change without notice.
Wireless actuator
Socket universal dimmer switch
FSUD-230V
30 100 002 -2
Universal dimmer switch, 300 W power
MOSFET. Automatic lamp detection. Only 0.7
watt standby loss. With adjustable minimum
brightness.
With switching operation for children‘s
rooms and snooze function.
Encrypted wireless, bidirectional wireless
and repeater function are switchable.
Adapter for German fused safety socket.
With increased shock protection.
Supply and switching voltage 230 V.
Universal dimmer switch for lamps up to
300W. Dimmable energy saving lamps ESL
and dimmable 230 V-LEDlamps,dependent
on the lamps electronics.
Zero passage switching with soft ON and
soft OFF to protect lamps.
No minimum load.
This dimmer switch is activated by wireless
pushbuttonsFTandFFT,handheldwireless
transmitters FHS and FMH, and remote
controls FF8 and UFB.
The set brightness level is stored when
switched off (memory), but can be switched
off for ESL lamps.
In case of a power failure the switch
position and the brightness stage are
stored and may be switched on when the
power supply is restored.
Automatic electronic overload protection
and overtemperature switch-off.
Starting in production week 11/14, you can
teachinencryptedsensors.Bidirectional
wirelessand/or a repeaterfunction can be
switched on.
Every change in state and incoming central
command telegrams are then conrmed by
a wireless telegram.This wireless telegram
can be taught into other actuators, the soft-
ware GFVS, and universal displays FUA55.
The current dimming value is also displayed
in % in the software GFVS.
Up to 35 wireless pushbuttons are assigned
with the left button LRN,either as a univer-
sal pushbutton, direction pushbutton or
centralpushbutton.
It can be switched on and off manually with
the right button.
The pushbuttons can be either taught-in
asdirectionpushbuttonsoruniversal
pushbuttons:
Asdirectionbutton'switch on and dim up'
is on one side and 'switch off and dim down'
on the other side. A double-click on the
switch on side triggers the automatic dimming
up to full brightness.
A double-click on the switch off side
triggers the snooze function. The children‘s
room function is triggered on the switch on
side.As a universal pushbuttonthe direction
change is made by briey releasing the
pushbutton.
Centralcontrolpushbuttonon:
Switching on with memory value when active.
Centralcontrolpushbuttonoff:
Switching off.
Switching operation for children‘s rooms
(universal switch or direction switch on the
switch-on side): If the light is switched on
by holding down the pushbutton, it starts at
the lowest brightness level after approx. 1
second and dims up slowly as long as the
pushbutton is held down. The last saved
brightness level is not modied.
Snoozefunction(universal switch or
direction switch on the switch-off side):
With a double impulse the lighting is dimmed
down from the current dimming position to
the minimum brightness level and switched
off. The current dimming position as well as
the adjustable minimum brightness level
determine the dimming time (max. = 60
minutes) which can be reduced as required.
It can be switched off at any time by short-
time control commands during the lighting
is dimmed down.
The LED performs during the teach-in pro-
cess according to the operation manual. It
shows wireless control commands by short
ickeringduringoperation.
Technical data
Incandescent and halogen lamps
1)
up to 300 W 230V (R)
Inductiveup to 300 W
2)3
transformers (L)
)
Electronicup to 300 W
2)3
transformers (C)
)
Electronicup to 300 W
5)
transformers (C)
Dimmable 230 V LEDs up to 300 W
5)
Ambienttemperaturerange0-35°C
4)
Standby loss (activ power) 0,7W
1)
Applies to lamps of max. 150 W.
2)
Per dimmer it is only allowed to use max. 2 inductive (wound)
transformers of the same type, furthermore no-load operation
on the secondary part is not permitted. The dimmer might be de-
stroyed. Therefore do not permit load breaking on the seconda-
ry part. Operation in parallel of inductive (wound) and capacative
(electronic) transformers is not permitted!
3)
When calculating the load a loss of 20 % for inductive (wound)
transformers and a loss of 5 % for capacitive (electronic)
transformers must be considered in addition to the lamp load.
4)
Affects the max. switching capacity.
5)
Usually applies for dimmable energy saving lamps and dimmab-
le 230 V LED lamps. Due to differences in the lamps electronics,
there may be limited dimming range, switch on and off problems
dependent on the manufacturer and a restriction on the maxi-
mum number of lamps; especially if the connected load is very
low (for 5 W-LEDs).
Teaching-in wireless sensors in wirel-
ess actuators
All sensors must be taught-in in the
actuators so that they can detect and
execute commands.
Theteach-inmemoryisemptyondelivery
from the factory. To ensure that a device
was not previously taught-in, clear the
memorycompletely:
Press the left button LRN/CLR for
approximately 3 seconds, the LED ashes
exitedly. Press the right button ON/OFF
approximately 5 seconds, the LED goes
out. All taught-in sensors are cleared,
the repeater and the conrmation tele-
grams are switched off.
Clearindividualtaught-insensors:
Press the left button LRN/CLR for
approximately 3 seconds, the LED ashes
exitedly. Press the sensor which is to be
cleared, the LED goes out.
If all the functions of an encrypted sensor
are cleared, teach-in must be repeated as
describedunderTeach-inencrypted
sensors.
Teaching-insensors:
Teach-in universal pushbutton and PC
with Eltako Wireless Building Visuali-
sation and Control Software GFVS:
Press and hold the left button LRN/CLR
for approx. 0.5 seconds and then
release. The LED lights up. Press the
right button ON/OFF briey once.
The LED ashes once as conrmation.
Operate the sensor to be cleared.
The red LED goes out.
Teachindirectionpushbutton:
Press and hold the left button LRN/CLR
for approx. 0.5 seconds and then
release. The LED lights up. Press the
right button ON/OFF briey twice. The
LED ashes twice as conrmation. Operate
the sensor to be cleared. The red LED
goes out.
When you press a pushbutton, a rocker
is fully taught-in automatically. The side
where the pushbutton is rst pressed is
dened as switch-on and the other side
is then the switch-off side.
Teachincentralcontrolpushbutton'ON':
Press and hold the left button LRN/CLR
for approx. 0.5 seconds and then
release. The LED lights up. Press the
right button ON/OFF briey three times.
The LED ashes three times as conr-
mation. Operate the sensor to be clea-
red. The red LED goes out.
Teach in central control pushbutton 'OFF':
Press and hold the left button LRN/CLR
for approx. 0.5 seconds and then
release. The LED lights up. Press the
right button ON/OFF briey four times.
The LED ashes four times as conrmation.
Operate the sensor to be cleared. The
red LED goes out.
Exitthelearnandclearmodeimmediately
by briey pressing the LRN/CLR button.
The routine exits the learn and clear
mode automatically after 60 seconds.
!
Temperature at mounting location:
0°C up to +35°C.
Storage temperature: -25°C up to +70°C.
Relative humidity:
annual average value <75%.
valid for devices from production week
11/14 (see bottom side of housing)
To prevent unintentional teach-in, teach
in pushbuttons by „double-clicking“
(pressing rapidly twice in succession).
1.Briey press the left button LRN/CLR
button 2 times, the LED blinks 2 times
forconrmation.
2.Select the desired teaching-in function
with the right button.
3.Press the taught-in button with 'double
click'. The LED goes out.
Unencrypted and encrypted sensors can
be taught-in.
Teachinencryptedsensors:
1.Press the left button LRN/CLR for
approximately 0.5 seconds and then
release, the LED lights up.
2.Briey press the right button ON/OFF
5 times, the LED ashes very excitedly.
3.Enable encryption of the sensor within
120 seconds. The LED goes out.
Attention! The power supply should not
be turned off.
4.Now teach-in the encrypted sensor as
described among teaching-in sensors.
If further encrypted sensors should be
taught-in, go back to point 1.
With encrypted sensors, use the 'rolling
code', i.e. the code changes in each tele-
gram, both in the transmitter and in the
receiver.
If a sensor sends more than 50 tele-
grams when the actuator is not enabled,
the sensor is no longer recognised by the
enabled actuator and you must repeat
teach-in as 'encrypted sensor'. It is not
necessary to repeat the function teach-
in.
Save minimum brightness (fully dimmed):
Switch on light with a wireless pushbutton.
Mutually hold the left button LRN/CLR and
the right button ON/OFF for 2 seconds, set
the desired minimum brightness with the
wireless pushbutton and then release both
buttons. The LED lights up briey for conr-
mation.
PC with Eltako Wireless Building Visuali-
sation and Control Software GFVS:
The percentage brightness can be adjusted
at the PC between 0 and
100 percent and then be retrieved.
Switch memory on/off:
Hold the left button LRN/CLR and insert the
FSUD-230V into the socket.
The memory function will be switched on or
off. For status indication the LED ashes for
2 seconds = memory off or 0.5 seconds =
memory on (as-delivered state).
Switch on/off repeater:
Press and hold the right button ON/OFF and
plug the FSUD-230V into the socket. Switch
repeater on or off. The LED lights up for 2
seconds to indicate the status = repeater
off (as-delivered state) or for
5 seconds = repeater on.
Switch on/off conrmation telegrams:
Press and hold down the left button LRN/
CLR and the right button ON/OFF together
and plug the FSUD-230V in the socket.
Conrmation telegrams are switched on
and off. The LED lights up for 0.5 seconds =
conrmation telegrams OFF (as-delivered
state) or for
2 seconds = conrmation telegrams ON to
indicate the status.
Conrmationtelegrams:
The FSUD-230V transmits a feedback into
the Eltako wireless network with its own ID.
After switching on 0x70 and the dimming
value in % will be sent. After switching off
0x50 and the dimming value in % will be
sent. After dimming the dimming value in %
will be sent.
Teach in conrmation telegrams in other
actuators on in the Wireless Building
Visualisation and Control Software GFVS:
Press the right button ON/OFF to change
the switch position and send the con rmation
telegram at the same time.
May only be used in closed dry
rooms. The socket must be easily
accessible. Don’t insert in a row.
GB
Frequency 868.3 MHz
Transmit power max. 10 mW
Hereby, Eltako GmbH declares that the radio
equipment type FSUD-230 V is in com-
pliance with Directive 2014/53/EU.
The full text of the EU declaration of
conformity is available at the following
internet address: eltako.com
WEEE registration number DE 30298319
Must be kept for later use!
Eltako GmbH
D-70736 Fellbach
Technical Support English:
+49 711 94350025
technical-support@eltako.de
eltako.com
03/2021 Subject to change without notice.
/2
%
Quick check
I'm not a robot
Incorrect answer, please try again.
Chat with your Eltako FSUD-230V manual using AI
Get instant AI answers from your Eltako FSUD-230V manual
Ask anything about the Eltako FSUD-230V. Answers come from this manual, with the pages they are based on.
Ask a Question
0/1000
Do you recommend FSUD-230V?
YesNo
Frequently Asked
Questions
A
The Eltako FSUD-230V supports a universal load of up to 300 watts for various lamp types including incandescent, halogen, and dimmable LEDs.
Is this answer helpful?
A
Yes, it works with dimmable 230 V LED lamps and energy-saving lamps, though performance may vary depending on the specific electronics of the bulb manufacturer.
Is this answer helpful?
A
Trigger the snooze function by double-clicking the switch-off side of a paired pushbutton. The light will dim down gradually based on the current position and minimum setting.
Is this answer helpful?
A
Yes, the switch position and brightness stage are stored automatically and the light can turn back on to the previous state when power is restored.
Is this answer helpful?
A
Yes, starting from production week 11/14, the device supports teaching in encrypted sensors using rolling codes for enhanced security.
Is this answer helpful?
A
The device has a very low active standby power loss of only 0.7 watts, making it energy efficient.
Is this answer helpful?
M: QW-35-FL
Advantagesand
Disadvantages
Advantages
Supports up to 300 W load with automatic lamp detection
Includes specialized snooze and children's room modes
Low standby power consumption of only 0.7 watts
Enables encrypted wireless and bidirectional communication
Retains memory settings during power failures
VS
Disadvantages
Limited to specific transformer types (max 2 inductive)
Requires manual configuration for some advanced features
Compatibility varies slightly with different LED manufacturers
Teach-in process can be complex for first-time users
Only includes adapter for German fused safety sockets
M: QW-35-FL
Product
Specification
Type
Actor
Standard
F-bus
Function
Switch socket (on/off), Dimming function
Topology
Bus
M: QW-35-FL
Product
Description
Eltako FSUD-230V Universal Dimmer Switch Review
The Eltako FSUD-230V Universal Dimmer Switch stands out as a robust solution for modern lighting control. Designed with a powerful 300 W MOSFET, this device handles a wide array of lamp types including incandescent, halogen, electronic ballasts, and dimmable LEDs. Its intelligent features include automatic lamp detection and zero passage switching, which ensures soft ON and OFF transitions to extend the lifespan of your bulbs. The unit is engineered for safety with increased shock protection and an adapter specifically for German fused safety sockets.
One of the most impressive aspects of this dimmer is its wireless versatility. It supports encrypted wireless communication, bidirectional signaling, and a repeater function that can be easily switched on or off. This allows for reliable operation even in larger homes where signal strength might be an issue. Users can pair up to 35 wireless pushbuttons, handheld transmitters, or remote controls to manage their lighting setup. The system remembers the last brightness level when power is restored after an outage, ensuring convenience without manual adjustment.
Special functions make this switch ideal for families. The snooze function gradually dims lights over a set period before turning them off, perfect for winding down in the evening. For children's rooms, a dedicated mode allows lights to start at minimum brightness and slowly rise, preventing harsh light shocks. The standby loss is incredibly low at just 0.7 watts, contributing to energy efficiency. Whether you are integrating it into a smart home ecosystem using GFVS software or controlling it manually, the Eltako FSUD-230V offers flexibility and reliability.
Important Notes
Ensure no more than two inductive transformers are used per dimmer to prevent damage.
The device operates within an ambient temperature range of 0°C to 35°C.
Teaching-in sensors requires specific button sequences to avoid accidental activation.