Manual.ly Logo

Eltako FRGBW14 Manual

0.0 · 0 Ratings

PDF manual · 2 Pages

English

M: qwen/qwen3.5-flash-20260224
page

/ 2

Loading...
9b48069e63a4e949e8972ac5eb9b6538ac0b page 1
Wireless actuator
PWM dimmer switch for LED
FRGBW14
GB
Temperature at mounting location:
-20°C up to +50°C.
Storage temperature: -25°C up to +70°C.
Relative humidity:
annual average value <75%.
30 014 068 - 1
Only skilled electricians may install this
electrical equipment otherwise there is
the risk of  re or electric shock!
PWM dimmer switch with 4 channels for
LED 12-24 V DC, each up to 4 A. Adjustable
minimum brightness and dimming speed.
With snooze function and light alarm circuit.
Additionally with light scene control via
PC or with wireless pushbuttons.
Standby loss only 0.1 watt.
Modular device for DIN-EN 60715 TH35 rail
mounting. 2 modules = 36 mm wide, 58 mm
deep.
Connection to the Eltako-RS485 bus. Bus
cross wiring and power supply with jumper.
The set brightness level remains stored
when switched off (memory).
In case of a power failure, the switch position
and brightness level are saved and switched
on when the power supply is restored.
Automatic electronic overload protection and
overtemperature shutdown.
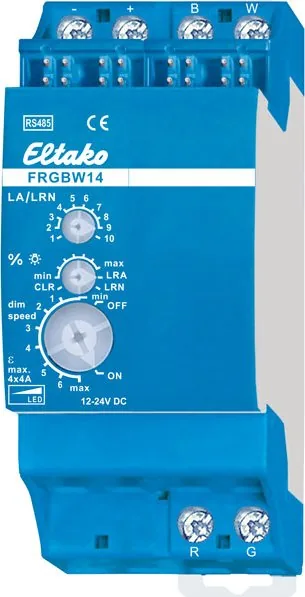
The upper rotary switch is only required
for teach-in.
Use the middle %
rotary switch to set
the minimum brightness (fully dimmed).
Use the lower dimming speed rotary
switch to set the dimming speed.
The pushbuttons can either be taught in
as direction pushbuttons or universal
pushbuttons: as direction pushbutton,
one side is 'switch on and dim up'; the other
side is 'switch off and dim down'. A double-
click on the switch-on side triggers the auto-
matic dimming up to full brightness at dim-
speed. Doubleclick on the switch-off side to
trigger the snooze function.
As universal pushbutton, change the
direc-
tion by briefly releasing the pushbutton.
FBH wireless motion/brightness sensors
can be taught in as master or slave.
FAH wireless brightness sensors can be
taught in for switch-off dependent on
brightness or as a twilight switch.
Pushbutton 'central off' for 1 channel:
switches off.
Pushbutton 'central ON' for channel 1:
switches on with the memory value.
Pushbutton 'central off' for all 4 channels:
saves the current lighting scene and swit-
ches off.
Pushbutton 'central ON' for all 4 channels:
switches on with the light scene where cen-
tral was switched off most recently. After a
power failure, the memory values are swit-
ched on.
Rotary switch: Press the middle of the rotary
knob to switch on with the memory value and
to switch off and save the current dimming
value. Turn to the right (clockwise) to dim up.
The turning speed determines the dim-up
speed. If the dimming actuator was turned to
the right when it was switched off, the dimmer
will switch on at minimum brightness and
then continue to dim up. If the rotary knob is
turned jerkily – and the actuator was previously
switched on or off – dimup is rapid to full
brightness.
Turn to the left (anticlockwise) to dim-down
to the minimum brightness which is adjusted
on the dimming actuator.
The turning speed
determines the dim-down
speed. If the rotary
knob is turned to the left
jerkily, dim-down is rapid to the minimum
brightness which is adjusted on the dimming
actuator.
A rotary switch acting as intensity control
must be taught-in in all channels: Press or
turn to switch on. To dim up, turn to the
right and to dim down, turn to the left. Press
to switch off
.
A rotary switch acting as colour control
must be taught-in in all channels: Turn to
the right or left to switch on and change the
colour. Press to switch to white and press
again to change back to colour mode.
Colour and intensity double-rocker pushbut-
tons must be taught-in in all channels: Press
top part of right rocker to switch on and dim
up; press bottom part of right rocker to switch
off and dim down. Press top or bottom part of
left rocker to change the colour; press twice to
switch to white; press long to switch back to
colour mode.
Switching for light alarm clocks: An appro-
priately taught-in timer wireless signal starts
the wake-up function by switching on the
lighting at lowest brightness and slowly
dimming up to maximum brightness over a
period of 30 minutes (or light scene 5).
The dimming process is stopped by tapping
briefly, e.g. on the hand-held transmitter.
Snooze function (Univeral or direction push-
buttons must be taught-in in all channels):
With a double impulse the lighting is dimmed
down from the current dimming position to
the minimum brightness level and switched off.
The current dimming position as well as the
adjustable minimum brightness level determine
the dimming time (max. = 30 minutes) which
can be reduced as required. It can be switched
off at any time by short-time control com-
mands during the lighting is dimmed down.
Light scenes on the PC are set and retrieved
using the Wireless Visualisation and Control
Software GFVS. One or several FRGBW14
devices must be taught in on the PC as dim-
ming switches with percentage brightness
values or high-definition brightness values.
FBH as Master: When an FBH wireless motion
detector and brightness sensor is taught in,
the switching threshold at which the lighting
is switched on at the brightness values of
light scene 6 is defined during teach-in
using the lower rotary switch. The switching
th h ld i d d t th b i ht i
using
the
lower
rotary
switch
.
The
switching
threshold is dependent on the brightness in
addition to motion (from approx. 30 lux in
position OFF to approx. 300 lux in max position.
When the FBH in taught-in in the ON position,
it is only evaluated as a motion detector.
A time delay of 1 minute is a fixed setting in
the FBH.
By switching-off or dimming with pushbutton
,
the FBH is deactivated.
Central pushbutton, scene pusbhbutton and
'dimming value' by PC also lead to deactivation.
A short press on the switchon side of the
direction pushbutton, the FBH is reactivated.
FBH as Slave: The FBH is only evaluated as
motion detector.
FAH as Master: When a wireless brightness
sensor FAH is taught-in, the switching
threshold is defined by the lower rotary
switch during teach-in. The switching
threshold switches the lighting off depending
on the brightness. Switch-on is only possible
by pressing the pushbutton.
FAH as twilight switch: When an FAH wire-
less brightness sensor is taught in, the
switching threshold at which the lighting is
switched on at the brightness values of light
scene 6 is defined during teach-in using the
lower rotary switch. The switching threshold
is dependent on the brightness (from approx.
0 lux in position OFF to approx. 50 lux in max
position.
Switch-off takes place at a brightness of
> 200 Lux.
The red LED accompanies the teach-in
process and indicates control commands in
operation by flashing briefly.
Typical connection
BUS BUS
N
Hold
FAM14
BUSBUS
230V AC
FSNT14
+12VGND
RG
-
+
BW
12-24V DC
+
-
Teaching-in wireless sensors in
wireless actuators
All sensors must be taught-in in the
actuators so that they can detect and
execute commands.
Teaching-in actuator FRGBW14
The teach-in memory is empty on delivery
from the factory. To make sure that
nothing has already been taught-in, clear
the memory content completely:
Set the middle rotary switch to CLR.
The LED  ashes at a high rate. Within the
next 10 seconds, turn the upper rotary
switch three times to the right stop (turn
clockwise) and then turn back away from
the stop. The LED stops  ashing and
goes out after 2 seconds. All taught-in
sensors are cleared.
Clear individual taught-in sensors in the
same way as in the teach-in procedure,
except that you set the middle rotary
switch to CLR instead of LRN, and operate
the sensor. The LED previously flashing
at a high rate goes out.
Teaching-in sensors:
A total of 116 memory locations are
available.
1. Set the top rotary switch to the
required teach-in function.
1 = timer as wake-up light;
Teach-in FAH or FBH as Master
2 = 'central off';
Teach-in second FBH as slave
3 = universal switch;
Teach-in third FBH as slave;
4 = 'central on';
Teach-in fourth FBH as slave
5 = Teach in direction pushbutton;
Direction pushbutton are automatically
taught-in fully when pressed. Depending
on where the button is pressed, the
functions for switch-on and dim-up are
defined on one side and switchoff and
dim-down on the other side.
6 = teach in sequential light scene push-
button, a pushbutton or half of a double
pushbutton is assigned automatically.
7 = Teach in 4-way direct light scene
pushbuttons (a complete pushbutton
with double rocker is assigned automa-
tically). Turn the lower rotary switch to
the following position:
1liht hbtt f 14
Function rotary switches

Chat with your Eltako FRGBW14 manual using AI

Get instant AI answers from your Eltako FRGBW14 manual

Ask anything about the Eltako FRGBW14. Answers come from this manual, with the pages they are based on.

Ask a Question

0/1000

Do you recommend FRGBW14?

Yes No

Frequently Asked Questions

A

The device operates with 12 to 24 volt direct current for LED loads. It connects to the RS485 bus system for control signaling. Always verify power supply limits before connecting fixtures. Incorrect voltage may damage the actuator or connected lights.

Is this answer helpful?

A

There are four independent channels for controlling different color or intensity groups. Each channel can handle up to four amps depending on frequency settings. This allows flexible management of RGBW lighting systems. Separate switches can control each channel independently.

Is this answer helpful?

A

Yes, the switch position and brightness level are saved automatically. When power is restored, it switches on with the saved values. The memory function remains active even during total blackouts. This feature ensures consistent lighting behavior on return.

Is this answer helpful?

A

FBH and FAH wireless sensors can be taught-in to the actuator. FBH detectors handle motion and brightness while FAH handles light levels. They can function as master or slave devices for complex setups. Proper teach-in settings define their operation modes.

Is this answer helpful?

A

Only skilled electricians may install this equipment to prevent fire or shock risks. Electrical safety is paramount when wiring mains connected devices. Follow local regulations and manufacturer guidelines strictly. Ignoring this may void warranties or cause accidents.

Is this answer helpful?

A

Up to eight light scenes can be retrieved using dedicated pushbuttons. Direct pushbuttons store four brightness values per device. Sequential buttons allow cycling through defined scenes programmatically. Advanced software also supports additional scene management for custom needs.

Is this answer helpful?

A

Operating temperature ranges from minus twenty degrees Celsius to positive fifty degrees Celsius. Storage temperature is much wider at minus twenty-five to positive seventy degrees. Ensure ventilation to maintain safe thermal conditions during extended use. Extreme heat may trigger overtemperature shutdown protection.

Is this answer helpful?

M: qwen/qwen3.5-flash-20260224

Advantages and Disadvantages

Advantages

  • Four channel PWM control supports 4x 4A load at low voltages.
  • Memory retention ensures lights resume settings after power failure.
  • Low standby loss of 0.1 watt improves energy efficiency significantly.
  • Wireless sensor integration allows for motion and brightness automation.
  • DIN-EN 60715 modular mounting fits standard professional electrical rails.
VS

Disadvantages

  • Requires skilled electrician for installation due to electrical risks.
  • Complex teach-in memory clearing procedure might confuse new users.
  • Specific bus wiring required for RS485 connectivity and power supply.
  • Wireless sensor range may depend heavily on environmental obstacles.
  • Configuration tool PC software needed for advanced light scene editing.
M: qwen/qwen3.5-flash-20260224

Product Specification

Type

Actuator

Standard

RS485

Function

Switch actuator (on/off), Dimming function

Topology

Bus

M: qwen/qwen3.5-flash-20260224

Product Description

Modern lighting control requires precision and reliability for residential and commercial settings to ensure both comfort and efficiency. The Eltako FRGBW14 PWM Dimmer Switch stands out as a versatile component for managing complex LED environments effectively. This device supports four independent channels, each capable of handling up to four amps of load within a 12 to 24 volt direct current range. Its design accommodates a wide temperature scope, ensuring stable operation from minus twenty to positive fifty degrees Celsius during use. Storage temperatures allow for even broader ranges, making it suitable for various climates and conditions.

Integration into a control system relies on the Eltako RS485 bus connection protocol. This modular device fits onto a standard DIN rail, occupying two modules or approximately 36 millimeters of width and 58 mm deep. A key feature is the persistent memory function. The system remembers the last brightness setting and switch position reliably. If power is restored after a brief failure, the lights resume the previous state automatically without user intervention. Standby power consumption is minimal, drawing only 0.1 watt, which aligns well with energy efficiency goals and reduces heat generation.

Control flexibility is a major highlight for installers and end users alike. Users can adjust minimum brightness levels and control the dimming speed using specific rotary switches located on the unit face. Wireless integration allows connection to sensors like the FBH and FAH series for automation. These sensors can act as master or slave units, detecting motion or ambient light levels accurately. Twilight functions allow lights to switch off when natural light is sufficient. Furthermore, the unit supports light alarm clocks that slowly wake occupants with a dimming light ramp over 30 minutes.

Installation must be performed by skilled electricians due to potential electrical risks. The device includes automatic overload protection and overtemperature shutdown mechanisms for safety. Programming is managed through wireless pushbuttons or the GFVS software on a PC for advanced configuration. Configurable light scenes enable dynamic atmospheres to match user preferences. The Eltako FRGBW14 PWM Dimmer Switch, 2TE REG, Switch Actuator with Dimmer Manual is designed for precise setup and integration. Technicians can set brightness thresholds for sensors easily using the central switches.

Configuring the device involves specific teach-in procedures for sensors. The upper rotary switch selects the teach-in function while the middle switch activates learning mode. A total of 116 memory locations are available for sensor storage. Clearing memories restores factory settings easily. The PCT14 tool allows further configuration of operating modes like light scene switch-through. These settings ensure the device fits specific project requirements precisely.

M: qwen/qwen3.5-flash-20260224

© Copyright 2026 Manual.ly