
Dorr DRL-232 Manual
PDF manual · 17 Pages
English


Quick check
Incorrect answer, please try again.
Chat with your Dorr DRL-232 manual using AI
Get instant AI answers from your Dorr DRL-232 manual
Ask anything about the Dorr DRL-232. Answers come from this manual, with the pages they are based on.
DRL-232 Maintenance Schedule
Use a soft, slightly damp microfiber cloth. Turn off the device and remove batteries before cleaning.
Set the main switch to position OFF after usage to preserve battery life and ensure safety.
Remove leaking or empty batteries immediately and clean the contacts before inserting fresh batteries.
Ask a Question
Do you recommend DRL-232?
Yes NoFrequently Asked Questions
Yes, the device supports standard Mignon AA batteries or rechargeable units of the same type. For longer runtime, you can also use optional Li-Ion batteries such as Sony NP-F models.
Is this answer helpful?
The color temperature is 5800 Kelvin with an accuracy of plus or minus 200 Kelvin, providing a natural daylight balance suitable for various photography scenarios.
Is this answer helpful?
No, do not look directly into the LED. Looking at the light for an extended period may cause irreversible damage to the retina. Never direct the beam into human or animal eyes.
Is this answer helpful?
The kit includes adapter rings for lens diameters ranging from 52 mm to 77 mm, covering 52, 55, 58, 62, 67, 72, and 77 mm sizes for various camera lenses.
Is this answer helpful?
Use a soft, slightly damp microfiber cloth to clean exterior parts. Do not use benzine or aggressive cleaning agents. Always turn off the device and remove batteries before cleaning.
Is this answer helpful?
Yes, the control unit and ring light both have ¼ inch tripod sockets. The unit can be mounted on the camera or on a separate tripod stand away from the lens.
Is this answer helpful?
Dispose of the device according to the WEEE directive. Do not put it in household waste. Use local collection points for electrical and electronic equipment to comply with EU regulations.
Is this answer helpful?
Advantages and Disadvantages
Advantages

- 232 LEDs provide uniform shadow-free illumination for macro and portrait work.
- Brightness is adjustable from 20 to 100 percent for flexible lighting control.
- Supports both AA batteries and optional Li-Ion units for extended runtime.
- Includes ball head and adapter rings for versatile mounting options up to 77mm.
Disadvantages

- Requires purchase of separate Li-Ion batteries for optimal long-term use.
- Not suitable for permanent room lighting, strictly for photography purposes.
- Safety warnings restrict direct viewing which demands careful handling.
- Battery box must be removed if not in use to prevent leakage.
Product Specification
AF-Assist Light
no
Power Source
Battery
Features
Video Light
Dimensions
6.30x6.30x0.98in (WxHxD)
Weight
0.80 lbs
Product Description
Enhance Your Photography with Superior Lighting
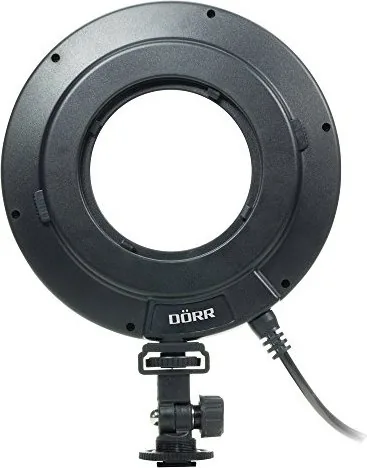
Capturing the perfect shot often depends on how light interacts with your subject. Whether you are a professional portrait artist or a hobbyist exploring macro photography, consistent illumination is key. This is where the Dörr DRL-232 LED Ring Light with Battery Box Manual becomes an essential reference for users seeking clarity. The device features 232 high-performance LEDs that provide uniform, shadow-free illumination. This specific setup ensures that details in close-up areas are captured without harsh contrast or dark spots that can ruin an image.
The flexibility of this lighting system allows photographers to position the unit on the camera lens or externally for creative shadow effects. The control unit includes a brightness regulator capable of adjusting output from 20 to 100 percent. This range offers significant control over the visual mood of the photograph. Users can choose between standard AA batteries housed in the included battery box or optional Sony Li-Ion batteries for extended runtime. This dual-power option ensures reliability whether you are shooting in the studio or outdoors. The battery box accommodates six Mignon AA cells or rechargeable units of the same type.
Mounting is straightforward with adapter rings compatible with various lens diameters. The kit includes rings for sizes ranging from 52 mm to 77 mm. A sturdy ball head allows for precise angle adjustments when the light is detached from the camera. It locks securely into place to prevent movement during capture sessions. Safety is a priority in the design, with warnings against looking directly into the LEDs due to potential retinal damage. The unit must be kept away from flammable materials and moisture. Cleaning should only be done with a microfiber cloth while powered off.
Proper documentation is vital for longevity. Referring to the Dörr DRL-232 LED Ring Light with Battery Box Manual ensures owners understand maintenance schedules and disposal protocols. Ignoring safety warnings could lead to equipment damage or personal injury. This tool supports aperture priority and manual modes effectively. The color temperature remains stable at 5800 Kelvin, providing a natural daylight balance. It generates approximately 1800 Lux at one meter distance. Whether for portraits or detailed product shots, this ring light elevates visual quality. Always keep it dry and store in a cool place. Protecting the investment ensures years of service for any photography enthusiast. The weight is approximately 300 grams, making it portable for field work. Users should ensure the flash shoe is secured firmly to the camera body.
Important Safety Precautions
Protecting your eyes is critical when using high-intensity light sources. Do not direct the beam into human or animal eyes. Keep the device away from children and pets to prevent accidents. Dispose of batteries according to local regulations regarding electronic waste. This ensures environmental safety and compliance with European directives like RoHS and WEEE.
Maintenance and Storage Tips
Regular maintenance extends the life of the equipment. Check the ventilation slots to ensure they remain unobstructed during operation. Dust accumulation can affect performance over time. Use a soft cloth to wipe the exterior surfaces gently. Never use harsh chemicals or liquids near the electronics. Disconnect the battery if storing for long periods. This prevents leakage and corrosion. Keeping the manual accessible helps troubleshoot minor issues quickly.
Search for 67,706 Manuals online


Type-in Brand or Model