Manual.ly Logo

Britax Romer Kidfix 2 S Manual

0.0 · 0 Ratings

PDF manual · 2 Pages

English

M: gpt-5.6-terra
page

/ 2

Loading...
08f3153783cb939d82d7829cfddc41da669a page 2
For the safety of your child, before every car journey check that...
► the child seat is engaged on both sides with the ISOFIT locking arms
05
in the
ISOFIT fi xing points
01
and both locking buttons
07
are fully green;
► the lap belt
15
is passed into the bright red belt guides
04
on both sides of the
seat cushion;
► the lap belt
15
is passed through the bright red SecureGuard
13
;
► the diagonal strap
16
on the vehicle belt buckle side
18
is also passed into the
bright red belt guide
04
on the seat cushion;
► the diagonal strap
16
is passed through the dark red belt holder
03
at the
headrest;
► the diagonal strap
16
runs diagonally backwards;
► the straps are tight and not
twisted;
► the vehicle belt buckle
18
is not placed in the bright red belt guide
04
on the
seat cushion.
DANGER! If your child tries to open the ISOFIT locking buttons
07
or the vehi-
cle belt buckle,
18
or to insert the diagonal strap
16
into the bright red Secure-
Guard
13
, stop your vehicle as soon as possible. Check that the child seat is cor-
rectly fastened and that your child is correctly secured. Explain to your child the
dangers caused by such actions.
UNFASTENING YOUR CHILD AND REMOVAL:
To unfasten your child or to remove the child seat, follow the steps in Section 7
“REMOVAL AND DISPOSAL”.
With 3-POINT BELT + BACKREST
8.2
12
Follow the steps in Section 6 "ADJUSTING THE HEADREST".
1. Place the child seat on the car seat.
Check that the backrest
12
is fl at against the backrest of
the car seat.
TIP! If the headrest of the car seat is preventing this, it
should be removed and stowed safely somewhere in the
vehicle.
2. Carry out the steps in paragraph 8.3 "SECURING THE
CHILD IN A CHILD SEAT WITH BACKREST".
For the safety of your child, before every car journey check that...
► the child seat is securely fastened,
► the lap belt
15
is passed into the bright red belt guides
04
on both sides of the
seat cushion,
► the lap belt
15
is passed through the bright red SecureGuard
13
,
► the diagonal strap
16
on the vehicle belt buckle side
18
is also passed into the
bright red belt guide
04
on the seat cushion,
► the diagonal strap
16
is passed through the dark red belt holder
03
at the
headrest,
► the diagonal strap
16
runs diagonally backwards,
► the straps are tight and not
twisted,
► the vehicle belt buckle
18
is not placed in the bright red belt guide
04
on the
seat cushion.
DANGER! If your child tries to open the vehicle belt buckle
18
or insert the di-
agonal strap
16
into the bright red SecureGuard
13
, stop your vehicle as soon as
possible. Check that the child seat is correctly fastened and that your child is cor-
rectly secured. Explain to your child the dangers caused by such actions.
UNFASTENING YOUR CHILD AND REMOVAL:
To unfasten your child or to remove the child seat, follow the steps in Section 7
“REMOVAL AND DISPOSAL”.
SECURING THE CHILD IN A CHILD SEAT WITH
BACKREST
8.3
1.
KIDFIX² S
On the side nearer the vehicle door, turn the SICT
23
an-
ti-clockwise until it is at adistance of 5 mm from the vehi-
cle door or until it is fully unscrewed.
23
18
All versions:
Pull out the vehicle belt and pass it in front of your child
to the vehicle belt buckle
18
.
DANGER! Check that the vehicle belt is not twisted,
otherwise the full protective e ect of the restraint system
is not ensured.
2. Engage the belt clip in the vehicle belt buckle
18
so that
there is an audible CLICK.
16
15
04
18
04
15
16
13
15
16
22
03
16
3. Insert the diagonal strap
16
and lap belt
15
on the vehi-
cle belt buckle side
18
into the bright red belt guide
04
on the seat cushion.
DANGER! The vehicle belt buckle
18
must not be
positioned between the bright red belt guide
04
and the
armrest.
4. Also place the lap belt
15
in the bright red belt guide
04
on the other side of the seat cushion.
DANGER! The lap belt
15
must lie as low as possible
over your child's hips on both sides.
5. Insert the lap belt
15
in the bright red
SecureGuard
13
.
DANGER! Do not pass the diagonal strap
16
into
the bright red SecureGuard
13
.
6. Pass the diagonal strap
16
into the dark red belt hol-
der
03
at the headrest
22
until it is fully inside the belt
holder
03
without twisting.
TIP! If the backrest
12
is covering the belt holder
03
,
youcan adjust the headrest
22
upwards. The diagonal
strap
16
can then be easily inserted. Now move the
headrest
22
back to the correct height. Make sure that
the button on the belt holder
03
is fully closed.
7. Make sure that the diagonal strap
16
is lying over your
child's collarbone and not at his or her neck.
TIP! You can still also adjust the height of the headrest
22
in the vehicle.
DANGER! The diagonal strap
16
must run diagonally
backwards. You can adjust the belt routing with the ad-
justable belt defl ector in the vehicle.
DANGER! The diagonal strap
16
must never run for-
ward to the belt defl ector on the vehicle. In this case, use
the child seat on the rear seat only.
8. Tighten the vehicle belt by pulling on the diagonal
strap
16
.
9. Follow the steps listed in Section 8 “
For the safety of
your child, before every car journey check that ...
”
16
9. USING AS A BOOSTER SEAT
REMOVING THE BACKREST
9.1
1. Place the seat on alevel surface.
2. Open the fl ap on the storage compartment
25
on the
bottom of the booster seat and take out the
Torx
screwdriver.
5. Loosen the 4 Torx screws on the backrest
12
.
6. Push the seat cushion
09
towards the backrest
12
until
the connection snaps out.
3. Lift the cover of the backrest
12
and fold it forward.
4. Lift the cover of the seat cushion
09
and fold it backward.
12
09
For age group 3 (22 kg to 36 kg), the child seat can also be used as abooster seat
without the backrest. Follow the steps described below for the removal and at-
tachment of the backrest. You will need aTX20 Torx screwdriver. BRITAX RÖMER
recommends using it with the backrest as this provides your child with optimum
protection in the case of aside impact. If using without the backrest, suffi cient
side impact protection can be ensured only with side curtain airbags at the seat
positions. For information about vehicle equipment options, please contact the
manufacturer of your vehicle.
DANGER! Use this product as abooster seat only if your child is in age
group3 (22 to 36 kg) and is taller than 125 cm. For all other age groups, the prod-
uct must be used with the backrest .
We recommend using the seat with the backrest for as long as possible, and as
abooster seat starting from achild height of 135 cm.
7. So as not to lose them, screw the 4 screws back into the
holes provided in the backrest
12
.
8. Pull the seat cushion cover
09
back and hook the trans-
parent plastic piece onto the notch provided.
For design reasons in some vehicle models, the diagonal strap
16
may not pass
ideally over your child's shoulder area. When using as abooster seat, always
check that the diagonal strap
16
is located in the area indicated. If the diagonal
strap
16
does not pass through the correct (green) area, the fl exible belt guide
24
must also be used.
Attaching the fl exible belt guide - securing with ISOFIT locking arms
USING THE FLEXIBLE BELT GUIDE
9.2
16 16
1. Open the fl ap on the storage compartment
25
on the
bottom of the seat cushion
09
and take out the fl exible
belt guide
24
.
2. Close the fl ap on the storage compartment
25
.
3. Pass the metal attachment
26
over the ISOFIX locking
arm
27
located on the vehicle belt buckle side.
4. Place the belt guide clip
28
of the fl exible belt guide
24
on the sitting surface of the seat cushion
09
.
5. Follow the remaining steps for the installation method
9.3
FASTENING WITH ISOFIT LOCKING ARMS AS A SEAT
CUSHION WITHOUT BACKREST
6. Attach the belt guide clip
28
to the diagonal strap
16
.
Check that the belt of the fl exible belt guide
24
is not
twisted and passes diagonally behind your child.
7. Adjust the belt guide clip
28
so that the diagonal strap
16
is located in the green area.
DANGER! The diagonal strap
16
must always be in
the area indicated.
16 16
Attaching the fl exible belt guide - securing with the vehicle 3-point belt
1. Open the fl ap on the storage compartment
25
on the bot-
tom of the booster seat and take out the fl exible belt
guide
24
.
2. Close the fl ap on the storage compartment
25
.
4. Place the belt guide clip
28
of the fl exible belt guide
24
on the sitting surface of the booster seat.
5. Follow the remaining steps for the installation method
9.4
FASTENING WITH 3-POINT BELT AS A SEAT CUSHION
WITHOUT BACKREST
6. Attach the belt guide clip
28
to the diagonal strap. Check
that the belt of the fl exible belt guide
24
is not twisted.
7. Adjust the belt in the belt guide clip
28
so that the diago-
nal strap
16
is located in the green area. If the diagonal
belt is not in the green area even with the fl exible belt
guide
24
, the child seat must not be used without the
backrest on this seat.
DANGER! The diagonal belt must always be located
in the area indicated.
The child seat is installed permanently in the vehicle with the ISOFIT locking
arms.
Your child is then buckled into the child seat with the vehicle's 3-point seat belt.
01
02
1. If your vehicle is not equipped with ISOFIX seat fi ttings as standard, clamp
the two insertion aids
02
supplied with the seat*, with notch facing upwards,
onto the two ISOFIX fi xing points
01
in your vehicle.
TIP! The ISOFIX fi xing points are located between the seat surface and the
backrest of the car seat.
* The insertion aids make it easier to install the child seat with the ISOFIX fi xing points and they
prevent damage to the car seat covers. If they are not being used, remove them and keep them
in asafe place. For vehicles with afolding backrest, the insertion aids need to be removed before
folding the backrest. Any problems that occur are usually caused by dirt or external objects on the
insertion aids and on the hook. Remove the dirt or external objects to resolve such problems.
FASTENING WITH ISOFIT LOCKING ARMS AS
ABOOSTER SEAT WITHOUT BACKREST
9.3
2. Hold down the ISOFIT setting button
08
and push the
ISOFIT locking arms
05
fully out.
3. On both sides of the seat, squeeze the green locking but-
ton
07
and the red release button
06
together. This en-
sures that both hooks on the ISOFIT locking arms
05
are
open and ready to use.
4. Place the child seat facing forward on acar seat ap-
proved for this purpose.
5. Position the two ISOFIT locking arms
05
directly in front
of the two insertion aids
02
.
6. Push both ISOFIT locking arms
05
into the insertion aids
02
until the ISOFIT locking arms
05
engage on both
sides with an audible click.
DANGER! The green locking button
07
must be visi-
ble on both sides, indicating that the child seat is cor-
rectly fastened.
7. Hold down the ISOFIT setting button
08
and push the
child seat as far back as possible.
8. Shake the child seat to check that it is securely fastened,
and check the locking buttons
07
again to ensure that
they are both fully green.
9. Carry out the steps in paragraph 9.5 "SECURING THE
CHILD IN A CHILD SEAT WITHOUT BACKREST".
For the safety of your child, before every car journey check that...
► the child seat is engaged on both sides with the ISOFIT locking arms
05
in the
ISOFIT fi xing points
01
and both locking buttons
07
are fully green,
► the lap belt
15
is passed into the bright red belt guides
04
on both sides of the
seat cushion,
► the lap belt
15
is passed through the bright red SecureGuard
13
,
► the diagonal strap
16
on the vehicle belt buckle side
18
is also passed into the
bright red belt guide
04
on the seat cushion,
► the diagonal strap
16
runs diagonally backwards,
► the straps are tight and not
twisted,
► the vehicle belt buckle
18
is not placed in the bright red belt guide
04
on the
seat cushion.
DANGER! If your child tries to open the ISOFIT locking buttons
07
or the vehi-
cle belt buckle
18
or to insert the diagonal strap
16
into the bright red Secure-
Guard
13
, stop your vehicle as soon as possible. Check that the child seat is cor-
rectly fastened and that your child is correctly secured. Explain to your child the
dangers caused by such actions.
UNFASTENING YOUR CHILD AND REMOVAL:
To unfasten your child or to remove the child seat, follow the steps in Section 7
“REMOVAL AND DISPOSAL”.
The child seat is not installed permanently in the vehicle. It is simply secured
along with your child by the vehicle's 3-point seat belt.
1. Place the child seat on asuitable vehicle seat.
Follow the steps in paragraph 9.5
“SECURING THE CHILD IN A CHILD SEAT WITHOUT
BACKREST”.
For the safety of your child, before every car journey check that...
► the child seat is securely fastened,
► the lap belt
15
is passed into the bright red belt guides
14
on both sides of
the seat cushion,
► the lap belt
15
is passed through the bright red SecureGuard
13
,
► the diagonal strap
16
on the vehicle belt buckle side
18
is also passed into
the bright red belt guide
04
on the seat cushion,
► the diagonal strap
16
runs diagonally backwards,
► the straps are tight and not
twisted,
► the vehicle belt buckle
18
is not placed in the bright red belt guide
04
on the
seat cushion.
DANGER! If your child tries to open the vehicle belt buckle
18
or insert the di-
agonal strap
16
into the bright red SecureGuard
13
, stop your vehicle as soon as
possible. Check that the child seat is correctly fastened and that your child is
correctly secured. Explain to your child the dangers caused by such actions.
UNFASTENING YOUR CHILD AND REMOVAL:
To unfasten your child or to remove the child seat, follow the steps in Section 7
“REMOVAL AND DISPOSAL”.
SECURING THE CHILD IN A CHILD SEAT WITH-
OUT BACKREST
9.5
1. Sit your child sit in the child seat.
2. Pull out the vehicle belt and pass it in front of your child to
the vehicle belt buckle
18
.
DANGER! Check that the vehicle belt is not twisted,
otherwise the full protective e ect of the restraint system
is not ensured.
3. Engage the belt clip in the vehicle belt buckle
18
so that
there is an audible CLICK.
4. Insert the diagonal strap
16
and lap belt
15
on the vehi-
cle belt buckle side
18
into the bright red belt guide
04
on the seat cushion.
DANGER! The
vehicle
belt buckle
18
should not be
in the same area as the bright red belt guide
04
.
The lap belt
15
must lie as low as possible over your
child's hips on both sides.
5. Insert the lap belt
15
in the bright red
SecureGuard
13
.
DANGER! Do not insert the diagonal strap
16
into
the bright red SecureGuard
13
.
03
16
12
09
12
09
24
25
26
27
28
24
28
16
25
24
3. Engage the metal attachment
26
in the ISOFIX locking
arm
27
located on the vehicle belt buckle side.
26
27
28
24
28
16
08
05
070605
0502
05
02
07
08
07
18
16
15
18
04
FASTENING WITH 3-POINT BELT AS A SEAT
CUSHION WITHOUT BACKREST
9.4
16
13
15
en-GB_180926_H29_KIDFIXR_KIDFIX S.indd 2 11.10.2018 12:46:31

Chat with your Britax Romer Kidfix 2 S manual using AI

Get instant AI answers from your Britax Romer Kidfix 2 S manual

Ask anything about the Britax Romer Kidfix 2 S. Answers come from this manual, with the pages they are based on.

Kidfix 2 S Maintenance Schedule

Remind me when maintenance is due
Every 5 years
Replace after accident or damage

Replace the seat if involved in an accident over 10 km/h or if damaged.

Before every trip
Check seat installation and belt routing

Verify ISOFIX locking indicators are green, belts are straight and routed correctly through guides.

Free maintenance reminders

Timed to your purchase date. Always free, unsubscribe anytime.

By submitting you agree to the privacy policy. Unsubscribe with one click in any email.
M: QW-35-FL

Ask a Question

0/1000

Do you recommend Kidfix 2 S?

Yes No

Frequently Asked Questions

A

It is approved for Group II/III children weighing 15 to 36 kg, generally around 4 to 12 years old. Fit should always be based on the child's size, belt position, and the vehicle seating position.

Is this answer helpful?

A

Yes. It can be used with a vehicle's approved three-point belt. ISOFIT is optional and provides a fixed connection to ISOFIX anchor points when the vehicle supports it.

Is this answer helpful?

A

No. The seat must never be used with a two-point vehicle belt. A three-point belt is required to provide correct restraint and belt routing.

Is this answer helpful?

A

Set the headrest so there is about a two-finger space between the child's shoulders and the headrest. The shoulder belt should pass over the collarbone, not the neck, and angle back toward the vehicle anchor.

Is this answer helpful?

A

SecureGuard is the light-red belt-routing section for the lap belt. It helps keep the lap belt low across the child's hips. The shoulder belt must not be placed through SecureGuard.

Is this answer helpful?

A

The backrest may be removed only for children weighing 22 to 36 kg and taller than 125 cm. Keeping the backrest in place as long as possible, preferably until at least 135 cm, is recommended for better side protection.

Is this answer helpful?

A

Remove the cover and wash it at 30 C on a gentle machine cycle with mild detergent, following its care label. Clean plastic parts with soapy water and do not use harsh cleaners or solvents.

Is this answer helpful?

M: gpt-5.6-terra

Advantages and Disadvantages

Advantages

  • Approved for children weighing 15 to 36 kg, covering approximately ages 4 to 12.
  • Offers ISOFIT attachment or three-point belt installation for broad vehicle compatibility.
  • Adjustable headrest and color-coded belt guides support correct belt positioning.
  • Kidfix2 S includes SICT side-impact protection on the door-facing side.
  • Can convert into a booster cushion for eligible older and taller children.
VS

Disadvantages

  • A two-point vehicle belt cannot be used with this seat.
  • Booster-only mode offers less side-impact protection than use with the backrest.
  • ISOFIT use is limited to vehicles with compatible ISOFIX anchor points.
  • Correct belt routing requires checks before every journey.
  • The seat should be replaced after a collision exceeding 10 km/h, even if damage is not visible.
M: gpt-5.6-terra

Product Specification

Group

2/3

Weight class

33.07-79.37 lb

Age group

3.5-12 years

Color

black

Belt system

three-point seat belt

Installation

forward-facing

ISOFIX

yes

Features

adjustable backrest, height-adjustable headrest, side-impact protection, removable/washable cover, installation indicators

Dimensions (W x H x D)

21.26 x 26.38-33.46 x 15.35 in

Weight

15.87 lb

M: gpt-5.6-terra

Product Description

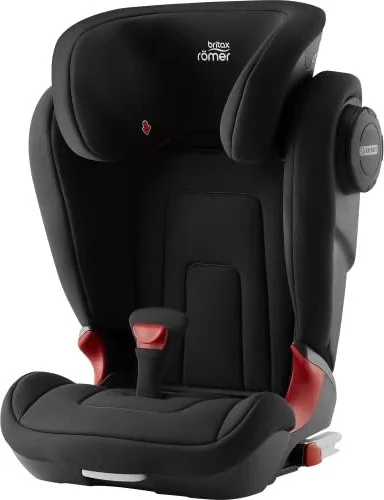
Britax Romer Kidfix2 S Cosmos Black 2018/2019 Manual

The Britax Romer Kidfix2 S cosmos black 2018/2019 Manual highlights a versatile high-back booster designed to support children through their later car-seat years. Suitable for Group II/III use, the seat is approved under ECE R44/04 for children weighing 15 to 36 kg, approximately ages 4 to 12. Its Cosmos Black finish gives the seat a clean, understated look that can suit many vehicle interiors.

Flexible installation for everyday travel

The Kidfix2 S can be used forward-facing with a vehicle three-point belt, either on its own or together with the ISOFIT connectors. ISOFIT attaches the seat to compatible ISOFIX anchor points, helping keep it stable when the child is not seated. Clear green indicators confirm that both connectors are properly engaged. The seat can also be installed using only the vehicle's three-point belt in approved seating positions.

A close fit against the vehicle seat back is important for correct positioning. Before every journey, parents should check that the seat is secure, the belt is not twisted, and the buckle is not resting inside a belt guide. The design is not suitable for use with a two-point belt.

Belt guidance and side-impact features

Color-coded guides help distinguish the belt paths. The lap belt runs through the light-red guides and the SecureGuard section, while the shoulder belt passes through the dark-red headrest guide. SecureGuard is designed to help keep the lap belt positioned low across the child's hips. For the Kidfix2 S version, the adjustable SICT side-impact element is positioned on the side nearest the vehicle door, leaving a small clearance from the door.

The height-adjustable headrest supports a better shoulder-belt route as a child grows. It should be set so there is roughly a two-finger gap between the child's shoulders and the headrest. The shoulder belt should cross the collarbone rather than touch the neck, then travel diagonally back toward the vehicle belt anchor.

Optional booster configuration

For older children, the backrest can be removed to create a booster cushion. This option is limited to children from 22 to 36 kg who are taller than 125 cm. Britax Romer recommends retaining the backrest for as long as possible, ideally until at least 135 cm, because it provides additional side-impact support. Without the backrest, use depends on correct shoulder-belt placement and suitable vehicle side protection. A flexible belt guide can help bring the belt into the required position.

Care and practical notes

The removable cover can be machine-washed at 30 C on a gentle cycle using mild detergent. Plastic parts can be cleaned with soapy water. Use original replacement covers only, avoid solvents or oils, and replace the seat after a significant collision or if it is damaged.

Note: Never leave a child unattended in the vehicle, and always secure the seat even when it is empty.

M: gpt-5.6-terra

© Copyright 2026 Manual.ly