
Bresser Nightlux 200 Pro Manual
PDF manual · 8 Pages
English



Quick check
Incorrect answer, please try again.
Chat with your Bresser Nightlux 200 Pro manual using AI
Get instant AI answers from your Bresser Nightlux 200 Pro manual
Ask anything about the Bresser Nightlux 200 Pro. Answers come from this manual, with the pages they are based on.
Nightlux 200 Pro Maintenance Schedule
Disconnect power first. Use a dry cloth for the exterior and a soft lint-free cloth with gentle pressure for lenses to avoid scratching.
If the device is not used for a long time, remove the batteries to prevent potential leakage or damage.
Ask a Question
Do you recommend Nightlux 200 Pro?
Yes NoFrequently Asked Questions
Press and hold the power button to activate the unit. Once on, view the LCD screen for a preview.
Is this answer helpful?
You need eight alkaline AA batteries. Insert four into each battery compartment following polarity markings.
Is this answer helpful?
Yes, press the photo button to capture images after adjusting focus and lighting settings appropriately.
Is this answer helpful?
The digital zoom increases up to 2x magnification. Press the button repeatedly until the desired level is reached.
Is this answer helpful?
Yes, the device features a tripod connection point for stable mounting and fixed positioning during use.
Is this answer helpful?
Use a soft, lint-free cloth with gentle pressure. Never use cleaning fluids on the exterior or optics.
Is this answer helpful?
The regular guarantee period lasts five years beginning on the day of your initial purchase transaction.
Is this answer helpful?
Advantages and Disadvantages
Advantages

- Digital zoom up to 2x magnification for detailed observation.
- Infrared LED supports night vision with seven brightness levels.
- Extended working time allows up to ten hours on batteries.
- Micro SD card slot accommodates storage from four to thirty-two GB.
- Built-in LCD screen provides immediate visual preview feedback.
Disadvantages

- Eight AA batteries are required but not included in packaging.
- Image quality may suffer if infrared is used during daylight.
- Some micro SD cards might face compatibility reading issues.
- Manual focus adjustment can be tedious for quick target locking.
- Disassembly is prohibited and voids the warranty immediately upon attempt.
Product Specification
Type
Binocular
Technology
Digital Low-Light
Magnification
3-6x
Viewing Range
390.42 ft
Field of View
6.8°
Battery Life
6h
Features
Recording Function
Dimensions
6.30 x 7.87 x 2.36 in (W x H x D)
Weight
1.05 lbs
Product Description
Exploring Advanced Night Vision Technology
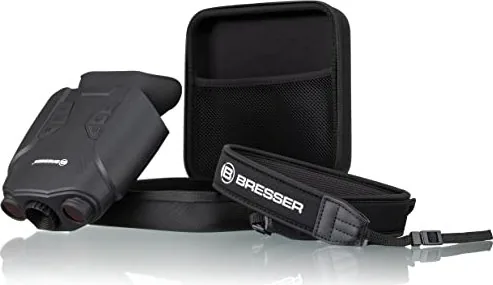
Understanding complex equipment requires preparation. Many users refer to the Bresser Digital Nightlux 200 Pro Manual to ensure correct operation. This guide emphasizes safety precautions regarding children and electrical components. The device transforms low-light environments into visible scenes effectively. Its design incorporates modern digital sensors for improved performance. This tool aids enthusiasts in exploring nocturnal activities safely.
Visual Capabilities and Controls
The viewing area connects directly to an LCD preview system. An adjustable aperture handles varying light conditions smoothly. Users can switch between day and night modes easily. The infrared function provides seven distinct brightness levels for optimal visibility. Digital zoom offers a maximum increase of two times magnification. This helps inspect distant objects without losing image quality significantly. Focus adjustments occur manually via a dedicated wheel on the front side. A wide visual angle ensures a comfortable field of view during extended sessions. Tripod connections offer stability for long exposure recordings.
Power Requirements and Storage Solutions
Sustained operation depends heavily on battery selection. The unit demands eight alkaline AA batteries distributed across two compartments. Operating time spans up to ten hours in daytime mode and six hours when utilizing night vision features. Data recording requires external memory integration. Compatible micro SD cards range from four to thirty-two gigabytes in capacity. Always verify installation status to avoid error messages regarding missing media. Ensure batteries are fully charged before every excursion outdoors.
Operational Best Practices
Turning on the device involves holding the power button securely. Photos and videos are captured using dedicated buttons on the interface. Screen brightness remains adjustable through repetitive pressing until desired level appears. Troubleshooting poor image quality often involves checking focus rings or ensuring infrared status matches ambient light. Privacy protection is vital; respect personal boundaries when observing surroundings.
Maintenance and Warranty Coverage
Cleaning requires disconnecting power sources first to prevent damage. Only use dry cloths for exteriors and lint-free materials for optics. Chemical fluids should never contact electronic parts. Dust and moisture protection is essential when not in active use. The product carries a five-year warranty starting from the purchase date. Dealers assist with defect reports by contacting service centers directly. Service inquiries can be made via email or telephone lines globally. Proper disposal follows environmental directives for electronic waste. Batteries must be returned to collection points rather than household trash.
Search for 67,706 Manuals online


Type-in Brand or Model