
Benning MM 1 Manual
PDF manual · 104 Pages
English



Quick check
Incorrect answer, please try again.
Chat with your Benning MM 1 manual using AI
Get instant AI answers from your Benning MM 1 manual
Ask anything about the Benning MM 1. Answers come from this manual, with the pages they are based on.
MM 1 Maintenance Schedule
Send the device to the factory service center annually to maintain specified measurement accuracy.
Replace batteries when the low battery symbol appears on the display. Use two 1.5 V micro batteries.
Free maintenance reminders
Timed to your purchase date. Always free, unsubscribe anytime.
Ask a Question
Do you recommend MM 1?
Yes NoFrequently Asked Questions
It is used for routine electrical measurements such as AC and DC voltage, DC current, resistance, continuity testing, and diode testing. It is aimed at trained users who need a compact everyday multimeter.
Is this answer helpful?
Yes, it is intended for electricians and qualified technical users. Its safety category, included test leads, and protective holster make it suitable for professional troubleshooting and maintenance tasks.
Is this answer helpful?
Yes. The meter includes automatic ranging, and the RANGE button lets the user switch to manual ranges when needed. A longer press returns the device to automatic range selection.
Is this answer helpful?
Yes. It has a combined continuity and diode test position. The continuity mode uses an audible buzzer, and the RANGE button switches between continuity and diode functions.
Is this answer helpful?
It is designed for circuits up to 600 V AC or DC in overvoltage category III, with proper rated leads and caps. It should be used only in dry conditions and inspected before each use.
Is this answer helpful?
It runs on two 1.5 V micro batteries and includes a low-battery warning. The device should be calibrated regularly, and the exterior should be cleaned with a dry cloth only.
Is this answer helpful?
Advantages and Disadvantages
Advantages

- Covers essential electrical tests: AC/DC voltage, DC current, resistance, continuity, and diode checking.
- Compact and lightweight design makes it easy to carry and use on site.
- Protective rubber holster adds durability and improves standing or hanging use.
- Auto ranging, hold function, and buzzer improve everyday testing convenience.
Disadvantages

- Limited to dry environments, so it is not suited for wet or harsh outdoor conditions.
- Current ranges are relatively narrow, which may not fit heavier-duty applications.
- Accuracy and feature set are practical, but not as advanced as higher-end multimeters.
- Battery replacement and calibration are needed for long-term reliable operation.
Product Specification
Measurement range
max. 600V, max. 32MΩ
Scope of delivery
Bag, Test leads
Product Description
Benning MM 1 Multimeter: A Compact Tool for Everyday Electrical Checks
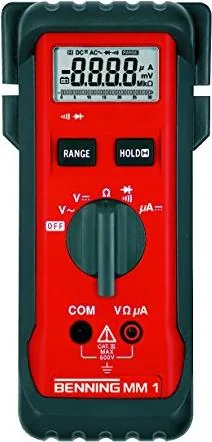
The Benning MM 1 Multimeter Manual points to a straightforward, professional-grade tester built for practical work in dry environments. This compact digital multimeter is designed for electricians, technicians, and trained users who need reliable readings without unnecessary complexity. It covers the core tasks most field users need: AC and DC voltage, DC current, resistance, continuity, and diode testing.
What stands out first is the balance between simplicity and safety. The MM 1 uses a 3½-digit LCD with auto polarity indication, manual and automatic ranging, and a hold function for freezing readings on screen. It also includes an audible continuity buzzer, which makes fast circuit checks easier when tracing wiring or confirming connections. For busy repair or installation work, these small conveniences can save time.
The meter is built with everyday handling in mind. A protective rubber holster helps shield the device from impact, while also allowing it to stand upright or hang for better visibility. The included safety test leads are rated for the meter’s intended category, and the design supports use up to 600 V in CAT III environments when proper accessories and caps are used. That makes it a practical option for common electrical maintenance tasks where safety and clarity matter.
Performance details also reflect a tool aimed at real-world use. The MM 1 offers automatic shutoff after about 10 minutes, a bargraph display for quick trend observation, and useful measurement ranges for low-level and standard electrical values. Its battery-powered operation and compact size make it easy to carry between jobs, while the low-battery indicator and simple battery replacement keep upkeep manageable. Regular calibration is recommended to maintain accuracy over time.
Overall, the Benning MM 1 is a dependable everyday multimeter rather than a feature-heavy specialty instrument. It fits users who value dependable measurements, clear operation, and a sturdy form factor. If your work involves routine troubleshooting, installation checks, or basic diagnostics, this model offers a practical mix of usability and protection.
Notes
- Best suited for dry environments and standard electrical testing.
- Use only properly rated leads and CAT caps for higher-risk measurement categories.
- Regular calibration helps preserve measurement accuracy.
Search for 67,706 Manuals online


Type-in Brand or Model