
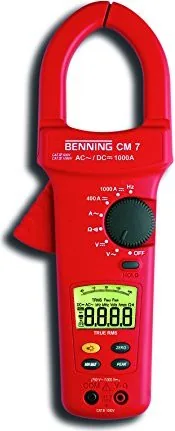
Benning CM 7 Manual
PDF manual · 118 Pages
English



Quick check
Incorrect answer, please try again.
Chat with your Benning CM 7 manual using AI
Get instant AI answers from your Benning CM 7 manual
Ask anything about the Benning CM 7. Answers come from this manual, with the pages they are based on.
CM 7 Maintenance Schedule
To maintain specified accuracy, send the device to Benning Service Center for recalibration. The recommended interval is one year.
Replace the internal 9V block battery immediately when the low battery symbol appears on the display. Ensure device is voltage-free before opening.
Wipe exterior with a clean dry cloth. Check battery compartment for electrolyte leaks or white deposits and clean with a dry cloth if found.
Free maintenance reminders
Timed to your purchase date. Always free, unsubscribe anytime.
Ask a Question
Do you recommend CM 7?
Yes NoFrequently Asked Questions
The Benning CM 7 can measure currents ranging from 0 to 1000 Amperes. It features three distinct ranges: 0-200A, 200-400A, and 400-1000A, ensuring precise readings across different load levels.
Is this answer helpful?
Yes, but only in dry conditions. The device has an IP30 rating which protects against solid objects larger than 2.5mm but offers no protection against water. It should not be used in rain or wet environments.
Is this answer helpful?
Benning recommends calibrating the device once a year to maintain the specified measurement accuracy. Calibration must be performed by their authorized service center to ensure compliance with technical specifications.
Is this answer helpful?
The device is powered by a single 9V block battery (IEC 6 LR 61). A fully charged alkaline battery typically lasts for about 100 hours of operation before needing replacement.
Is this answer helpful?
Yes, the Benning CM 7 supports frequency measurement directly through the current clamp. It measures frequencies between 20 Hz and 400 Hz with a minimum input sensitivity of 3 Amperes.
Is this answer helpful?
Advantages and Disadvantages
Advantages

- True RMS measurement capability ensures accurate readings even with non-sinusoidal waveforms
- High current range up to 1000 A allows for heavy-duty industrial applications
- Comprehensive safety ratings including CAT III 1000V and CAT IV 600V protection
- Includes necessary safety test leads and protective caps in the scope of delivery
- Auto-zero function improves accuracy for DC current measurements
Disadvantages

- Battery life is limited to approximately 100 hours under continuous use
- Device lacks wireless connectivity for remote data logging
- No built-in temperature measurement probe included
- Requires manual calibration every year to maintain specified accuracy
- Large size may be cumbersome for work in extremely tight spaces
Product Specification
Measurement Range
max. 1000A, max. 1000V, max. 400Ω
Delivery Scope
Bag
Product Description
Benning CM 7 Current Clamp Multimeter Review
The Benning CM 7 is a versatile digital current clamp multimeter designed for skilled electricians and electronics professionals who require precision in dry environments. This robust tool simplifies complex electrical diagnostics by combining multiple measurement functions into a single, handheld device. Whether you are troubleshooting industrial machinery or performing residential electrical checks, the CM 7 offers reliable performance for measuring direct voltage, alternating voltage, direct current, alternating current, resistance, continuity, and frequency.
Designed with safety as a priority, the Benning CM 7 adheres to strict international standards including DIN VDE and EN 61010-1. It features a large 3 ¾-digit LCD display that clearly shows readings, bar graphs, and battery status. The unit operates on a standard 9V block battery, providing approximately 100 hours of usage time. The clamp mechanism allows for non-intrusive current measurements up to 1000 Amperes, accommodating conductors with diameters up to 51 mm. The device includes essential safety accessories like CAT III and CAT IV rated test leads and protective caps to ensure user safety during high-voltage operations.
Users will appreciate the intuitive control layout featuring a rotary switch for function selection, a yellow backlight button for low-light conditions, and dedicated keys for HOLD, ZERO balance, MIN/MAX storage, and PEAK detection. The auto-power-off feature conserves battery life after 30 minutes of inactivity. With dimensions of 275 x 105 x 51 mm and a weight of 534 grams, it fits comfortably in a compact carrying case included in the package. This multimeter is an essential addition to any professional toolkit requiring accurate and safe electrical measurements.
Search for 67,706 Manuals online


Type-in Brand or Model
rocky81
5 months ago
Does the Benning CM 7 digital clamp meter match the product specifications and work properly out of the box?
Manual.ly
5 months ago
Yes, the Benning CM 7 digital clamp meter fully meets all advertised specifications and is completely functional upon arrival. No additional accessories or adjustments are required for immediate use.