Manual.ly Logo

be quiet! Shadow Rock Slim 2 Manual

4.8 · 10 Ratings

PDF manual · 2 Pages

English

M: QW-35-FL
page

/ 2

Loading...
bca4c53e7c5ffb2756dacb64e40c0a1df223 page 2
Intel: LGA 1200 / 1150 / 1151 / 1155
Installation of the mounting
brackets
Screw the Intel spacer nut B (8) onto the
previously positioned Intel backplate
(3). Then position the Intel mounting
brackets (4) over the Intel spacer nut B (8)
and affix these with the mounting bracket
fastening srews (10). You can use any
cross-tip screwdriver for this.
Fasten the 135mm fan (2) onto the cooler
unit (1) using fan clips (15). Connect the
fan to the motherboard’s PWM signal.
When dismantling the fan (2), push the
notches of the fan clips (15) towards the
CPU cooler (1) and unhook them.
Installation der Montagebrücken
Schrauben Sie die Intel Gewindebolzen
B (8) auf die zuvor platzierte Intel Back-
plate (3). Dann platzieren Sie die Intel
Montagebrücken (4) auf den Intel Gewin-
debolzen B, um sie dann mit den Befesti-
gungsschrauben für die Montagebrücke
(10) zu fixieren. Dafür können Sie einen
handelsüblichen Kreuzschraubendreher
verwenden.
Befestigung der Backplate
Platzieren Sie die Intel Backplate Schrauben
(12) in die auf der Rückseite der Intel
Backplate (3) befindlichen Aussparungen.
Beachten Sie hierzu die Bohrlöcher für den
jeweiligen Sockel.
Verwenden Sie zur Befestigung der Back-
plate-Schrauben auf der Intel Backplate
(3) die O-Ringe (14). Sobald die Intel
Backplate (3) für den jeweiligen Intel-
Sockel zusammengebaut ist, positio-
nieren Sie es unter dem Mainboard.
Achten Sie dabei darauf, dass die Intel
Backplate-Schrauben (12) genau in den
Mainboardlöchern positioniert sind.
Befestigen Sie den 135mm Lüfter (2)
mit Hilfe der Lüfterklammern (15) am
Kühler (1). Anschließend verbinden Sie
den Lüfter mit dem CPU-Lüfteranschluss
des Mainboards.
Zur Demontage des Lüfters (2) drücken
Sie die Kerben der Lüfterklammern (15) in
Richtung des CPU-Kühlers (1) und haken
diese aus.
Mounting the CPU cooler
First remove the protective foil from
the underside of the cooler. Spread the
thermal paste (17) on the surface of the
CPU. The amount supplied is sufficient
for one or two applications.
Caution: The thermal paste supplied
is not suitable for human consumption.
If swallowed, drink lots of water and
urgently seek medical attention. Keep
it out of the reach of children. Avoid
contact with skin and eyes.
Montage des CPU-Kühlers
Entfernen Sie zunächst die Schutzfolie
von der Unterseite des Kühlers. Tragen
Sie die Wärmeleitpaste (17) auf die
CPU-Oberfläche auf. Der Inhalt reicht
für ca. 1 – 2 Anwendungen.
Vorsicht: Die mitgelieferte Wärmeleit-
paste ist nicht zum Verzehr geeignet.
Bei Verzehr ausreichend Wasser trinken
und umgehend einen Arzt aufsuchen.
Außerhalb der Reichweite von Kindern
aufbewahren. Vermeiden Sie Haut- und
Augenkontakt.
Position the cooler mounting bridge (6)
centrally on the cooler (1). Next place
the cooler unit onto the CPU. Insert the
mounting bridge fastening screws (11)
from above into the cooler mounting
bridge (6) and then screw these alter-
nately tight. You can use any cross-tip
screwdriver for this.
Legen Sie die Kühler-Montagebrücke
(6) mittig auf den Kühler (1). Anschlie-
ßend platzieren Sie den Kühler auf der
CPU. Stecken Sie die Schrauben für die
Kühler-Montagebrücke (11) von oben
auf die Kühler-Montagebrücke (6) und
schrauben Sie diese abwechselnd fest.
Dafür können Sie einen handelsüblichen
Kreuzschraubendreher verwenden.
Place the four AMD spacer nuts (9) onto
the backplate bolts protruding through
the front side and affix both long AMD
mounting brackets (5) with the AMD
backplate screws (13).
Assembly of the cooler mounting
frame
To permit mounting of the cooler please
remove both the plastic retainers of the
AMD retention module. The factory
fitted backplate affixed to the rear side
of the motherboard will be needed for
sub-sequent installation of the cooler.
Note: To mount the Shadow Rock Slim 2
(1) on an AM3 motherboard, please use
the four AM3 washers (16), placing these
below the backplate bolts protruding
through the front side of the mother-
board.
Position the cooler mounting bridge (6)
centrally on the cooler (1). Next place
the cooler unit onto the CPU. Insert
the mounting bridge fastening screws
(11) from above into the cooler moun-
ting bridge and then screw these alter-
natively tight. You can use any cross-tip
screwdriver for this.
Fasten the 135mm fan (2) onto the
cooler unit (1) using fan clips (15).
Connect the fan to the motherboard’s
PWM signal.
When dismantling the fan (2), push the
notches of the fan clips (15) towards the
CPU cooler (1) and unhook them.
Platzieren Sie über die Vorderseite die
vier AMD Abstandsbolzen (9) auf die
Bolzen der Backplate und fixieren die
beiden langen AMD Montagebrücken (5)
mit Hilfe der AMD Backplate-Schrauben
(13).
Legen Sie die Kühler-Montagebrücke
(6) mittig auf den Kühler (1). Anschlie-
ßend platzieren Sie den Kühler auf der
CPU. Stecken Sie die Schrauben für die
Kühler-Montagebrücke (11) von oben
auf die Kühler-Montagebrücke (6) und
schrauben Sie diese abwechselnd fest.
Dafür können Sie einen handelsüblichen
Kreuzschraubendreher verwenden.
Befestigen Sie den 135mm Lüfter (2) mit
Hilfe der Lüfterklammern (15) am Kühler
(1). Anschließend verbinden Sie den
Lüfter mit dem CPU-Lüfteranschluss des
Mainboards.
Zur Demontage des Lüfters (2) drücken
Sie die Kerben der Lüfterklammern (15) in
Richtung des CPU-Kühlers (1) und haken
diese aus.
Mounting the CPU cooler
First remove the protective foil from
the underside of the cooler. Spread the
thermal paste (17) on the surface of the
CPU. The amount supplied is sufficient
for one or two applications.
Caution: The thermal paste supplied
is not suitable for human consumption.
If swallowed, drink lots of water and
urgently seek medical attention. Keep
it out of the reach of children. Avoid
contact with skin and eyes.
Montage des CPU-Kühlers
Entfernen Sie zunächst die Schutzfolie
von der Unterseite des Kühlers. Tragen
Sie die Wärmeleitpaste (17) auf die
CPU-Oberfläche auf. Der Inhalt reicht
für ca. 1 – 2 Anwendungen.
Vorsicht: Die mitgelieferte Wärmeleit-
paste ist nicht zum Verzehr geeignet.
Bei Verzehr ausreichend Wasser trinken
und umgehend einen Arzt aufsuchen.
Außerhalb der Reichweite von Kindern
aufbewahren. Vermeiden Sie Haut- und
Augenkontakt.
Aufbau des Kühlerbefestigungs-
rahmens
Bitte entfernen Sie zur Kühlermontage
die beiden Künststoffhalterungen des
AMD-Retentionmoduls. Die werkseitig
auf der Mainboard-Rückseite befestigte
Backplate wird für die weitere Instal-
lation des Kühlers benötigt.
Hinweis: Zur Installation des Shadow
Rock Slim 2 (1) auf einem AM3 Mainboard
nutzen Sie bitte die vier AM3 Unterleg-
scheiben (16) und legen diese auf die
Bolzen der werkseitig montierten Back-
plate über die Mainboard Vorderseite.
AMD: AM4 / AM3(+)
The following parts are needed for this:
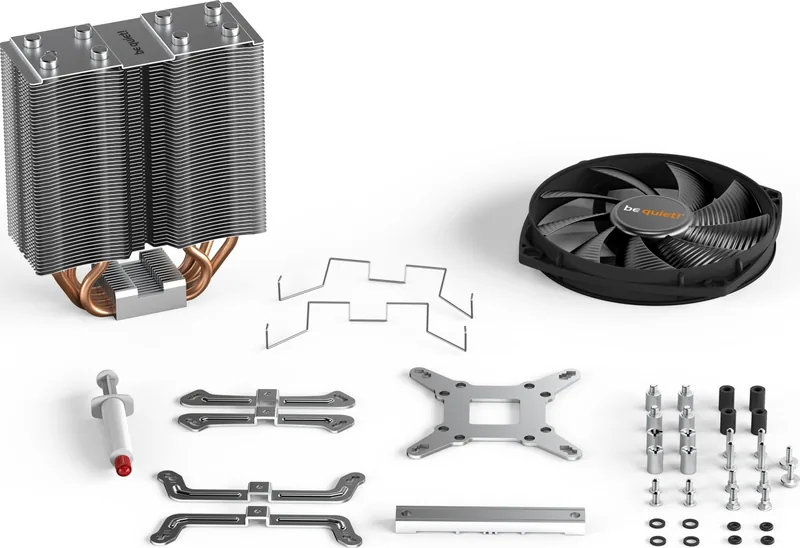
1x Shadow Rock Slim 2 CPU cooler (1), 1x 135mm fan (2), 1x Intel backplate (3), 2x Intel mounting brackets (4), 1x cooler
mounting bridge (6), 4x Intel spacer nut B (8), 4x mounting bracket fastening screws (10), 2x mounting bridge fastening screws
(11), 4x Intel backplate screws (12), 4x O-Ringe (14), 2x fan clips (15), 1x thermal paste (17)
Es werden folgende Bauteile benötigt:
1x Shadow Rock Slim 2 CPU-Kühler (1), 1x 135mm Lüfter (2), 1x Intel Backplate (3), 2x Intel Montagebrücken (4), 1x Kühler-
Montagebrücke (6), 4x Intel Gewindebolzen B (8), 4x Befestigungsschrauben für die Montagebrücke (10), 2x Schrauben für die
Kühler-Montagebrücke (11), 4x Intel Backplate-Schrauben (12), 4x O-Ringe (14), 2x Lüfterklammern (15), 1x Wärmeleitpaste (17)
Mounting the backplate
Position the Intel backplate screws (12)
in the notches situated on the rear side
of the Intel backplate (3). Pay attention
in so doing to align with the holes drilled
for each socket.
For fixing the backplate screws onto
the Intel backplate use the O-rings (14).
Once assembly of the Intel backplate (3)
for the respective Intel socket has been
completed, position it under the mother-
board. In so doing make sure that the
backplate screws (12) are precisely loca-
ted within the motherboard holes.
The following parts are needed for this:
1x Shadow Rock Slim 2 CPU cooler (1), 1x 135mm fan (2), 2x Long AMD mounting brackets (5), 1x cooler mounting bridge (6),
4x AMD spacer nuts (9), 2x mounting bridge fastening screws (11), 4x AMD backplate screws (13), 2x fan clips (15), 4x AM3
washers (16), 1x thermal paste (17)
Es werden folgende Bauteile benötigt:
1x Shadow Rock Slim 2 CPU-Kühler (1), 1x 135mm Lüfter (2), 2x Lange AMD Montagebrücken (5), 1x Kühler-Montagebrücke
(6), 4x AMD Abstandsbolzen (9), 2x Schrauben für die Kühler-Montagebrücke (11), 4x AMD Backplate-Schrauben (13),
2x Lüfterklammern (15), 4x AM3 Unterlegscheiben (16), 1x Wärmeleitpaste (17)

Chat with your be quiet! Shadow Rock Slim 2 manual using AI

Get instant AI answers from your be quiet! Shadow Rock Slim 2 manual

Ask anything about the be quiet! Shadow Rock Slim 2. Answers come from this manual, with the pages they are based on.

Ask a Question

0/1000

Do you recommend Shadow Rock Slim 2?

Yes No
0
User Pic

Shannon Roberts

4 months ago

Does this cooler effectively handle high-end CPUs like the i9-13600K or Ryzen 7 5800X without excessive noise?

0
User Pic

Manual.ly

4 months ago

Thank you for your inquiry. Our CPU cooler is designed to balance performance and acoustics across a wide range of processors. For mid-range chips such as the Ryzen 7 5800X, it maintains excellent temperatures (around 80°C under full load) while operating silently below 24 dB. However, for high-power models like the Intel i9-13600K, users have reported that cooling performance may reach its limits during sustained heavy loads, potentially resulting in higher temperatures. We recommend ensuring adequate case airflow and considering an additional fan if using extreme overclocking configurations.

M: QW-35-FL
M: QW-35-FL
0
User Pic

EvenietDolor92

4 months ago

Is the installation process difficult for beginners, and does it include all necessary mounting hardware for both AMD and Intel?

M: QW-35-FL

Frequently Asked Questions

A

It supports a wide range of Intel sockets including LGA 1200, 1150, 1151, 1155, 2011, and 2066, as well as AMD sockets like AM4 and AM3+. Specific brackets and spacers are included for each type.

Is this answer helpful?

A

The amount included is sufficient for one or two applications. If you need to reinstall the cooler, you may run out of paste and should purchase a new tube to ensure proper heat transfer.

Is this answer helpful?

A

While possible, the manufacturer recommends installing the cooler outside the case first. This makes the process easier and prevents accidental damage to other components during the mounting procedure.

Is this answer helpful?

A

Use the provided fan clips to secure the 135mm fan onto the cooler unit. Push the notches of the clips towards the cooler to unhook them if you need to remove the fan later.

Is this answer helpful?

A

The Shadow Rock Slim 2 comes with a three-year manufacturer guarantee for end consumers. You must provide a copy of the receipt from an authorized dealer to claim warranty service.

Is this answer helpful?

A

Yes, the included 135mm fan features PWM technology. You can connect it to the motherboard's PWM signal header to allow the system to automatically adjust fan speeds based on temperature.

Is this answer helpful?

M: QW-35-FL

Advantages and Disadvantages

Advantages

  • Slim profile fits easily into small form factor cases
  • Includes high-quality 135mm PWM fan for adjustable speed
  • Comprehensive mounting kit supports both Intel and AMD sockets
  • Three-year warranty covers manufacturing defects
  • Quiet operation suitable for office and home environments
VS

Disadvantages

  • May struggle with extreme overclocking compared to larger coolers
  • Thermal paste amount limits reuse without purchasing more
  • Installation requires careful alignment of mounting bridges
  • Not suitable for liquid-cooled systems as it is air-only
  • Fan clips can be slightly stiff to engage initially
M: QW-35-FL

Product Specification

Type

Tower Cooler

Dimensions with Fan

5.4x6.3x2.9 in (WxHxD)

Fan

1x 5.3x5.3x0.9 in, 1400rpm, 23.7dB(A)

Weight with Fan

1.5 lbs

Connector

4-Pin PWM

AMD Socket

AM5, AM4

Intel Socket

2011-0/2011-1/2011-3/2066, 1700 (Note), 1150/1151/1155/1156/1200

Intel Socket Note

Socket-1700 mounting kit may not be included; available from manufacturer

TDP Rating

160W

Features

4 Heatpipes, Direct-Touch Heatpipe

Manufacturer Warranty

3 Years

M: QW-35-FL

Product Description

The be quiet! Shadow Rock Slim 2: Silent Cooling for Compact Builds

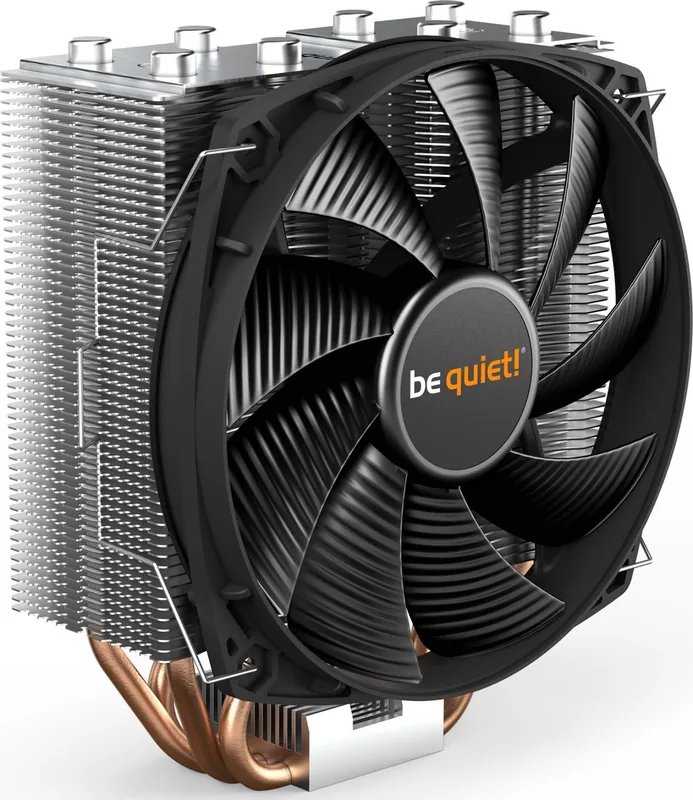
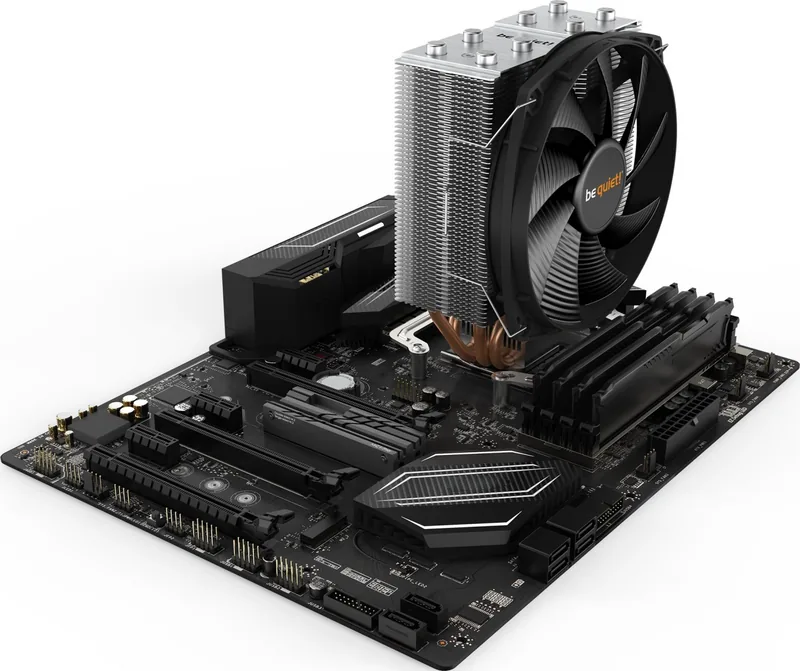
The be quiet! Shadow Rock Slim 2 is a high-performance air CPU cooler designed specifically for users who need efficient heat dissipation without the bulk of traditional large coolers. This unit stands out in the crowded market by offering robust cooling capabilities within a slim profile, making it an ideal choice for compact PC cases or builds where clearance is at a premium. Whether you are building a gaming rig, a workstation, or a home theater PC, this cooler ensures your processor stays cool under load while maintaining a whisper-quiet operation.

At the heart of the Shadow Rock Slim 2 is a sophisticated heatsink design featuring multiple heat pipes that efficiently transfer heat away from the CPU core. It comes equipped with a 135mm PWM fan, which allows for intelligent speed control based on system temperatures. This means the fan runs silently during light tasks and ramps up only when necessary to handle heavy workloads, balancing performance with acoustic comfort. The package includes all necessary mounting hardware for both Intel and AMD platforms, ensuring broad compatibility across modern motherboards.

Installation is straightforward thanks to the included detailed instructions and pre-applied thermal paste. The kit provides enough paste for one or two applications, saving you the hassle of buying a separate tube. The mounting system utilizes a bridge design that secures the cooler firmly to the motherboard, distributing pressure evenly to protect your CPU. For Intel sockets like LGA 1200, 1150, 1151, 1155, 2011, and 2066, specific backplates and brackets are provided. Similarly, AMD users benefit from dedicated long mounting brackets and spacer nuts compatible with AM4 and AM3+ sockets.

Beyond its functional excellence, the Shadow Rock Slim 2 reflects the brand's commitment to quality and reliability. It comes with a three-year manufacturer warranty for end consumers purchasing from authorized dealers, providing peace of mind regarding product longevity. The cooler is engineered to minimize noise pollution, allowing you to focus on your work or enjoy your games without the distraction of loud fans. By choosing the Shadow Rock Slim 2, you are opting for a solution that combines space-saving design with top-tier thermal performance.

Important Notes

  • Always remove the protective foil from the cooler base before applying thermal paste.
  • Ensure the cooler is mounted outside the case first to simplify cable management and installation.
  • The supplied thermal paste is not for human consumption; keep it away from children.
  • Use a standard cross-tip screwdriver for all mounting operations to avoid damaging screws.
M: QW-35-FL

© Copyright 2026 Manual.ly