
AG Neovo VWM-01 Manual
PDF manual · 2 Pages
English



Quick check
Incorrect answer, please try again.
Chat with your AG Neovo VWM-01 manual using AI
Get instant AI answers from your AG Neovo VWM-01 manual
Ask anything about the AG Neovo VWM-01. Answers come from this manual, with the pages they are based on.
Ask a Question
Do you recommend VWM-01?
Yes NoFrequently Asked Questions
It allows screens to be withdrawn for service without full disassembly of the wall structure.
Is this answer helpful?
Yes, it supports single use, in-line, or video wall installs effectively.
Is this answer helpful?
M6x12 and M8x14 screws are enclosed in the package for assembly.
Is this answer helpful?
You get up to 6.5 mm of fine adjustment for horizontal and vertical alignment.
Is this answer helpful?
A clear clearance of 1 mm is suggested for the best professional look.
Is this answer helpful?
Yes, ensure profiles are levelled horizontally and vertically for stability.
Is this answer helpful?
Press the screen to unlock, loosen screws, and lift out the unit.
Is this answer helpful?
Advantages and Disadvantages
Advantages

- Supports various configurations including single-use or in-line installations
- Push-out function enables easy service and display replacement
- Fine adjustments up to 6.5 mm ensure perfect alignment
- Compatible with optional profiles for straight line setups
- Reduces installation time with straightforward assembly process
Disadvantages

- Requires precise 1 mm spacing for optimal video wall appearance
- Installation involves managing multiple screw sizes and parts
- Lowest line service requires pressing screen above first
- Push-out brackets must be secure during final tightening
- Specific alignment tools may be needed for large walls
Product Specification
Type
Wall Mount
Number of Monitors
1
Screen Size
42-65"
Mobility
Fixed
Max Load
176.37 lbs
VESA
Max. 400x400
Color
black, silver
Weight
9.92 lbs
Product Description
Discover the Versatility of the AG neovo VWM-01 Video Wall Solution
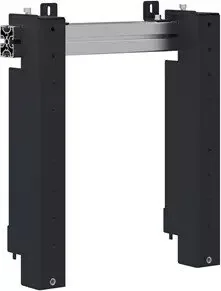
Creating professional video walls requires reliable hardware that simplifies complex installation tasks. The AG neovo VWM-01 stands out as a premier mounting option for businesses seeking stability. This system handles various configurations ensuring displays remain secure while allowing maintenance access. Whether setting up a single monitor or in-line array, this kit provides structural support for demanding environments.
Installation and Flexibility
One key feature is adaptability across use cases. It supports single-use and in-line installation methods. The system includes enclosed parts like M6 and M8 screws making assembly straightforward. Optional VWA-01 profiles integrate seamlessly for straight line setups. The physical design allows fine adjustments of up to 6.5 mm horizontally and vertically. This ensures perfect alignment even on uneven surfaces or during initial mounting.
Maintenance and Service
Serviceability is often overlooked, but this system prioritizes it to minimize downtime. The push-out function allows technicians to withdraw displays for repair without dismantling the entire wall. This is particularly useful for the lowest line where access might be restricted. Simply pressing indicated positions locks or unlocks the screen with a slight click. A clear span of 1 mm between screens ensures a clean look without distracting gaps in video content.
Final Thoughts
Investing in high-quality mounting hardware reduces long-term operational costs. The AG neovo VWM-01 reduces installation time and simplifies future maintenance. By combining robust construction with user-friendly features, this product ensures your video wall remains a central focus. It allows for rapid replacement of defective units while keeping the rest of the wall operational. The clear instructions regarding profile leveling and spacing contribute to a professional final result meeting industry standards.
Note: Always follow safety guidelines when handling heavy display equipment to prevent injury.
Search for 67,706 Manuals online


Type-in Brand or Model