
AeroCool Blade Manual
PDF manual · 2 Pages
English



Quick check
Incorrect answer, please try again.
Chat with your AeroCool Blade manual using AI
Get instant AI answers from your AeroCool Blade manual
Ask anything about the AeroCool Blade. Answers come from this manual, with the pages they are based on.
Ask a Question
Do you recommend Blade?
Yes NoFrequently Asked Questions
You can install multiple 3.5 inch hard drives and solid state drives depending on your requirements and space availability.
Is this answer helpful?
The manual included in the accessory bag provides step by step instructions for all major assembly tasks.
Is this answer helpful?
Yes, there is space for a rear radiator installation for those who prefer advanced cooling solutions.
Is this answer helpful?
USB 3.0, USB 2.0, HD Audio and Mic input ports are present for easy connectivity to external devices.
Is this answer helpful?
Most screws are included but verify against your specific motherboard model to ensure compatibility with standoffs.
Is this answer helpful?
Yes, PCIe slots are available for graphics or other expansion cards to enhance functionality.
Is this answer helpful?
Refer to the motherboard manual for correct header placement to connect power LED and switch cables properly.
Is this answer helpful?
Advantages and Disadvantages
Advantages

- Easy installation path for motherboard and drives
- Supports both 3.5 HDD and 2.5 SSD storage options
- Includes multiple fan mounts for front, top, rear, and radiator
- Front I/O panel provides USB 3.0 and audio connectivity
- Accessory bag contains specific screws for various components
Disadvantages

- Regional specifications may vary requiring retailer contact
- Beginner users might find the manual text dense
- Some screws might not fit all custom motherboard types
- Fan configurations depend on specific buyer preferences
- Cable routing requires patience for a clean aesthetic
Product Specification
External
N/A
Internal
2x 2.5"/3.5" (Horizontal, Drive Rails)
Ports
1x USB-A 3.0 (5Gb/s), 2x USB-A 2.0 (480Mb/s), 1x 3.5mm Jack (Line-Out), 1x 3.5mm Jack (Line-In)
PCI Slots
7
Fan (Front)
3x 120mm
Fan (Rear)
1x 120mm (RGB Illuminated)
Fan (Left)
N/A
Fan (Right)
N/A
Fan (Top)
2x 120mm (Optional)
Fan (Bottom)
N/A
Fan (Other)
2x 120mm (Optional)
Radiator Sizes
N/A Front, N/A Top, 120mm Rear
Motherboard
Up to ATX
Supported Motherboards
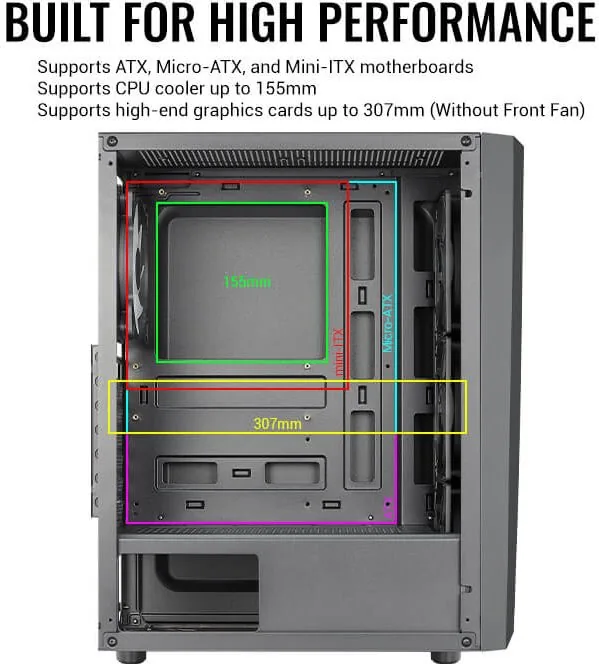
Mini-ITX (6.7"x6.7")/uATX (9.6"x9.6")/ATX (12"x9.6")
Power Supply
ATX (Max 5.94" deep)
PSU Position
Bottom
CPU Cooler
Max 6.10" Height
Graphics Card
Max 12.09" (without Radiator)
Color
Black, Interior Black
Lighting
Integrated LED Controller, Integrated RGB LED Lighting, Lit Fans
Dimensions (WxHxD)
8.0"x17.0"x14.1"
Volume
1905.76 cu in
Case Type
Mid-Tower
Front
Solid, Vent Slats Centered
Top
Partially Closed, Mostly Fan Grille
Bottom
Partially Closed, Fan Grille Rear
Left
Solid, Glass
Right
Solid
Rear
Partially Closed, Fan Grille Top Right, PCI Slots (7x Horizontal)
Front I/O Position
Case Side: Top, Height: Front, Position: Center
Features
Cable Management, Dust Filters, Glass Window
USB Placement
Left
Product Description
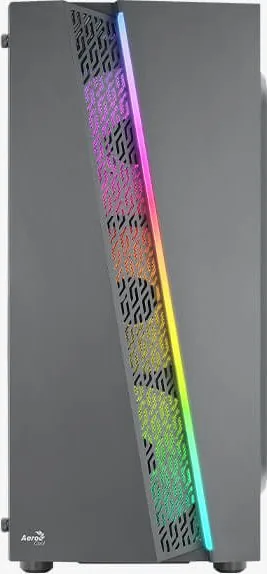
Discover the AeroCool Blade Glass Window Experience
Building a gaming rig is a journey that demands attention to detail and reliability. The AeroCool Blade Glass Window serves as an ideal chassis for this endeavor. As an RGB Mid Tower Case, it combines aesthetic appeal with rugged durability. The design prioritizes user accessibility while maintaining a professional look inside the room. Every component is designed to facilitate a seamless workflow from unpacking to final power up. This allows enthusiasts to focus on performance rather than assembly struggles.
Detailed Components and Assembly
The accessory bag includes essential screws for the motherboard, SSD, HDD, and PSU. Specifically, you will find screws for PCI brackets and MB standoffs to ensure stability. The guide outlines how to install the motherboard safely into the chassis without scratching the board. Following the manual helps prevent accidental damage to sensitive electronic components during the build process. Careful placement of the MB standoffs is crucial for grounding the system securely to the case frame. Proper screw tightening ensures the motherboard does not shift during transport or operation.
Storage and Drive Support
Expansion is key for the longevity of your system. The case supports installing 3.5-inch hard disks and 2.5-inch solid state drives. You can attach one or multiple drives depending on your evolving data requirements. The drive installation steps are clearly marked to help beginners navigate the layout easily. Secure mounting ensures minimal vibration and noise during operation. Cable management behind the panels keeps everything tidy and organized for airflow efficiency.
Power and Connectivity
Power system installation follows a logical sequence for efficiency. The front I/O cable connection utilizes standard headers found on most motherboards. Users can connect power LED switches and HDD activity lights to track system status. The I/O panel offers USB3.0 ports, HD Audio jacks, and Mic inputs. This organization streamlines cable routing behind the motherboard tray for a clean look. You should route cables away from fan blades to ensure smooth movement.
Thermal Solutions
Cooling options include front fans and top fans for intake. You may also attach a rear fan for exhaust purposes. For advanced users, installing a rear radiator is possible for liquid cooling setups. The airflow path is optimized to pull cool air in and push hot air out efficiently. This setup keeps your system running smoothly under heavy load without thermal throttling. Ensure you check the fan dimensions before purchase to verify fitment within the chassis interior space properly.
Expansion Card Installation
Installing add-on cards is seamless with the provided layout. You can slot graphics cards or sound cards into the PCIe slots easily. The guide instructs on how to align the card before screwing it in place. Proper alignment ensures the card connects fully to the motherboard slot. This prevents disconnects that could lead to system instability during heavy workloads or gaming sessions.
Final Thoughts
The AeroCool Blade delivers on performance expectations consistently. While specifications might vary by region, the core design remains consistent across markets. Contacting a local retailer can clarify specific details for your area to ensure compatibility. This case represents a solid investment for any computer builder seeking reliability and style in a modern workstation setup. It is recommended to test all connections before final assembly to avoid troubleshooting difficulties later.
Search for 67,706 Manuals online


Type-in Brand or Model
Alex Weber
6 months ago
Is cable management difficult due to space between the backplate and motherboard wall?
Manual.ly
6 months ago
Yes, users have noted that space can be tight in this area. To manage this, we suggest using braided sleeved cables that are thinner than standard ones or routing power connectors differently. Proper planning will help ensure a clean setup despite the limited space.