Manual.ly Logo

Vitavia Uranus 9900 Manual

0.0 · 0 Ratings

PDF manual · 32 Pages

English

M: OA-GPT-54-NAN
page

/ 32

Loading...
bb75453a32d296ea6c361b6edff6da79a9db page 4
4
SICHERHEITSVORKEHRUNGEN
SITE SELECTION
Always try to select a sunny location, sheltered
from the wind as much as possible.
IMPORTANT
Before assembling your new greenhouse,
please check that all parts in the provided list
are included. Please take each bundle out of
the packaging in order to identify the parts
better.
It is important that the opened bundles do not
get mixed with one another.
If something is missing please contact your
retailer.
Nuts (1002) - Max. tightening torque 3Nm.
NECESSARY TOOLS
Screw drivers (Normal and Crosshead PH2),
10 mm socket spanner or wrench, 10 mm
combination spanner, knife, measuring stick,
spirit level, Accu-drill with adjustable torque.
MAINTENANCE
The greenhouse should be thoroughly washed
with a gentle detergent occasionally. Please
check that the detergent used does not react
aggressively with aluminium or the glass xing
clips.
Ensure that the upper and lower door tracks
are cleaned regularly to avoid a build up of
debris.
0. BASE
Important! The base must be exactly square
and level. A zinc-coated steel base is available
as an accessory for all greenhouse models.
(Attention! Only when the greenhouse has to
be located in a very windy and unprotected
location: Drill through both the prole at the
base of the greenhouse and the steel base,
and connect them with nuts and bolts.)
If you would rather construct your own stone
or concrete foundation, please follow the
dimensions specied in diagram 0. Treated
wooden beams at least 18 mm high and not
more then 32 mm wide should be positioned
between the stone/concrete foundation and
the aluminium frame, and connected to the
foundation with 50 mm long bolts (not pro-
vided).
Foundations must extend down below the frost
level.
Diagrams in a single frame show the view
from inside the greenhouse. Those enclo-
sed in a double frame show the view from
outside the greenhouse.
1. SIDE ELEMENTS
Lay all of the parts on the oor and connect
them loosely.
At this stage it is necessary with each vertical
aluminium bar (2055) to include an extra
connecting bolt, to later connect corner braces
(2056) (1.5). On the outside bars (2055) in-
clude one additional extra bolt, to also connect
cross braces (2033) (1.2).
Loosely connect the corner plate (1092) (1.1).
In step 4 the corner plate bolts must also be
connected to the gable ends.
2. PLAIN GABLE END
Lay all of the parts on the oor and connect
them loosely.
Include two extra connecting bolts in the
vertical bars (2041 and 2042) to connect the
cross braces (2.2) and (2.6). In the vertical bar
(2101) please include only one extra bolt.
3. DOOR GABLE END
Lay all of the parts on the oor and connect
them loosely.
The door runner bars (1347) will be connected
to the horizontal bar (2048). Connect each of
these loosely from the outside with three bolts
and two nuts.
Connect (5001) and (5002) as shown in (3.10)
(3.11) with a nut.
As in step 2, please include two extra bolts in
both vertical bars (2041) and (2042) (3.3).
4A. CONNECTING THE SEPARATE
ELEMENTS
Bolt the side elements to the end elements.
(4.1) & (4.2).
Loosely connect the corner plate (1092) above
the eaves (4.3).
Assemble the ridge bar and then the corner
plates (1092) on the gable ends (4.4/4.5).
Connect the door runner supports (2043) to
the door runner bars (1347) using washer
(6060) (4.1) and to the gable end using bolt
(1005) and spacer (1310) (4.3) (4.6).
4B. CONNECTING THE SEPARATE
ELEMENTS
Connect the roof glazing bars (2055) between
the eaves (4.7) and the ridge bar (4.8). Insert
extra bolts into each glazing bar depending on
which house you have bought. The number is
indicated in a circle on each bar and to be
read beginning from both ends.
The corner braces (2056) (4.7), the roof
braces (2057) (4.9) and the cross braces
(2033) (4.11) (4.12) (4.13) can now be con-
nected.
Now position your greenhouse on the pre-
pared base/foundation and connect loosely.
Please do not over tighten. (max. 3Nm)
Adjust the greenhouse until it is completely
square and tighten all bolts.
Please do not over tighten.
Press the end protectors (1017) and (1018)
onto the prole ends (4.10).
5L and 5R. DOORS
Attention: Do not stand the assembled
001.01.1602
1. PLEASE READ THESE INSTRUCTIONS CAREFULLY AND COMPLETELY BEFORE ASSEMBLING YOUR GREENHOUSE.
2. Sharp edges and corners can cause injury. Always wear protective glasses, gloves, shoes and headgear when handling the aluminium proles, glass and
polycarbonate sheets. Broken glass is a safety hazard – always clear up immediately and dispose of with care.
3. The product you have purchased is intended only for growing plants and should only be used for this purpose. When used for other purposes we will take
no responsibility.
4. It is recommended that this greenhouse is assembled by two people.
5. Should you encounter difculties constructing this house, or in tting the glass or polycarbonate sheets, please contact your retailer
– do not use force!
6. The greenhouse must always be anchored.
Assembly Instructions
Safety Warning
EN

Chat with your Vitavia Uranus 9900 manual using AI

Get instant AI answers from your Vitavia Uranus 9900 manual

Ask anything about the Vitavia Uranus 9900. Answers come from this manual, with the pages they are based on.

Uranus 9900 Maintenance Schedule

Occasionally
Wash the greenhouse

Thoroughly wash with a gentle detergent. Ensure the detergent does not react aggressively with aluminium or glass fixing clips.

Regularly
Clean door tracks

Clean upper and lower door tracks regularly to avoid debris build-up.

M: QW-35-FL

Ask a Question

0/1000

Do you recommend Uranus 9900?

Yes No

Frequently Asked Questions

A

It is designed for growing plants in a protected, bright, and ventilated space. The layout suits seed starting, potting, and regular cultivation through changing seasons.

Is this answer helpful?

A

Yes. The instructions recommend two people for the build. That makes it easier to handle panels, align the frame, and install glazing safely and accurately.

Is this answer helpful?

A

The base should be perfectly square and level. A steel base is mentioned as an accessory, and a stone or concrete foundation can also be used if built to the correct dimensions.

Is this answer helpful?

A

Yes. The manual includes guidance for 4mm glazing and above. It is intended to provide a practical balance of light entry and protection for plant growing.

Is this answer helpful?

A

Do not over-tighten them. The manual specifies a maximum torque of 3Nm, which helps protect the frame and fittings from stress or damage.

Is this answer helpful?

A

Close all doors and vents during strong wind. In heavy snowfall, clear the roof or support it properly to reduce stress on the structure.

Is this answer helpful?

M: OA-GPT-54-NAN

Advantages and Disadvantages

Advantages

  • Spacious design that supports a wide range of plants and gardening projects.
  • 4mm glazing and roof ventilation help balance light, airflow, and temperature.
  • Double doors make it easier to move tools, trays, and larger plants in and out.
  • Detailed manual guidance helps ensure a square, stable, long-lasting build.
VS

Disadvantages

  • Assembly is involved and requires careful organization plus two people.
  • The base must be level and square, so site preparation takes time.
  • Bolts must not be over-tightened, which adds precision to the build process.
  • Glass handling and glazing clips require caution and protective gear.
M: OA-GPT-54-NAN

Product Specification

Glazing

Polycarbonate 4mm (Hollow chamber panels)

Frame

Aluminum

Color

black

Area

106.57 sq ft

Special features

Roof window, Rain gutter

Door

Double sliding door

Dimensions (LxWxH)

150.79x101.18x97.64in

Weight

159.13 lbs

M: OA-GPT-54-NAN

Product Description

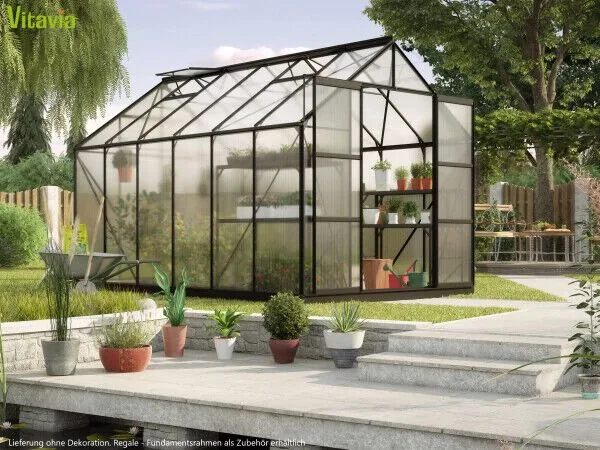
Vitavia Uranus 9900 HKP 4mm Greenhouse Black

The Vitavia Uranus 9900 HKP 4mm greenhouse black Manual points to a greenhouse built for gardeners who want a spacious, reliable, and neatly finished growing environment. With its elegant black look and practical layout, this model is designed to support everything from early seed starting to longer-season cultivation, while keeping plants sheltered and easy to manage.

A greenhouse made for steady growing

What stands out most is the balance between structure and usability. The manual emphasizes a strong aluminum frame, careful anchoring, and precise assembly, all of which help create a stable home for plants. The 4mm glazing option is ideal for everyday greenhouse use, giving light transmission that supports healthy growth while still offering a solid, protected enclosure. Double doors make access easier, whether you are carrying trays, watering cans, or taller potted plants.

Built with practical details in mind

The instructions also show how much attention has been given to daily function. Roof ventilation is included to help manage heat and humidity, which is essential in changing weather. The door system is designed to glide smoothly when assembled correctly, and the roof vent can be positioned for better airflow. These small details make a big difference once the greenhouse is in regular use.

Assembly and setup matter

The manual clearly stresses preparation: choose a sunny, sheltered spot, check every part before starting, keep bundles organized, and build on a square, level foundation. That guidance is more than technical advice — it is the key to a greenhouse that performs well over time. The structure should be assembled carefully by two people, with bolts tightened only to the recommended torque. This helps protect the frame, panels, and fittings during installation.

A smart choice for dedicated gardeners

This greenhouse is not just about appearance; it is about creating a dependable growing space. The combination of a refined black finish, practical ventilation, and adaptable glazing makes it a strong option for gardeners who want both style and purpose. Maintenance is straightforward too: regular cleaning, clear door tracks, and attention to weather precautions will help it stay in good condition for years.

Notes

  • Always anchor the greenhouse securely.
  • Close doors and vents during strong wind.
  • Clear snow from the roof in winter.
  • Keep the manual for future reference and spare parts.
M: OA-GPT-54-NAN

© Copyright 2026 Manual.ly
