

Vitavia Merkur 6700 Manual
PDF manual · 34 Pages
English



Quick check
Incorrect answer, please try again.
Chat with your Vitavia Merkur 6700 manual using AI
Get instant AI answers from your Vitavia Merkur 6700 manual
Ask anything about the Vitavia Merkur 6700. Answers come from this manual, with the pages they are based on.
Merkur 6700 Maintenance Schedule
Regularly clean upper and lower door tracks to avoid debris buildup. In Danish manual, also lubricate with wax or grease.
Wash thoroughly with a gentle detergent occasionally. Ensure the detergent does not react aggressively with aluminium or glass fixing clips.
Regularly remove leaves and dirt from the roof.
In winter, regularly clear snow from the roof or provide adequate support to hold the weight of heavy snowfall.
Continuously check that the anchoring into the ground is holding firmly.
For winter, dismount the automatic window opener and store it at temperatures above 0C to prevent frost damage.
Free maintenance reminders
Timed to your purchase date. Always free, unsubscribe anytime.
Ask a Question
Do you recommend Merkur 6700?
Yes NoFrequently Asked Questions
It is ideal for home gardeners who want a compact, stable greenhouse for seed starting, plant protection, and extending the growing season. The aluminum frame and 4 mm glazing make it practical for everyday cultivation.
Is this answer helpful?
Yes. A level and square base is essential. The instructions strongly stress anchoring the greenhouse to a proper foundation for stability, especially in windy locations.
Is this answer helpful?
Yes. The sliding door can be assembled to open from the left or the right, which makes it easier to adapt the greenhouse to your garden layout and access needs.
Is this answer helpful?
Use a mild detergent and soft cloth for cleaning. Regularly clear the door tracks and check that fittings remain secure. Keeping the roof free of debris also helps maintain performance.
Is this answer helpful?
It requires careful assembly and two people are recommended. The structure must be aligned, squared, and tightened correctly, so patience and basic tools are important.
Is this answer helpful?
Close all doors and vents during strong wind. In heavy snow, clear the roof or support it properly. Good anchoring and timely weather precautions help protect the structure.
Is this answer helpful?
Advantages and Disadvantages
Advantages

- Lightweight aluminum frame offers a durable, low-maintenance structure for everyday gardening.
- 4 mm glazing supports bright growing conditions while keeping the greenhouse practical and versatile.
- Sliding door can be mounted on either side for easier garden layout planning.
- Roof vent improves airflow and helps manage heat and humidity.
- Designed for secure anchoring and long-term stability on a proper base.
Disadvantages

- Assembly is detailed and time-consuming, so it is not a quick one-person project.
- A level, square foundation is essential; poor preparation can cause fitting problems.
- Glass and aluminum parts require care because sharp edges can pose a safety risk.
- Regular cleaning of door tracks and fittings is needed to keep the structure working smoothly.
- The greenhouse must be anchored and protected from severe weather conditions.
Product Specification
Glazing
Polycarbonate 0.16in (twin-wall sheets)
Frame
Aluminum
Color
silver
Area
72.12sq ft
Special features
2 roof windows
Door
Sliding door, Rain gutter, lockable
Dimensions (LxWxH)
101.57x101.18x91.34in
Weight
141.76lb
Product Description
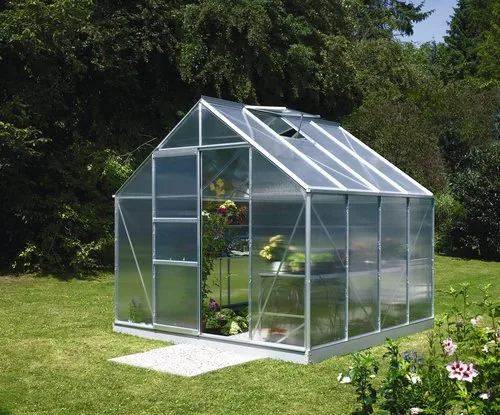
Vitavia Merkur 6700 HKP 4mm Aluminum Greenhouse
The Vitavia Merkur 6700 HKP 4mm aluminum greenhouse is a smart choice for gardeners who want a compact yet capable growing space with a clean, practical design. Built around a lightweight aluminum frame and 4 mm glazing, it balances durability with good light transmission, helping plants thrive through the seasons. If you are searching for the Vitavia Merkur 6700 HKP 4mm aluminum greenhouse Manual, the main takeaway is simple: this greenhouse is designed for careful assembly, secure anchoring, and long-term everyday use.
One of the most appealing aspects of this model is its flexible layout. The sliding door can be positioned on either side, which makes it easier to adapt the greenhouse to your garden path, fence line, or access point. A roof vent adds useful airflow control, helping regulate temperature and moisture when the weather shifts. For growers who value structure and order, the Merkur series offers a straightforward framework that supports practical planting, potting, and seasonal protection.
The greenhouse is intended to be installed on a perfectly level, square base, which is essential for stability and smooth operation. The instructions emphasize anchoring, careful alignment, and not overtightening the fittings. That attention to detail is a strength: once properly assembled, the structure is meant to stay firm and dependable. The manual also highlights easy maintenance habits, such as cleaning the door tracks and washing the frame with a mild detergent, which helps keep the greenhouse in good shape over time.
Another plus is the choice of glazing style. While the core model uses 4 mm glass or compatible panels, the design also accommodates polycarbonate options depending on configuration. That makes the Merkur 6700 adaptable for gardeners who prefer different levels of insulation, safety, or handling convenience. It is a greenhouse made for real growing needs, not just appearance.
In short, the Vitavia Merkur 6700 HKP 4mm aluminum greenhouse combines compact size, useful ventilation, and a sturdy aluminum structure in a design that suits both hobby gardeners and more experienced growers.
Notes
- Best results come from a level, anchored foundation.
- Two people are recommended for assembly.
- Clean door tracks regularly for smooth movement.
- Close doors and vents during strong wind or heavy snow.
Search for 67,706 Manuals online


Type-in Brand or Model