
Manual.ly Logo

Vitavia Mars 6700 Manual

0.0 · 0 Ratings

PDF manual · 32 Pages

English

M: OA-GPT-54-NAN
page

/ 32

Loading...
b8d879b37ab1677515d6cd836439a4c97240 page 4
4
SITE SELECTION
Always try to select a sunny location, sheltered
from the wind as much as possible.
IMPORTANT
Before assembling your new greenhouse,
please check that all parts in the provided list
are included. Please take each bundle out of
the packaging in order to identify the parts
better.
It is important that the opened bundles do not
get mixed with one another.
If something is missing please contact your
retailer.
Nuts (1002) - Max. tightening torque 3Nm.
NECESSARY TOOLS
Screw drivers (Normal and Crosshead PH2),
10 mm socket spanner or wrench, 10 mm
combination spanner, knife, measuring stick,
spirit level, Accu-drill with adjustable torque.
MAINTENANCE
The greenhouse should be thoroughly washed
with a gentle detergent occasionally. Please
check that the detergent used does not react
aggressively with aluminium or the glass xing
clips.
Ensure that the upper and lower door tracks
are cleaned regularly to avoid a build up of
debris.
0. BASE
Important! The base must be exactly square
and level. A zinc-coated steel base is available
as an accessory for all greenhouse models.
(Attention! Only when the greenhouse has to
be located in a very windy and unprotected
location: Drill through both the prole at the
base of the greenhouse and the steel base,
and connect them with nuts and bolts.)
If you would rather construct your own stone
or concrete foundation, please follow the
dimensions specied in diagram 0. Treated
wooden beams at least 18 mm high and not
more then 32 mm wide should be positioned
between the stone/concrete foundation and
the aluminium frame, and connected to the
foundation with 50 mm long bolts (not pro-
vided).
Foundations must extend down below the frost
level.
Diagrams in a single frame show the view
from inside the greenhouse. Those enclo-
sed in a double frame show the view from
outside the greenhouse.
1. SIDE ELEMENTS
Lay all of the parts on the oor and connect
them loosely.
At this stage it is necessary with each vertical
aluminium bar (3032) to include an extra
connecting bolt, to later connect corner braces
(2056) (1.5). On the outside bars (3032) in-
clude one additional extra bolt, to also connect
cross braces (3095) (1.2).
Loosely connect the corner plate (1092) (1.1).
In step 4 the corner plate bolts must also be
connected to the gable ends.
2. PLAIN GABLE END
Lay all of the parts on the oor and connect
them loosely.
Include two extra connecting bolts in the
vertical bars (3041 and 3042) to connect the
cross braces (2.2) and (2.6). In the vertical bar
(3101) please include only one extra bolt.
3. DOOR GABLE END
Lay all of the parts on the oor and connect
them loosely.
The door runner bars (1347) will be connected
to the horizontal bar (2048). Connect these
loosely from the outside with three nuts and
bolts.
Connect (5001) and (5002) as shown in (3.10)
(3.11) with a nut and bolt.
As in step 2, please include two extra bolts in
both vertical bars (3041) and (3042) (3.3).
4A. CONNECTING THE SEPARATE
ELEMENTS
Bolt the side elements to the end elements.
(4.1) & (4.2).
Loosely connect the corner plate (1092) above
the eaves (4.3).
Assemble the ridge bar and then the corner
plates (1092) on the gable ends (4.4/4.5).
Connect the door runner supports (2043) to
the door runner bars (1347) using washer
(6060) (4.1) and to the gable end using bolt
(1005) and spacer (1310) (4.3) (4.6).
4B. CONNECTING THE SEPARATE
ELEMENTS
Connect the roof glazing bars (2055) between
the eaves (4.7) and the ridge bar (4.8). Insert
extra bolts into each glazing bar depending on
which house you have bought. The number is
indicated in a circle on each bar and to be
read beginning from both ends.
The corner braces (2056) (4.7), the roof
braces (3057) (4.9) and the cross braces
(2033) (4.11) (4.12) (4.13) can now be con-
nected.
Now position your greenhouse on the pre-
pared base/foundation and connect loosely.
Please do not over tighten. (max. 3Nm)
Adjust the greenhouse until it is completely
square and tighten all bolts.
Please do not over tighten.
Press the end protectors (1017) and (1018)
onto the prole ends (4.10).
Assembly Instructions
Safety Warning
EN
1. PLEASE READ THESE INSTRUCTIONS CAREFULLY AND COMPLETELY BEFORE ASSEMBLING YOUR GREENHOUSE.
2. Sharp edges and corners can cause injury. Always wear protective glasses, gloves, shoes and headgear when handling the aluminium proles, glass and
polycarbonate sheets. Broken glass is a safety hazard – always clear up immediately and dispose of with care.
3.
The product you have purchased is intended only for the growing of plants and should only be used for this purpose. When used for other purposes we will
take no responsibility.
4. It is recommended that this greenhouse is assembled by two people.
5. Should you encounter difculties constructing this house, or in tting the glass or polycarbonate sheets, please contact your retailer
– do not use force!
6. The greenhouse must always be anchored.
012.01.1602

Chat with your Vitavia Mars 6700 manual using AI

Get instant AI answers from your Vitavia Mars 6700 manual

Ask anything about the Vitavia Mars 6700. Answers come from this manual, with the pages they are based on.

Mars 6700 Maintenance Schedule

Occasionally
Wash the greenhouse

Thoroughly wash with a gentle detergent. Ensure the detergent does not react aggressively with aluminium or glass fixing clips.

Regularly
Clean door tracks

Clean upper and lower door tracks regularly to avoid debris buildup.

M: QW-35-FL

Ask a Question

0/1000

Do you recommend Mars 6700?

Yes No

Frequently Asked Questions

A

It combines an aluminum frame, 4 mm glazing, a roof vent, and a sliding door, creating a practical space for growing plants while keeping maintenance relatively straightforward.

Is this answer helpful?

A

Yes. A square and level foundation is important for stability. The instructions emphasize anchoring the greenhouse properly, especially in windy locations.

Is this answer helpful?

A

It is strongly recommended that two people assemble it. The parts are large enough and the glazing process is easier and safer with help.

Is this answer helpful?

A

Occasional washing with a mild detergent, regular cleaning of the door tracks, and checking the seals and clips are the main maintenance tasks.

Is this answer helpful?

A

Yes, if it is anchored correctly and installed on a proper base. In very exposed areas, extra fixing to a steel base is recommended.

Is this answer helpful?

A

Close all doors and vents during strong wind. In heavy snow, clear the roof so the load does not become too heavy for the structure.

Is this answer helpful?

M: OA-GPT-54-NAN

Advantages and Disadvantages

Advantages

  • Lightweight aluminum frame offers solid durability with low maintenance needs.
  • 4 mm glazing supports good light levels for healthy plant growth.
  • Roof vent and sliding door improve ventilation and day-to-day access.
  • Detailed assembly system helps create a stable, square greenhouse when installed correctly.
VS

Disadvantages

  • Assembly is time-consuming and requires careful step-by-step work.
  • Two people are recommended for installation, which may limit convenience.
  • A level, square foundation is essential, so site preparation is important.
  • Glass handling and tightening limits demand caution to avoid damage.
M: OA-GPT-54-NAN

Product Specification

Glazing

Polycarbonate 4mm (twin-wall sheets)

Frame

Aluminium

Color

silver

Area

72.12 ft2

Special features

2 roof windows

Door

Double sliding door, Rain gutter

Dimensions (LxWxH)

101.57x101.18x91.34in

Weight

120.81 lbs

M: OA-GPT-54-NAN

Product Description

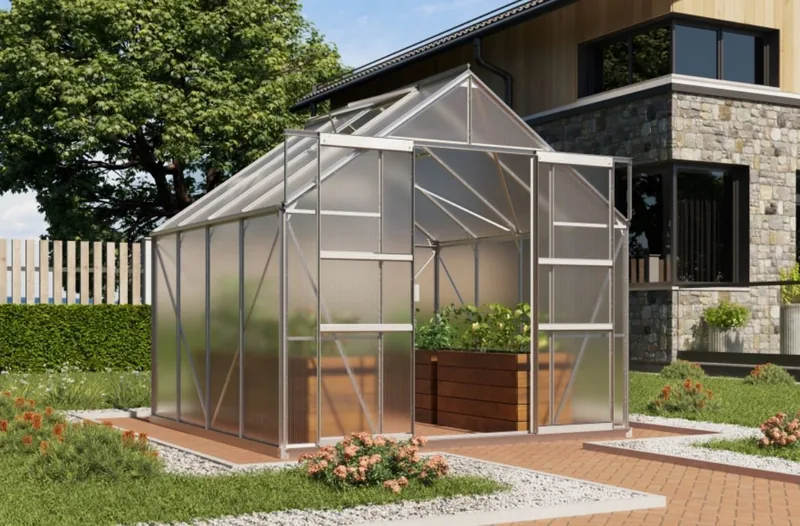
Vitavia Mars 6700 HKP 4mm Greenhouse Aluminum

The Vitavia Mars 6700 HKP 4mm greenhouse aluminum is a practical choice for gardeners who want a dependable growing space with a clean, lightweight structure. Built around an aluminum frame and designed for 4 mm glazing, it balances durability with a refined look that suits both compact and larger garden settings.

One of the strongest points of this greenhouse is its thoughtful construction. The frame is meant to be anchored on a level foundation, which helps the structure stay stable in changing weather. The design also includes a sliding door and a roof vent, giving you better control over airflow and making everyday access easier. For plant lovers, that means a more comfortable environment for seedlings, herbs, tomatoes, and seasonal crops.

The manual highlights the importance of careful assembly, and that says a lot about the product itself: this is a greenhouse built for long-term use, not a quick temporary setup. The aluminum profiles, glazing bars, braces, and door components work together to create a solid growing house when assembled correctly. The 4 mm glazing specification makes it a versatile option for gardeners who want protection, light transmission, and a neat finish.

It is also a greenhouse that rewards preparation. A square base, the right tools, and two people for assembly are all recommended, which makes installation smoother and the final result more reliable. Once installed, routine care is simple: occasional washing, clean door tracks, and attention to seals and clips will help keep it performing well season after season.

Notes

  • Best placed in a sunny, sheltered spot.
  • Must be anchored and kept level.
  • Close doors and vents during strong wind.
  • Clear snow from the roof in winter.
  • Keep the model label and manual for future reference.
M: OA-GPT-54-NAN

© Copyright 2026 Manual.ly
