

Manual.ly Logo

Vitavia Aphrodite 11500 Manual

0.0 · 0 Ratings

PDF manual · 56 Pages

English

M: OA-GPT-54-NAN
page

/ 56

Loading...
c4e9cd854cae25240e96e09375d48867a69f page 6
6
1. PLEASE READ THESE INSTRUCTIONS CAREFULLY AND COMPLETELY BEFORE ASSEMBLING YOUR GREENHOUSE.
2. Sharp edges and corners can cause injury. Always wear protective glasses, gloves, shoes and headgear when handling the aluminium proles, glass
and polycarbonate sheets. Broken glass is a safety hazard – always clear up immediately and dispose of with care.
3. The product you have purchased is intended only for the growing of plants and should only be used for this purpose. When used for other purposes we
will take no responsibility.
4. It is recommended that this greenhouse is assembled by two people.
5. When using a step ladder one person should steady it at all times whilst the other works.
6. Should you encounter difculties constructing this house or in positioning the polycarbonate sheets, please contact your retailer
– do not use force!
7. The greenhouse must always be anchored.
Assembly Instructions
Safety Warning
EN
070.02.1704
SITE SELECTION
Always try to select a sunny location, sheltered
from the wind as much as possible.
IMPORTANT
Before assembling your new greenhouse,
please check that all parts in the provided list
are included. Please take each bundle out of
the packaging in order to identify the parts
better.
It is important that the opened bundles do not
get mixed with one another.
If something is missing please contact your
retailer.
Note - The UV-resistant side of the polycar-
bonate panes is indicated by a plastic lm
or printing at the edge. This side must face
outside.
In order to seal the greenhouse effectively it is
suggested that you apply neutral silicone as
shown in diagrams (4b.7), (4b.8), (7a.6) and
(7a.8). Silicone is provided for this purpose.
NECESSARY TOOLS
Screw drivers (Normal and Crosshead PH2)
Rubber Hammer
2 x 1.8m ladder
10 mm socket spanner or wrench
10 mm combination spanner
Craft knife
Measuring stick
Spirit level
Accu-drill with adjustable torque
MAINTENANCE
The greenhouse should be thoroughly washed
with a gentle detergent occasionally. Please
check that the detergent used does not react
aggressively with aluminium or plastic.
Ensure that the door tracks are cleaned regu-
larly to avoid a buildup of debris.
0. FOUNDATION
Important! The foundation must be exactly
right angular and level. To achieve this you will
require a spirit level and a right angle.
Note - If the distance between the two opposi-
te corners is the same then the foundation is
right angular.
For the erection of this greenhouse we
suggest a solid foundation constructed from
concrete, brickwork or stonework.
If you have no experience with the construc-
tion of such a foundation please consult a
company specialising in this work.
Materials and tools for the preparation of the
suggested foundation are not provided.
The suggested foundation allows the door to
be assembled in the front of the greenhouse.
The door can also be assembled on any other
side if required. Please then prepare the
210mm wide foundation on this side using
length C or D as reference.
Foundations must extend down below the frost
level.
Diagrams in a single frame show the view
from inside the greenhouse. Those enclo-
sed in a double frame show the view from
outside the greenhouse.
1. BACK ELEMENT
Note - If the door is to be assembled on this
side of the house remove one of the middle
bars (7311).
Push seal (7396) into the sill bar (7304 / 7306)
and cut to t both ends (1.1) (1.2).
Lay all of the parts, according to the model, on
the oor and loosely connect by inserting bolts
(7052) into the bolt channels.
Take care that the eave angles (7314 / 7316)
are pushed into the corner of both corner bars
(7310) (1.3) (1.4) and that corner bars (7310)
and middle bars (7311) sit correctly on the
assembly edge on the eave angle (1.9) (1.12).
Assemble diagonal bars (7312) on both sides
(1.3) (1.4) (1.10) (1.11). At the sill loosely at-
tach using bolt (7050). (7050) will be removed
during glazing (section 7b).
2. PLAIN GABLE END L
Note - If the door is to be assembled on this
side of the house remove middle bar (7311).
Push seal (7396) into sill bar (7304) and cut to
t the ends (2.1) (2.2).
Lay all of the parts on the oor and loosely
connect by inserting bolts (7052) into the bolt
channels.
Assemble end bar (7319) into the recess in
corner bar (7437) (2.3) (2.4) and then (7437)
onto sill bar (7304) (2.5) (2.6).
Assemble middle bars (7311) (2.7) (2.8).
Assemble diagonal bar (7312) (2.3) (2.4) (2.9)
(2.10). At the sill loosely attach using bolt
(7050). (7050) will be removed during glazing
(section 7b).
3. PLAIN GABLE END R
Note - If the door is to be assembled on this
side of the house remove middle bar (7311).
Assemble all parts as in Section 2.
4a. CONNECTING THE ELEMENTS
Push seal (7396) into the sill bar (7304 / 7306)
and cut to t both ends (4a.1) (4a.2).
To connect the previously prepared sections,
loosely prepare bolts (7399) and nuts (7053) in
sill bars (7304) as shown in (4a.3). Lower cor-
ner bars (7310) tting the bolt heads of (7052)
into the bolt channels of (7310) (4a.4).

Chat with your Vitavia Aphrodite 11500 manual using AI

Get instant AI answers from your Vitavia Aphrodite 11500 manual

Ask anything about the Vitavia Aphrodite 11500. Answers come from this manual, with the pages they are based on.

Aphrodite 11500 Maintenance Schedule

Remind me when maintenance is due
Quarterly
Clean greenhouse exterior

Wash thoroughly with a gentle detergent occasionally. Ensure the detergent does not react aggressively with aluminium or plastic.

Quarterly
Clean door tracks

Clean regularly to avoid buildup of debris. On Danish manual, also lubricate with wax or graphite oil.

Free maintenance reminders

Timed to your purchase date. Always free, unsubscribe anytime.

By submitting you agree to the privacy policy. Unsubscribe with one click in any email.
M: QW-35-FL

Ask a Question

0/1000

Do you recommend Aphrodite 11500?

Yes No

Frequently Asked Questions

A

It is designed for growing plants in a sheltered, controlled space. The generous layout suits vegetables, herbs, flowers, and seedlings, especially when you want more room for staging and airflow.

Is this answer helpful?

A

Yes. The design supports multiple glazing options, including glass and polycarbonate in different thicknesses. This flexibility lets you choose between clarity, insulation, and easier handling.

Is this answer helpful?

A

Yes. A level, square, and anchored foundation is essential. A concrete, brick, or stone base is recommended to keep the frame stable and aligned over time.

Is this answer helpful?

A

Two people are strongly recommended. The parts are large, the glazing can be heavy or fragile, and the frame is easier to position safely with a second set of hands.

Is this answer helpful?

A

The greenhouse includes opening windows and sliding doors, which help control heat and humidity. Good airflow is important for healthy plant growth and condensation management.

Is this answer helpful?

A

Clean it periodically with mild detergent, keep door tracks clear of debris, and check nuts and bolts after assembly. During harsh weather, close openings and remove heavy snow from the roof.

Is this answer helpful?

M: OA-GPT-54-NAN

Advantages and Disadvantages

Advantages

  • Spacious interior suited to vegetables, seedlings, and mixed planting.
  • Strong aluminum frame designed for long-term greenhouse use.
  • Flexible glazing options allow glass or polycarbonate setup.
  • Ventilation windows and sliding doors improve daily usability.
  • Rainwater handling and sealing details support practical installation.
VS

Disadvantages

  • Assembly is detailed and requires patience, tools, and planning.
  • A level, square foundation is essential before installation.
  • Two-person setup is strongly recommended for safe handling.
  • Needs regular maintenance, including cleaning tracks and fixings.
  • Extra care is needed in storms, snow, and winter conditions.
M: OA-GPT-54-NAN

Product Specification

Glazing

Polycarbonate 0.39in (Multiwall sheets), Safety glass 0.12in

Frame

Aluminum

Color

silver

Area

123.79 sq ft

Special features

Venting windows, Rain gutter, lockable

Door

Double sliding door

Dimensions (LxWxH)

154.72x116.14x73.62in

Weight

275.58 lb

M: OA-GPT-54-NAN

Product Description

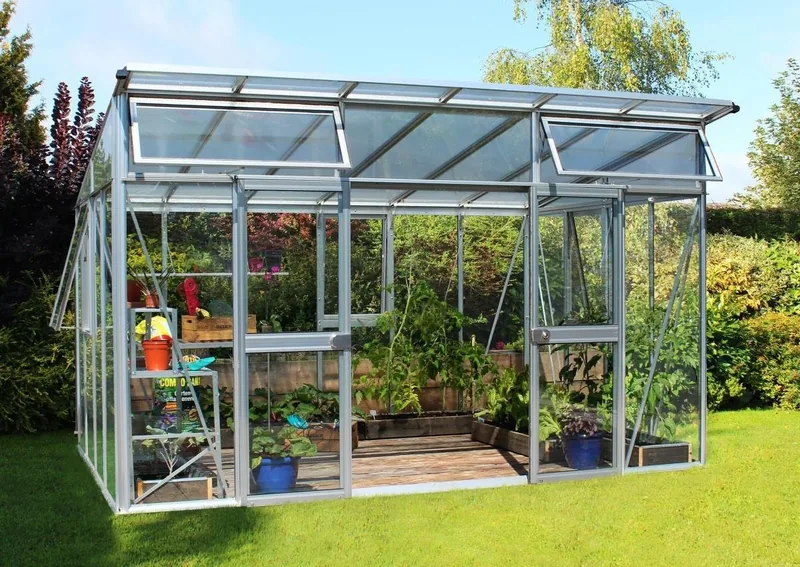
Vitavia Aphrodite 11500 ESG/HKP Aluminum Greenhouse Manual

A Spacious Greenhouse for Dedicated Gardeners

The Vitavia Aphrodite 11500 ESG/HKP aluminum greenhouse is built for growers who want generous space, strong structure, and practical everyday use. Its aluminum frame offers a clean, durable finish, while the modular design supports different glazing choices such as glass or polycarbonate, letting you match the greenhouse to your gardening style and climate needs.

What stands out most is how thoughtfully the structure is designed. The greenhouse includes sliding doors for easy access, multiple opening windows for ventilation, and a roof layout that helps light move deep into the interior. That makes it a great environment for seedlings, vegetables, herbs, and ornamental plants that benefit from stable growing conditions and good airflow. The integrated guttering and downpipe connections also add convenience by helping manage rainwater more efficiently.

This model is clearly made with serious use in mind. The assembly system relies on precise connections, anchoring, and a level foundation, which supports long-term stability once installed. It is best suited to a sunny, sheltered position, and the instructions emphasize careful preparation before construction begins. For best results, the UV-protected side of any polycarbonate panel should face outward, and neutral silicone can be used to improve sealing around key joints.

The greenhouse is not just about structure; it is about creating a reliable growing space. With its adaptable glazing options and solid frame, the Aphrodite 11500 can support a wide range of gardening goals, from early-season propagation to extending harvests later into the year. The spacious layout also makes it easier to organize shelving, staging, and plant groups without feeling cramped.

Notes

  • Best assembled by two people
  • Foundation must be level, square, and anchored
  • Clean door tracks and check fixings regularly
  • Close vents and doors during strong wind or heavy snow
  • Keep the model label and instructions for future reference
M: OA-GPT-54-NAN

© Copyright 2026 Manual.ly
