

Tepro Drip Irrigation Kit Manual
PDF manual · 2 Pages
English



Quick check
Incorrect answer, please try again.
Chat with your Tepro Drip Irrigation Kit manual using AI
Get instant AI answers from your Tepro Drip Irrigation Kit manual
Ask anything about the Tepro Drip Irrigation Kit. Answers come from this manual, with the pages they are based on.
Ask a Question
Do you recommend Drip Irrigation Kit?
Yes NoFrequently Asked Questions
You must connect the water pressure regulator #7351 to ensure constant and stable irrigation pressure for your plants throughout the process.
Is this answer helpful?
Place the edge of the pipe #7305 in hot water to soften it before attaching it to the system to ensure ease of use.
Is this answer helpful?
Yes, please make sure to connect up to 4 units together with 1 pressure regulator for optimal coverage in your garden.
Is this answer helpful?
Do not cut the pipe unless a final decision has been made on the mounting location to prevent waste of materials.
Is this answer helpful?
Connecting this irrigation kit to an automatic irrigation system is possible for added convenience and ease of management.
Is this answer helpful?
Palram provides after sale service with contact info available on the official website for global support and assistance.
Is this answer helpful?
The specific irrigation pipe part number is 7305 for your reference and to ensure correct ordering of parts.
Is this answer helpful?
Advantages and Disadvantages
Advantages

- Stable water pressure provided by included regulator #7351 promotes healthy plant growth and deep roots.
- System is compatible with automatic irrigation systems for a hands-free and convenient watering routine.
- Scalable design allows connecting up to 4 units to a single pressure regulator for larger coverage areas.
- Durable piping design allows bending with hot water using no specialized tools for easier installation.
- Flexible installation prevents cutting until final location is confirmed which saves money on materials.
Disadvantages

- Requires specific pressure regulator #7351 for optimal performance and stable pressure output.
- Pipe softening process requires access to hot water during the initial connection phase.
- Pipe cannot be cut early which delays final installation until mounting decision is definitely sure.
- Assembly instructions are provided in multiple languages which might cause initial confusion for users.
- Complex setup may require additional plumbing knowledge for full automatic system integration.
Product Specification
Fits
Palram Irrigation System
Length
32.81 ft
Package Contents
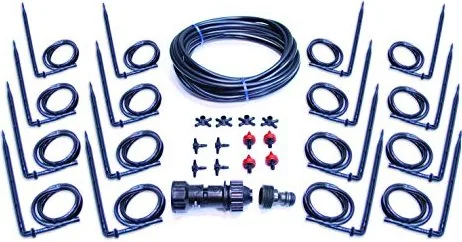
4 T-Connectors, 16 End Caps, Adapter 3/4"
Product Description
Elevate Your Garden with Precision Watering
Discovering the Tepro Palram Canopia Irrigation Set Manual
Creating a lush healthy garden requires consistent care and effective water management is the absolute foundation of sustainable plant health. The Tepro Palram Canopia Irrigation Set Manual offers a comprehensive guide for setting up a reliable watering system that ensures your plants receive the precise amount of hydration they need without unnecessary waste. This kit is designed for ease of use, featuring robust components that withstand daily garden demands while maximizing efficiency in your greenhouse or outdoor space. Water conservation is important making this drip irrigation solution a vital investment for anyone serious about growing produce for your flowers.
When setting up this irrigation kit the most critical component is the water pressure regulator clearly identified as part number 7351. Connecting this regulator is essential to maintain constant and stable irrigation pressure for your plants throughout the entire day. Stable pressure prevents damage to delicate seedlings and ensures deep root watering which leads to stronger plant structures. Without this regulator fluctuations in water supply could stress your plants causing uneven growth patterns.
For the irrigation pipe known as part number 7305 the installation process involves a simple heating trick. To attach the irrigation pipe effectively place the edge of the pipe in hot water to soften it before connecting. This technique allows for easy bending and fitting into your specific layout without requiring specialized tools. However you should refrain from cutting the pipe unless a final decision has been made on the mounting location. This flexibility prevents material waste during the initial planning phase during installation work for optimal performance.
One major advantage of this system is its scalability. Connecting this irrigation kit to an automatic irrigation system is possible adding convenience to your daily routine. You do not need to manually water every plant if you integrate it with automated timers. Furthermore you can ensure you connect up to 4 units together with 1 pressure regulator. This makes it ideal for larger setups or multiple greenhouses requiring a single management point.
Support and Safety Notes
If you encounter difficulties during assembly dedicated support is available through the manufacturer. Follow all safety guidelines found within the product documentation to ensure personal safety. Regular maintenance of the pipes and regulators will extend the life of your irrigation system. By following these steps you ensure a thriving garden environment that produces better yields. Remember to check all connections before starting. Proper setup is key to long term success over the years.
Search for 67,706 Manuals online


Type-in Brand or Model