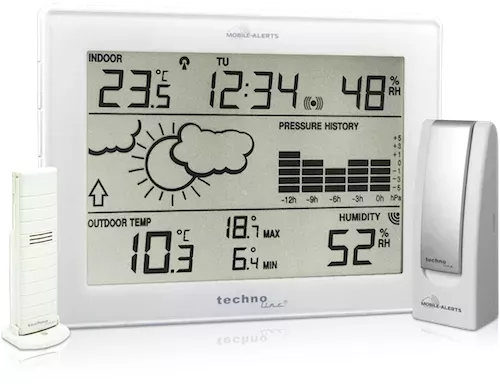
MA 10006 - Starter Set
Gateway + MA 10410
Instruction Manual
APP DOWNLOAD
Download the MOBILE-ALERTS app from "Apple App Store" or "Google Play".
CONNECT THE GATEWAY
Connect gateway to power supply using the supplied AC adapter. Connect included LAN
cable with gateway and your router. After about 10 seconds, the gateway is in operation. The
LED will turn static green.
If no DHCP server is available in your network, you can configure the gateway in the app
under the
point “Settings” manually.
Important: The Gateway
should always be put into operation before starting the
sensors!
FEATURES
The Weather Station
DCF Radio controlled time with manual setting option
Time reception ON/OFF setting
Weekday, date and month display (year only in setting mode)
Time zone option (-2h to +5h)
Daylight saving time (DST) setting
Alarm setting
Temperature display in degree Celsius (°C)
Indoor temperature display with MIN/MAX recordings
Outdoor temperature display with MIN/MAX recordings with time and date received
All MIN/MAX recordings can be reset
Indoor and outdoor humidity display in RH%
Weather forecast with weather tendency indicator
Relative air pressure history for the past 12 hours
LCD contrast setting
Low battery indicator
Table standing or wall mounting
Thermo-Hygro Transmitter
Remote transmission of outdoor temperature and humidity to weather
station by 868MHz
Wall mounting case
Mounting at a sheltered place. Avoid direct rain and sunshine
SETTING UP
Note: This weather station receives only one outdoor transmitter.
1. First, insert the batteries in the transmitter (see “How to install and replace batteries
in the thermo-hygro transmitter” above).
2. Within 30 seconds of powering up the transmitter, insert batteries in the weather station
(see “How to install and replace batteries in the weather station” above). Once the
batteries are in place, all segments of the LCD will light up briefly and a short signal
tone will sound. Then the indoor temperature, humidity and the time as 0:00 will be
displayed. If these information are not displayed on the LCD after 60 seconds, remove
the batteries and wait for at least 60 seconds before reinserting them. Once the indoor
data is displayed user may proceed to the next step.
3. After the batteries are inserted, the weather station will start receiving data signal from
the transmitter. The outdoor temperature and humidity data should then be displayed
on the weather station. If this does not happen after 2 minutes, the batteries will need
to be removed from both units and reset from step 1.
4. In order to ensure successful 868 MHz transmission, the distance between the weather
station and the transmitter should be within 100 meters (see notes on “Positioning”
and “868 MHz Reception”).
5. Once the outdoor data reception test period is completed, the DCF tower icon in the
clock display will start flashing in the upper left corner. This indicates that the clock has
detected that there is a radio signal present and is trying to receive it. When the time
code is received, the DCF tower becomes permanently lit and the time will be
displayed.
TO INSTALL AND REPLACE BATTERIES IN THE WEATHER STATION
The weather station uses 3 x AAA, IEC LR3,
1.5V batteries. To install and replace the
batteries, please follow the steps below:
1. Insert finger or other solid object in the
space at the bottom center of the
battery compartment and lift up to
remove the cover.
2. Insert batteries observing the correct
polarity (see marking).
3. Replace compartment cover.
TO INSTALL AND REPLACE BATTERIES IN THE THERMO-HYGRO
TRANSMITTER
The outdoor thermo-hygro transmitter uses 2 x AA, IEC LR6, 1.5V batteries. To install and
replace the batteries, please follow the steps below:
1. Remove the battery cover by pushing the battery cover upwards with
your thumb.
2. Insert the batteries, observing the correct polarity (see battery
compartment marking).
3. Replace the battery cover on the unit.
Note:
In the event of changing batteries in any of the units, all units need to be reset
by following the setting up procedures. This is due to a random security code assigned by the
transmitter at start-up. This code must be received and stored by the weather station in the
first 3 minutes of power being supplied to the transmitter.
ADD DEVICE TO MOBILE-ALERTS SYSTEM
(MOBILE ALERTS gateway needed, sold separately)
Open the app, dashboard is displayed. Tap "Add new sensor" and scan the QR code on the
back of the MA 10410. Then set a name for the sensor. To set a name, select the transmitter
and then tap on the left area of the pencil icon in the upper right.
Note:
Only the data for indoor, outdoor temperature and indoor, outdoor humidity are transmitted to
Mobile-Alerts.
DCF RADIO CONTROLLED TIME
The time base for the radio controlled time is a Cesium Atomic Clock operated by the
Physikalisch Technische Bundesanstalt Braunschweig which has a time deviation of less than
one second in one million years. The time is coded and transmitted from Mainflingen near
Frankfurt via frequency signal DCF-77 (77.5 kHz) and has a transmitting range of
approximately 1,500 km. Your radio-controlled weather station receives this signal and
converts it to show the precise time in summer or wintertime.
The quality of the reception depends greatly on the geographic location. In normal cases,
there should be no reception problems within a 1,500 km radius of Frankfurt.
DCF reception is done twice daily at 02:00 and 03:00 am. If the reception is not successful at
03:00 am, then the next reception takes place the next hour and so on until 06:00am, or until
the reception is successful. If the reception is not successful at 06:00 am, then the next
attempt will take place the next day at 02:00 am.
If the tower icon flashes, but does not set the time or the DCF tower does not appear at all,
then please take note of the following:
Recommended distance to any interfering sources like computer monitors or TV sets is
a minimum of 1.5 - 2 meters.
Within ferro-concrete rooms (basements, superstructures), the received signal is
naturally weakened. In extreme cases, please place the unit close to a window and/ or
point its front or back towards the Frankfurt transmitter.
During nighttime, the atmospheric disturbances are usually less severe and reception is
possible in most cases. A single daily reception is adequate to keep the accuracy
deviation below 1 second.
FUNCTION KEYS:
Weather station:
The weather station has 4 easy to use function keys:
SET key
Press and hold for 2 seconds to enter manual setting modes: LCD contrast, time zone,
time reception ON/OFF, DST ON/OFF, manual time setting and calendar
To stop the alarm sound
+ key
To increase/change values in setting modes
Toggle between time / date / humidity / seconds display
To stop the alarm sound
MIN/MAX key
To toggle between the indoor and outdoor MIN/MAX temperature
To decrease/change values in setting modes
Press and hold for 3 seconds to reset ALL indoor/outdoor minimum/maximum
temperature recordings to current readings
To stop the alarm sound
ALARM key
To activate/deactivate the alarm and display alarm time
Press and hold for 2 seconds to enter the alarm setting mode
To stop the alarm sound
To exit the manual setting mode
LCD SCREEN
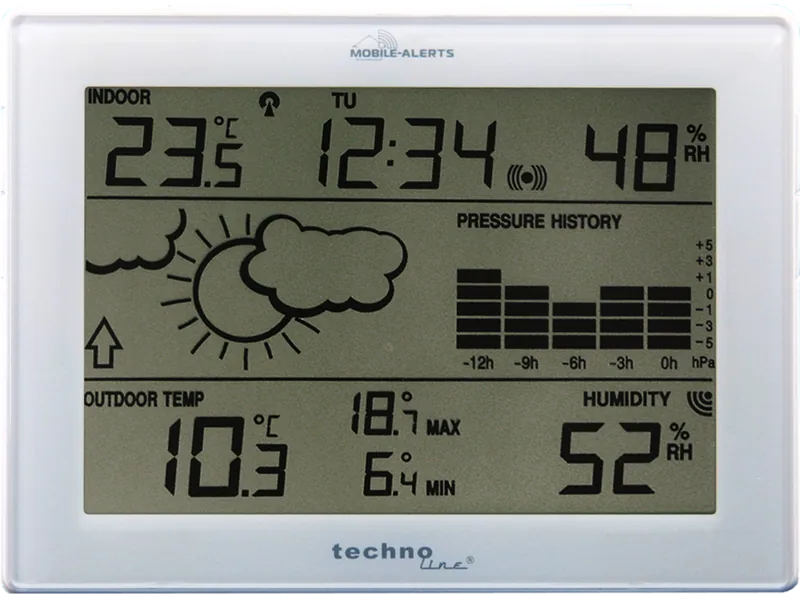
The LCD screen is split into 3 sections displaying the information for time/calendar, indoor
data, weather forecast and air pressure history, and outdoor data.
* When the signal is successfully received by the weather station, the outdoor transmission
icon will be switched on. (If not successful, the icon will not be shown on LCD). The user can
then easily see whether the last reception was successful (icon on) or not (icon off).
MANUAL SETTINGS
The following settings can be changed when pressing and holding the SET key:
LCD contrast setting
Time zone setting
Time reception ON/OFF setting
Daylight saving time (DST) ON/OFF setting
Manual time setting
Calendar setting
LCD CONTRAST SETTING
The LCD contrast can be set within 8 levels, from LCD 0 to LCD 7 (Default is LCD 4):
1. The LCD contrast level starts flashing.
2. Use the + or MIN/MAX key to select the level of contrast desired.
3. Confirm with the SET key and enter the Time Zone Setting.
TIME ZONE SETTING:
The time zone default of the weather station is “0”. To set a different time zone:
1. The current time zone value starts flashing.
2. Use the + or MIN/MAX key to set the time zone. The range runs from -2h to +5h hours
in 1-hour intervals.
3. Confirm with the SET key and enter the Time Reception ON/OFF Setting.
TIME RECEPTION ON/OFF SETTING
In area where reception of the DCF-77 time signal is not possible, the DCF-77 time reception
function can be turned OFF. The clock will then work as a normal quartz clock. (Default
setting is “1” = ON).
1. The digit “1” will start flashing on the LCD.
2. Use the + or MIN/MAX key to turn OFF (“0” = OFF) the time reception function.
3. Confirm with the SET key and enter the Daylight Saving Time (DST) ON/OFF
Setting.
Note:
If the Time Reception function is turned OFF manually, the clock will not attempt any
reception of the DCF time as long as the Time Reception OFF function is activated.
The time reception “ “ and the “DCF” icons will not be displayed on the LCD.
DAYLIGHT SAVING TIME (DST) ON/OFF SETTING
The daylight saving time (DST) function can be set ON/OFF. Default setting is “1” = ON:
1. The digit “1” will start flashing on the LCD.
2. Use the + or MIN/MAX key to turn OFF (“0” = OFF) the daylight saving function.
3. Confirm with the SET key and enter the Manual Time setting.
Important:
This function is only significant if the time reception setting is turned OFF “0”.
Daylight saving time setting “1” (ON): the clock calculates DST automatically in
normal quartz mode. DST begins on the last Sunday of March and ends on the last
Sunday of October.
Daylight saving time setting “0” (OFF): DST feature is OFF and the clock will not
change time automatically.
If the time reception setting is turned ON “1”, please set the daylight saving time “1”
(ON): the time change will be updated by the DCF-77 signal (as long as a proper reception is
possible).
In case of daylight saving time setting “0” (OFF): the time will be transmitted by the DCF-77
signal, but the clock calculates automatically a “no-DST time”.
MANUAL TIME SETTING:
In case the weather station cannot detect the DCF-signal (for example due to disturbances,
transmitting distance, etc.), the time can be manually set. The clock will then work as a
normal quartz clock.
1. The hour digit will start flashing.
2. Use the + or MIN/MAX key to set the hour. Keep holding the key allows the digit to
advance faster.
3. Press again the SET key to set the minutes. The minute digits start flashing.
4. Use the + or MIN/MAX key to set the minutes. Keep holding the key allows the digit to
advance faster
5. Confirm with the SET key and enter the Calendar setting.
Note:
The unit will still try and receive the signal despite it being manually set. When it does
receive the signal, it will change the manually set time into the received time. During
reception attempts the DCF tower icon will flash. If reception has been unsuccessful,
then the DCF tower icon will not appear but reception will still be attempted the
following day.
The time reception “ “ and the “DCF” icons will not be displayed on the LCD after
manual time setting.
CALENDAR SETTING
1. The year digits will start flashing. The range runs from 2011 to 2025 (default is 2011).
2. Use the + or MIN/MAX key to set the year. Keep holding the key allows the value to
advance faster.
3. Press the SET key to confirm and enter the month setting mode.
4. The month digit will be flashing. Use the + or MIN/MAX key to set the month. Keep
holding the key allows the value to advance faster.
5. Press the SET key to enter date setting.
6. The date digit will be flashing. Use the + or MIN/MAX key to set the date. Keep holding
the key allows the value to advance faster.
7. Confirm with the SET key and exit the manual setting.
Note:
The weekday is automatically displayed above the time in short form (from Monday to
Sunday): MO / TU / WE / TH / FR / SA / SU.
TO EXIT THE MANUAL SETTING MODE
To exit the manual setting mode anytime during the manual setting, press the ALARM key.
The mode will return to normal time display.
ALARM SETTING
To set the alarm:
1. Press and hold ALARM key for 3 seconds until the alarm time shown.
2. The hour digit will be flashing. Use the + or MIN/MAX key to adjust the hour. Keep
holding the key allows the value to advance faster.
3. Use the ALARM key again, and the minute digits will be flashing. Press + or MIN/MAX
key to set the minute. Keep holding the key allows the value to advance faster.
4. Press the ALARM key to confirm the setting.
Note:
To activate/deactivate the alarm function, press the ALARM key once. The display of the
alarm icon represents that the alarm is "ON".
The duration of alarm sounding is 2 minutes. Press any key will stop the alarm sound.
WEATHER FORECASTING ICONS:
The weather icons in the second section of LCD can be displayed in any of the following
combinations:
For every sudden or significant change in the air pressure, the weather icons will update
accordingly to represent the change in weather. If the icons do not change, then it means
either the air pressure has not changed or the change has been too slow for the weather
station to register. However, if the icon displayed is a sun or raining cloud, there will be no
change of icon if the weather gets any better (with sunny icon) or worse (with rainy icon) since
the icons are already at their extremes.
The icons displayed forecasts the weather in terms of getting better or worse and not
necessarily sunny or rainy as each icon indicates. For example, if the current weather is
cloudy and the rainy icon is displayed, it does not mean that the product is faulty because it is
not raining. It simply means that the air pressure has dropped and the weather is expected to
get worse but not necessarily rainy.
Note:
After setting up, readings for weather forecasts should be disregarded for the next 12-24
hours. This will allow sufficient time for the weather station to collect air pressure data at a
constant altitude and therefore result in a more accurate forecast.
Common to weather forecasting, absolute accuracy cannot be guaranteed. The weather
forecasting feature is estimated to have an accuracy level of about 75% due to the varying
areas the weather station has been designed for use. In areas that experience sudden
changes in weather (for example from sunny to rain), the weather station will be more
accurate compared to use in areas where the weather is stagnant most of the time (for
example mostly sunny).
If the weather station is moved to another location significantly higher or lower than its initial
standing point (for example from the ground floor to the upper floors of a house), discard the
weather forecast for the next 12-24 hours. By doing this, the weather station will not mistake
the new location as being a possible change in air-pressure when really it is due to the slight
change of altitude.
The weather forecast and tendency are not transmitted to MOBILE ALERTS! They can
only be read on the display.
WEATHER TENDENCY INDICATOR
The weather tendency indicators (located on the left side of the weather icons) are working
together with the weather icons. When the indicator points upwards, it means that the air-
pressure is increasing and the weather is expected to improve, but when indicator points
downwards, the air-pressure is dropping and the weather is expected to become worse.
Taking this into account, one can see how the weather has changed and is expected to
change. For example, if the indicator is pointing downwards together with cloud and sun
icons, then the last noticeable change in the weather was when it was sunny (the sun icon
only). Therefore, the next change in the weather will be cloud with rain icons since the
indicator is pointing downwards.
Note:
Once the weather tendency indicator has registered a change in air pressure, it will remain
permanently visualized on the LCD.