Manual.ly Logo

SLV New Tria 1 Manual

5.0 · 3 Ratings

PDF manual · 13 Pages

English

M: gpt-5.6-terra
page

/ 13

Loading...
5f0334406739890c7676a29ae3964ec405cc page 3
ENGLISH
OPERATING MANUAL FOR
RECESSED CEILING LUMINAIRE
NEW TRIA GU10
Read this short manual carefully and keep it accessible for further
reference!
SAFETY MESSAGES
Disregard of the safety messages may lead to danger of life, burning or
fire!
• Installation, mounting or works on the electrical connection may only be
carried out by an approved electrician.
• The product may not be modified or converted.
• Do not hang or fasten anything on the product, especially no decoration.
• Do not cover the product - provide free air circulation.
• In case of a malfunction you may NOT touch the product or operate it
further. Disconnect the product from the power supply by an external
switch or by the fuse.
A malfunction exists when:
• visible damages appear.
• the product does not work properly (e.g. flickering).
• smoke, steam or crackling sounds appear.
• smell of burning is recognisable.
• an overheating is recognisable (e.g. by discolouration of adjacent
surfaces).
Operate the product only after maintenance and examination by an
approved electrician!
• This product is not intended to be used by children. Ensure that children do
not suffer any harm e.g. by burns from hot surfaces or by electrical shock.
Additional safety messages are indicated by this symbol: .
USE AS DIRECTED
This product serves exclusively lighting purposes and may:
• only be used with a voltage of 230V ~50Hz.
• only be installed according to safety class II (two).
• only be operated when firmly mounted on a stable, even and tilt-fixed
surface.
• only be operated on normally or not flammable surfaces.
• only be used in dry condition,
• not in damp or dirt-endangered rooms.
• not in areas of high air humidity.
• not be exposed to strong mechanical loads or to strong contamination.
OPERATION
The distance between the light source and the illuminated surface must
be at least
0,5m
. Pay special caution to easily inflammable objects (e.g.
curtains, fabrics, foliage, etc.).
MAINTANANCE AND CARE
Light source
Exchange the light source always before it reaches its lifespan, to avoid
personal injuries, or damages of the luminaire or other objects.
Disconnect the product from the power supply, before you exchange the
light source. Let the light source cool down before replacement.
Use only light sources that are suitable for the product. Suitable light
sources are indicated on the type label.
• Suitable light sources: QPAR51, GU10, 50W max.
• Replacing the light source
• Loosen the bulb keeping device.
• Remove the used light source.
• Insert the new light source into the bulb holder.
• Insert the new light source with a slight-turn to the right.
• Reattach the bulb keeping device.
Care
Disconnect the product from the power supply and let it cool down, before
you clean the product.
• Clean the product on a regular basis using a slightly moistened, soft and fluff-
free cloth. Please also note additional supplied notes on maintanance and
care.
STORAGE AND DISPOSAL
Storage
• The product must be stored in a dry and clean environment. Do not strain
the product mechanically during storage.
After a damp or soiling storage the product may only be installed after
checking its condition by an approved electrician.
Disposal (European Union)
• Do not dispose the product with the regular household waste! Products
marked with this sign must be disposed according to the directive (WEEE,
2012/19) on electrical and electronic devices at local collection points for such
devices!
INSTALLATION
(only by an approved electrician)
Switch off the mains or respectively the connection lead before doing any
works!
Use only parts, which are supplied with the product or are described as
accessories!
Inspect the product for loose parts inside the housing. When there are loose
parts inside the housing and these are not explicitly described the product may
not be installed or operated.
Use the supplied fastening material only when it is suited for the installation
background. If this is not the case use only fastening material suiting the
installation background.
Unpacking
• Carefully take the product out of the packaging removing any transport
safeguards.
• Before disposal of the packaging material make sure that all components
of the product are removed.
Installation place
• The product is solely suited for recessed ceiling installation.
• Note the security advice on the distance to the illuminated surface in the
chapter OPERATION.
• The surface of the luminaire may get very hot depending on the utilized
light source. When using halogen light sources the luminaire may only be
installed and operated in a minimum height of 2,50m, outside of the arm’s
reach.
• Note the minimum distances in the ceiling. Minimum distance to each side:
5 cm.
Keep a sufficient distance to flammable surfaces. The indicated recess
depth is the minimum depth. Depending on the installation situation the
needed recess depth may be larger. This is especially the case, when there
are flammable materials above the luminaire or to ensure the sufficient
ventilation
.
Do not cover the product, especially not with insulating materials:
.
Installation steps (read completely before installation)
• Install the luminaire as shown in the figure.
• Mark and cut the opening. Do not damage the mains lead. The
measurements for the openings are:
111360/113490/113510/
111361/113491/113511: Ø: 7,8 cm
111362/113492/113512: L/W: 15,5/7,8 cm
111363/113493/113513: L/W: 23,5/7,8 cm
• Remove the cover on top of the connection clamp.
• Electrical Connection
• The product must be able to be separated by an all pole separation
from the current supply.
• For electric connection attach the black or brown wire (live conductor)
of the connection lead with the clamp L and the blue wire (neutral
conductor) of the connection lead with the clamp N.
• Attach the cover back on the connection clamp.
• Direct the luminaire into the opening, with the retaining springs pointing
upwards.
• Inserting the light source
• Insert the light source into the luminaire as shown on the figure.
Check if the product functions properly and is securely fixed!
art.-no. 111360 / 111361 / 111362 / 111363 113490 / 113491 / 113492 /
113493 / 113510 / 113511 / 113512 / 113513 © 07.02.2017
SLV GmbH, Daimlerstr. 21-23, 52531 Übach-Palenberg, Germany,
Tel. +49 (0)2451 4833-0
Technical Details are subject to change.

Chat with your SLV New Tria 1 manual using AI

Get instant AI answers from your SLV New Tria 1 manual

Ask anything about the SLV New Tria 1. Answers come from this manual, with the pages they are based on.

Ask a Question

0/1000

Do you recommend New Tria 1?

Yes No
0
User Pic

Sofia Lindberg

5 months ago

Are these spotlights good quality, easy to maintain, and true to the product photos?

0
User Pic

Manual.ly

5 months ago

Customers consistently describe the spotlights as high-quality, elegant, and matching the online listing. They are also reported to be easy to combine with other decor and simple to maintain. Reviews mention fast delivery and secure packaging as well.

M: gpt-5.6-terra
M: gpt-5.6-terra

Frequently Asked Questions

A

It is designed for one QPAR51 GU10 lamp with a maximum rating of 50W. Compatible GU10 LED lamps can be selected to suit the preferred brightness, color temperature, and beam angle.

Is this answer helpful?

A

Yes. The fitting allows 360-degree rotation and up to 30 degrees of tilt, helping direct the beam toward selected surfaces, architectural details, or work areas.

Is this answer helpful?

A

The round single-light models require a circular cut-out with a diameter of 7.8 cm. Confirm the available recess space as the listed installation depth is a minimum requirement.

Is this answer helpful?

A

It is intended only for recessed installation in dry indoor ceilings. Do not use it in damp rooms, areas with high humidity, or locations exposed to heavy contamination.

Is this answer helpful?

A

Installation, mounting, and electrical connection must be performed by an approved electrician. The power supply must be isolated before any work begins.

Is this answer helpful?

A

Keep at least 5 cm of side clearance in the ceiling and maintain a minimum 0.5 m distance between the light source and the illuminated surface. Do not cover the fitting or restrict ventilation.

Is this answer helpful?

M: gpt-5.6-terra

Advantages and Disadvantages

Advantages

  • Brushed aluminum finish provides a restrained, modern ceiling detail.
  • GU10 compatibility allows the light source and beam character to be selected separately.
  • 360-degree rotation and 30-degree tilt support targeted accent or task lighting.
  • Compact round format uses a 78 mm ceiling cut-out for a neat recessed appearance.
VS

Disadvantages

  • Light source is not included and must be selected separately.
  • Installation requires a qualified electrician and adequate ceiling recess depth.
  • Suitable only for dry indoor areas, not humid rooms or exposed locations.
  • The fitting can become hot, especially when used with halogen GU10 lamps.
M: gpt-5.6-terra

Product Specification

Type

Recessed light, spotlight, downlight

Old energy efficiency class suitable light source

A++ to E (A++ to E)

Built-in LEDs

no

Socket

1x GU10 (max. 50 W)

Light bulb

no

Material

Aluminum

Color

silver

Design

round

Special features

adjustable

Protection class

2

Dimensions

3.07 x 4.92 in (diameter x H)

M: gpt-5.6-terra

Product Description

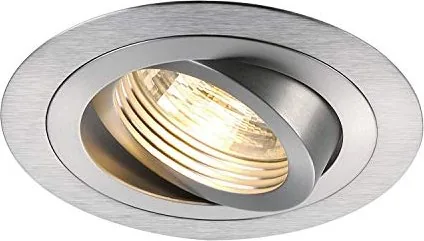
SLV New Tria 1 Round GU10 Recessed Light in Brushed Aluminum

The SLV New Tria 1 round GU10 recessed light in brushed aluminum is a refined ceiling lighting choice for interiors that call for a clean, integrated finish. Its circular format sits neatly within the ceiling, helping create a calm, uncluttered look while directing useful light exactly where it is needed. The brushed aluminum surface adds a subtle metallic character that works well with contemporary kitchens, hallways, living spaces, retail settings, and other dry indoor areas.

Flexible GU10 Lighting

Designed for one QPAR51 GU10 lamp, this recessed fitting supports light sources up to 50W. The GU10 format gives homeowners and planners freedom to choose an appropriate lamp for the room, including LED GU10 options for lower energy use or halogen lamps where permitted and desired. Because the lamp is replaceable, the lighting effect can be adapted over time without replacing the entire fitting.

The round single-light version uses a 78 mm ceiling cut-out and has a compact outer diameter of approximately 93 mm. Its minimum recess depth is 110 mm, making it important to confirm that sufficient ceiling space is available before installation. The luminaire is intended for 230V, 50Hz electrical systems and is built to protection class II requirements.

Discreet Directional Illumination

A key benefit of the New Tria design is its adjustable lamp position. With 360-degree rotation and up to 30-degree tilt, the light can be aimed toward a wall feature, worktop, artwork, shelving, or a preferred part of the room. This makes the fitting suitable for both general accent lighting and focused task lighting. A series of matching fittings can also create a consistent lighting layout across a larger ceiling.

The installation uses retaining springs to secure the fitting in the prepared ceiling opening. For reliable operation and safety, installation and electrical connection should be completed by an approved electrician. The fixture must remain uncovered so air can circulate freely, and it is designed only for dry locations. Maintain at least 50 cm between the lamp and the illuminated surface, with suitable clearance from flammable materials.

Care and Practical Notes

Switch off the power and allow the fitting to cool before replacing the lamp or cleaning it. A soft, slightly damp, lint-free cloth is recommended for routine care. Do not modify the fitting or attach decorations to it. If flickering, visible damage, smoke, overheating, or burning smells occur, isolate the power immediately and have the installation checked by a qualified electrician.

Note: When using halogen GU10 lamps, install the light at least 2.5 m above the floor and out of normal reach. LED GU10 lamps may be a practical choice for many everyday lighting schemes.

M: gpt-5.6-terra

© Copyright 2026 Manual.ly