
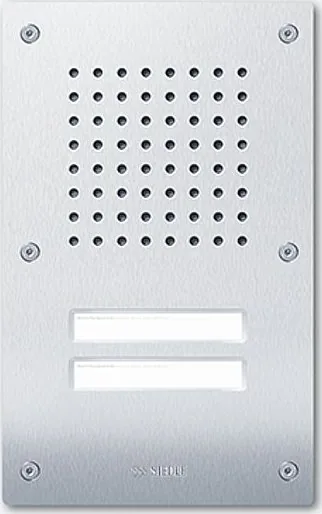
Siedle Classic CL 111-2 N-02 Manual
PDF manual · 12 Pages
English



Quick check
Incorrect answer, please try again.
Chat with your Siedle Classic CL 111-2 N-02 manual using AI
Get instant AI answers from your Siedle Classic CL 111-2 N-02 manual
Ask anything about the Siedle Classic CL 111-2 N-02. Answers come from this manual, with the pages they are based on.
Ask a Question
Do you recommend Classic CL 111-2 N-02?
Yes NoFrequently Asked Questions
No, installation, mounting, and servicing work on electrical devices must be performed exclusively by a qualified electrician to ensure safety and compliance with regulations.
Is this answer helpful?
Yes, it is designed to replace Portavox series models TL 111/411, and the existing flush mount housing can be retained during the exchange process.
Is this answer helpful?
Use warm water with dish soap and a soft cloth. Avoid steel wool or abrasive cleaners. Do not use metal care products on plastic parts.
Is this answer helpful?
No, within the existing wiring of the intercom system, no devices like additional bells or chimes should be installed.
Is this answer helpful?
Volume is set on the back of the door loudspeaker module. You should move your hand about 5 cm in front of the louvre to check for feedback.
Is this answer helpful?
The letter N stands for the 1+n system, whereas B indicates the In-Home bus system for different network types.
Is this answer helpful?
Advantages and Disadvantages
Advantages

- Compatible with existing Portavox housing, reducing installation time and cost significantly for homeowners.
- Built with stainless steel V4A for superior durability against weather and corrosion over time.
- Allows volume adjustment on the back of the speaker module for optimal audio balance without feedback.
- Includes necessary Allen screws and tools in the scope of supply for basic mounting tasks.
- Supports 1+n and In-Home bus systems, offering flexible integration options for various network setups.
Disadvantages

- Installation and service work must only be performed by a qualified electrician, limiting DIY repairs.
- Existing flush mount housing must be retained, which might require specific measurements before buying.
- Additional bells or chimes cannot be installed within the existing wiring loop without issues.
- Aggressive dirt like bird droppings must be removed immediately to prevent surface staining on materials.
- Voltage inside the housing is strictly limited to 50V, requiring careful adherence to safety standards.
Product Specification
Display
N/A
Detection Range
N/A
Connection
2-wire
Connections
2
Package Contents
1x Outdoor Station
Dimensions
6.73x10.91x0.08 in
Product Description
Siedle Classic Door Station Audio CL 111-2 N-02 Comprehensive Overview
The Siedle Classic Door Station Audio CL 111-2 N-02 represents a pinnacle in outdoor communication technology. This stainless steel V4A outdoor station ensures durability against harsh weather while maintaining a sleek aesthetic. For homeowners seeking clarity and reliability, this guide serves as the definitive resource for the Siedle Classic Door Station Audio CL 111-2 N-02 1+n 2-way Stainless Steel V4A Outdoor Station Manual experience. It is a robust unit built for longevity.
Designed as a direct replacement for the older Portavox series, this device simplifies upgrades significantly. You can retain your existing flush mount housing, utilizing the same fixtures which saves significant labor and ensures compatibility. The 1+n system integration supports seamless two-way audio communication across different network types. This flexibility makes it an ideal choice for residential security projects where minimal disruption is key for property owners. Adapters like FTL 101 to 103 can also be replaced effectively.
Installation requires strict adherence to safety protocols. Qualified electricians must handle all mounting and wiring tasks. Voltage levels inside the housing cannot exceed fifty volts according to DIN VDE standards. This ensures safety of the building infrastructure and the user. Existing wiring can be reused, but no additional bells or chimes should be installed in the loop. Volume adjustment is accessible on the back of the door loudspeaker module.
Maintenance is straightforward but requires specific care to preserve the finish. Regular cleaning is recommended, especially in coastal or industrial areas where dirt accumulates fast. Aggressive dirt like bird droppings should be removed immediately to prevent surface damage or discoloration. Never use abrasive cleaners such as steel wool or scouring sponges. Instead, use warm water with a soft cloth or nylon brush. Plastic parts must not get metal care products applied to them. Drying all surfaces after cleaning is crucial to prevent water spots or stains.
Serviceability is a genuine highlight of the Classic series design. Nameplates can be swapped out by gently leveraging the call button. Grip rails are accessible through the mail slot cover for customization. Even the loudspeaker module can be swapped if needed for upgrades. The scope of supply includes necessary tools like a two-hole screwdriver and Allen screws for assembly. This comprehensive package ensures that initial setup and future maintenance are manageable tasks for professionals. You can rely on Siedle service for engraving if needed.
Whether upgrading your intercom or installing a new entry system, the Siedle Classic Door Station stands out. The combination of robust materials and user-friendly design makes it a top choice. Integrated lighting enhances visibility during evening hours. Proper installation protects your investment. Always refer to the system manual for programming details included with the server.
Search for 67,706 Manuals online


Type-in Brand or Model