Manual.ly Logo

REV Ritter Premium 25500 Manual

0.0 · 0 Ratings

PDF manual · 17 Pages

English

M: qwen/qwen3.5-flash-20260224
page

/ 17

Loading...
b90b2c1438b7b89d4d08d8b24ee1fc7a69ff page 2
INTENDED USE
For automatic on/off switching of lamps and electrical
equipment, in dry rooms, only for indoor use.
Conforms to corresponding European direc-
tives.
TECHNICAL DATA
Voltage: 230V∼, 50Hz
Switching capacity: max. 3680W, 16A,
ind. 690VA, 3A
Operating temperature: 0°C to + 35°C
Settings:
▪ Up to 16 programs are possible.
▪ 16 program options per day or week; due to block
formation (e.g. MO - FR, SA - SU etc.) up to 112
switch operations are possible
▪ Minimum switching period 1 minute
▪ Manual switching is possible
▪ Countdown function (connected device is switched
on or off when set time expires)
▪ Random function (connected device, e.g. radio/light
is randomly switched on/off, thus giving the impres-
sion that someone is at home)
▪ Reserve in case of power failure
▪ Blue LCD display with blue backlight (can be
switched off) > 100h
▪ Child-proof lock
SAFETY INSTRUCTIONS
▪ Only a proper mains socket (230V∼, 50Hz,
with protective earth) from the public supply
network may be used.
▪ Do not operate any equipment which could
cause danger to life and limb if operated
without supervision.
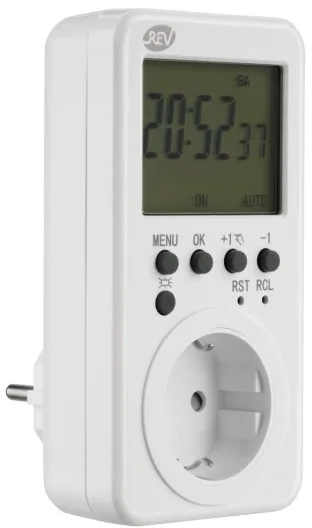
EXPLANATION OF CONTROL PANEL
Fig. [1]
MENU
▪ Switching mode between time of day,
program and countdown function
▪ Confirmation of settings
OK
▪ Setting activation of time of day, program and
countdown
+1
▪ Manual switching
▪ Program selection, forward
▪ Setting hours and minutes, forward
-1
▪ Random function
▪ Program selection, backward
▪ Setting day, hours and minutes, backward
RST
▪ Deleting all settings
RCL
▪ Deleting programs
▪ On and off switch for blue display light
Remove the timer from the socket and press RCL and
RST using a thin, electrically non-conductive object
COMMISSIONING
1. Plug timer into a 230V∼ socket. The battery requires
only approx. 6 hours charging time. If timer is not
used for an extended period, it should be connected
at least once a month for at least two hours to main-
tain battery capacity.
2. If there is no display, press the RST key.
3. The timer is now ready to be set.
LIGHT OF LCD DISPLAY
If timer is plugged into a live Schuko socket, the blue
backlight of the LCD display can be switched on or off
by pressing the key.
SETTING THE TIME OF DAY
▪ Use MENU key to select time setting
▪ Press OK key for about 3 seconds. The day of week
begins to flash; use +1 or -1 key to select the day.
▪ Press OK key, the hours are flashing; use +1 or -1
key to select the hours.
▪ Press OK key, the minutes are flashing; use +1 or -1
key to select the minutes.
▪ Press MENU key to confirm (fig. [2] ).
▪ For rapid sequence, press and hold +1 or -1 key.
SETTING/CHECKING PROGRAMS
▪ The timer can be set for daily or weekly programs.
▪ To open the individual programs, use MENU key to
access program 1 ON.
▪ Use +1 (forward) or -1 (backward) key to access the
individual programs from 1 to 16:
Program 1 ON - Program 1 OFF
Program 16 ON - Program 16 OFF
▪ For rapid sequence, press and hold +1 or -1key.
▪ You can select daily or weekly combinations:
MO = Monday, TU = Tuesday, WED = Wednesday,
TH = Thursday, FR = Friday, SA = Saturday,
SU = Sunday
or for combinations:
MO – WE – FR
TU – TH – SA
SA – SU
MO – TU – WE
TH – FR – SA
MO – TU – WE – TH – FR
MO – TU – WE – TH – FR – SA
MO – TU – WE – TH – FR – SA – SU
EXAMPLE FOR SETTING
A DAILY PROGRAM
▪ MO 8.15 On / MO 15.45 Off
▪ Use MENU key to access program 1 ON.
▪ Press OK key once until day of week is flashing; use
+1 or -1 key to select the day (e.g. MO).
▪ Press OK key, hours are flashing; use +1 key to se-
lect the hours (e.g. 8).
▪ Press OK key, minutes are flashing; use +1 key to
select the minutes (e.g. 15) (fig. [3] )
▪ Press OK key, 1 ON is flashing; use +1 key to select
program 1OFF
▪ Press OK key once until day of week is flashing
▪ Use +1 or -1 key to select the day (e.g. MO)
▪ Press OK key, hours are flashing; use +1 key to se-
lect the hours (e.g. 15).
▪ Press OK key, minutes are flashing; use +1 key to
select the minutes (e.g. 45) (fig. [4] ).
The timer will only switch on and off on Monday.
EXAMPLE FOR SETTING
A WEEKLY PROGRAM
▪ MO – Fr, 8.15 On / 15.45 Off
▪ Use MENU key to access program 1 ON.
▪ Press OK key once until day of week is flashing; use
+1 or -1 key to select weekly combination (e.g. MO
TU WE TH FR).
▪ Press OK key, hours are flashing; use +1 key to se-
lect the hours (e.g. 8).
▪ Press OK key, minutes are flashing; use OK key to
select the minutes (e.g. 15) (fig. [5] )
▪ Press OK key, 1 ON is flashing; use +1 key to select
program 1 OFF
▪ Use +1 or -1 key to select weekly combination (e.g.
MO TU WE TH FR).
▪ Press OK key, hours are flashing; use +1 key to se-
lect the hours (e.g. 8).
▪ Press OK key, minutes are flashing; use +1 key to
select the minutes (e.g. 15) (fig. [6]
Every day, from Monday through Friday, the timer
switches on and off at the same time.
Caution: To ensure that programming is activated,
AUTO ON or AUTO OFF must be displayed in time
mode. Press +1 key during time mode to access AUTO
ON / AUTO OFF (see Manual Switching).
HOW TO DISABLE PROGRAMS
▪ Use MENU key to access program 1 ON.
▪ Use +1 (forward) or -1 (backward) key to access
program to be disabled.
▪ Press RCL key; dashes appear. Please note that ON
and OFF programs must be deleted individually, fig.
[7]
COUNTDOWN TIMER
The connected device can be switched on or off after
expiration of the set time.
▪ In time mode, use +1 key to set either OFF (load is
switched on after expiration of countdown) or ON
(load is switched off after expiration of countdown).
▪ Use MENU key to access program CTD. The hours
are flashing; use +1 or -1 key to select the hours
▪ Press OK key, the minutes are flashing; use +1 or -1
key to select the minutes.
▪ Press OK key, the seconds are flashing; use +1 or -1
key to select the seconds.
▪ Press OK key to run; all other programs are disabled
during running. Display shows 0:00 after expiration.
▪ To end countdown during running, press RCL key
once, fig. [8].
RANDOM FUNCTION
▪ In time mode, use -1 key to activate random function.
Display shows RND. The display must show AUTO
OFF; if necessary, set as described under Manual
Switching.
▪ This causes a delay of the set on and off times (On-
Off programs from 1 - 16) by 4 - 32 minutes. Thus, the
connected loads (e.g. light or radio) can be switched
on or off at irregular intervals, giving unwanted visi-
tors the impression that someone is at home.
▪ To deactivate random function, press -1 again. RND
disappears from the display, fig. [9].
Caution: To prevent programs from overlapping, the
time lag between two subsequent programs must be at
least 33 minutes. If this is not observed, the connected
load remains switched on.
▪ Example: Program 1 ON is programmed for 1:00,
and program 1 OFF for 3:00. The timer randomly
switches on between 1:04 and 1:32, and off be-
tween 3:04 and 3:32.
MANUAL SWITCHING
This timer allows you to manually switch connected
loads on and off.
Press +1 key during time mode to switch as follows:
▪ ON connected load is always switched on
▪ AUTO - ON connected load is on in the program
▪ ON connected load is always switched off
▪ AUTO - OFF is switched off in the program
(fig. [10] ).
AUTOMATIC RETURN
TO TIME DISPLAY
If timer shows program or count-down mode and more
than 2 minutes have expired since key was last oper-
ated, the display automatically returns to the time dis-
play.
SUMMER / WINTER TIME
▪ Press RCL key. The hour display advances one hour
and + 1h appears on the display to indicate summer
time.
▪ To return to display of winter time, press RCL key
WEEE-REFERENCE OF DISPOSAL
In accordance with European defaults used electrical
and electronics devices may no more be given to the
unsorted waste. The symbol of the waste bin on wheels
refers to the necessity of separate collection.
Please help with environmental protection and see to
it that this device is given to the for this purpose desi-
gnated systems of waste sorting if you do not use it any
longer.
GUIDELINE 2012/19/EU of the EUROPEAN
PARLIAMENT AND the COUNCIL of July 04th
2012 about electrical and electronics old devices.
Batteries and accumulators are not to be
disposed of in the normal house waste bin.
Every user is legally obliged, to hand over all
batteries and accumulators, irrespective of
whether or not they contain harmful substances to a
communal collection point in the local town area or to
a trade dealer so that they can be disposed of in an
orderly environmentally friendly manner.
Batteries and accumulators should only be handed over
when they are completely discharged!
GB
ANL_25500.indd 2 03.06.2019 14:02:27

Chat with your REV Ritter Premium 25500 manual using AI

Get instant AI answers from your REV Ritter Premium 25500 manual

Ask anything about the REV Ritter Premium 25500. Answers come from this manual, with the pages they are based on.

Ask a Question

0/1000

Do you recommend Premium 25500?

Yes No

Frequently Asked Questions

A

You can configure up to sixteen programs per week. These can be set for individual days or week blocks.

Is this answer helpful?

A

It varies switch times by 4 to 32 minutes to simulate presence. This helps deter intruders when you are traveling.

Is this answer helpful?

A

The battery reserve lasts for over one hundred hours during power failure. It ensures your settings are not lost during short outages.

Is this answer helpful?

A

No, it is designed for dry indoor rooms only. Outdoor usage may violate safety regulations and damage the unit.

Is this answer helpful?

A

It supports a maximum switching capacity of 3680 Watts. Ensure connected devices do not exceed this limit.

Is this answer helpful?

A

Use the RCL key to switch between Summer and Winter time. This adjusts the clock automatically for daylight savings.

Is this answer helpful?

A

Yes, you can manually switch on or off regardless of the program. This allows immediate control without canceling the schedule.

Is this answer helpful?

M: qwen/qwen3.5-flash-20260224

Advantages and Disadvantages

Advantages

  • Supports up to 16 programmable scenarios for flexible weekly scheduling
  • Random switch function enhances home security by simulating occupancy
  • Battery backup provides over 100 hours of clock retention during power outages
  • Blue backlit LCD display ensures easy reading in low light conditions
  • Countdown timer function allows single-use automation for temporary needs
VS

Disadvantages

  • Battery requires approximately 6 hours to fully charge upon first use
  • Restricted to dry indoor environments and cannot be used outdoors
  • Initial programming may be complex for users unfamiliar with digital interfaces
  • Requires a grounded mains socket for safe electrical operation
  • Manual override prevents automatic schedules from engaging immediately
M: qwen/qwen3.5-flash-20260224

Product Specification

Type

Digital Socket Timer

Controls

Buttons, LCD (blue backlit)

Specifications

230V, 3680W, 16A, Operating range 32°F to 95°F

Functions

112 switching programs stored, Weekly programs (with grouping), Presence simulator, Countdown, Manual permanent switch, minimum switching interval 1min, 12/24h mode selectable

Special Features

integrated battery for memory (1.2V NiMH), Child protection

Color

white

Manufacturer Warranty

two years

M: qwen/qwen3.5-flash-20260224

Product Description

Transforming Home Automation with Simple Timers

Managing your home electronics becomes much easier with the right tools. This digital timer simplifies the process of switching appliances automatically. The REV Ritter Premium Digital Timer White Manual provides comprehensive instructions for setup and daily use. It allows users to control lighting and heating systems based on specific schedules. This flexibility helps save electricity while ensuring comfort upon arrival. The device features a distinct blue backlit screen that shows all active information clearly.

Advanced Programming Capabilities

You can set up to sixteen different programs for your weekly routine. These programs can be organized into blocks for weekdays or weekends. This means you can set your lights to turn on every Monday through Friday at the same hour. Individual day selection offers precision for varying schedules. Each program allows for both turn on and turn off actions. The smallest switching interval is set to one minute for precise timing. This granularity allows for exact control over your daily routine.

Security and Random Function

Security is a priority when you are away from home for long periods. The random function simulates occupancy by varying the switch times slightly. Devices will activate between four and thirty two minutes later than set. This creates uncertainty for potential intruders checking for patterns. It is an excellent feature for holiday safety without complex installation. Always ensure the manual settings align with the random mode parameters. It is a key component for home security awareness.

Power Reserves and Technical Specs

The unit operates on standard mains power for reliability. It handles up to 3680 Watts of connected load capacity safely. If the power goes out, the internal memory battery keeps the clock going. This reserve lasts for more than one hundred hours without interruption. You do not lose your schedule during short blackouts. The operating temperature range is suitable for most indoor rooms. It ensures consistent performance across seasons without overheating.

Safety and Usability Features

A child safety lock prevents accidental manipulation of the controls. This ensures that settings remain unchanged by younger hands. The device is intended for use in dry indoor rooms only. Outdoor usage violates safety regulations and may damage the unit. Adjustments for summer and winter time are made with a dedicated key. The backlight can be toggled off to save energy or reduce glare. Following the REV Ritter Premium Digital Timer White Manual ensures all features work correctly. Proper grounding is required for the socket used. Regular checks prevent electrical issues over time. This tool is a staple for modern energy conscious households.

Maintenance and Service Support

Proper maintenance extends the life of the timer significantly. Connect it to grounded sockets for maximum safety and performance. Avoid overloading the device beyond rated specifications to prevent damage. If issues arise, contacting service channels is recommended by the manufacturer. The manual provides clear troubleshooting steps for display errors or unresponsiveness. Resetting the device is easy using the designated system reset button. Overall, this timer offers a blend of security and convenience for users. It simplifies energy management while enhancing home safety protocols effectively.

M: qwen/qwen3.5-flash-20260224

© Copyright 2026 Manual.ly