Manual.ly Logo

Raijintek Pallas 120 Manual

0.0 · 0 Ratings

PDF manual · 2 Pages

English

M: OA-GPT-5-NAN
page

/ 2

Loading...
562a5b1bc8140a4750b7cb44b8a07f3a8afc page 1
INTEL AMD
LGA 1366
LGA
115x
LGA 775
AM4
AM2/AM2+/AM3
▪ Heat-sink × 1
▪ Heat-Sink × 1
▪ Radiateur × 1
▪ Disipador de calo × 1
▪ Dissipatore × 1
▪ ヒートシンク × 1
▪
೸ሤጡώវ
× 1
▪ Радиатор × 1
▪ Radyatör × 1
▪ Dissipador de calor × 1
▪ Fan × 1
▪ Lüfter × 1
▪ Ventilateur × 1
▪ Ventilador × 1
▪ Ventola × 1
▪ ファン × 1
▪
ࢲ
× 1
▪ Вентилятор × 1
▪ Fan × 1
▪ Ventoinha × 1
▪ Back Plate × 1
▪ Back Plate × 1
▪ Back Plate × 1
▪ Placa trasera × 1
▪ Back Plate × 1
▪ バックプレート × 1
▪
ࡦڕ
× 1
▪ Задняя панель × 1
▪ Arka Plaka × 1
▪ Placa traseira × 1
▪ Crossbar × 1
▪ Quersteg × 1
▪ Barre transversale × 1
▪ barra transversal × 1
▪ Barra Trasversale × 1
▪ クロスバー × 1
▪
ᑅڕ
× 1
▪ Перекладина × 1
▪ Köprü × 1
▪ Trave × 1
▪ Mounting-clip × 1
▪ Installations-Clip × 1
▪ Barre de fixation × 1
▪ Clipdemontaje × 1
▪ Clip di montaggio × 1
▪ マウンティングクリップ × 1
▪
ᒖԛљ׍
× 1
▪ Монтажные клипсы × 1
▪ Ba侃lantıklipsi × 1
▪ Clipe de montagem × 1
▪ Knurledthreadedscrews × 4
▪ Gewindeschrauben × 4
▪ Vis moletées × 4
▪ Tornillosroscadosestriados × 4
▪ Controdadi zigrinati × 4
▪ ボルト × 4
▪
ܜᓲක
× 4
▪ Винт с резьбой × 4
▪ Di㶆licivata× 4
▪ Parafuso roscado serrilhado× 4
▪ LGA 201x/2066screw × 4
▪ LGA 201x/2066Schrauben× 4
▪ Vis LGA 201x/2066 × 4
▪ LGA 201x/2066Tornillo × 4
▪ Viti LGA 201x/2066 × 4
▪ LGA 201x/2066ネジ × 4
▪ LGA 201x/2066
ᓲක
× 4
▪ LGA 201x/2066винт × 4
▪ LGA 201x/2066vida× 4
▪ Parafuso LGA 201x/2066× 4
▪
FanClip × 2
▪ Lüfterbefestigung × 2
▪ Clip pour Ventilateur × 2
▪ losclipsdelVentilador× 2
▪ Staffe per le ventole × 2
▪ クリップ × 2
▪
ቢљ
× 2
▪ Крепления для вентилятора × 2
▪ FANKL佲PSLER佲 × 2
▪ Clipe Ventoinha × 2
▪ Metalnut× 4
▪ Metallmutter × 4
▪ Écrou en métal × 4
▪ Tuercadelmetal× 4
▪ Dadi in metallo × 4
▪ メタルナット × 4
▪
ܛᛳᓲಽ
× 4
▪ Металлическая гайка × 4
▪ Metalsomun× 4
▪ Porca de metal × 4
▪ Metalnut× 4
▪ Metallmutter × 4
▪ Écrou en métal × 4
▪ Tuercadelmetal× 4
▪ Dadi in metallo × 4
▪ メタルナット × 4
▪
ܛᛳᓲಽ
× 4
▪ Металлическая гайка × 4
▪ Metalsomun× 4
▪ Porca de metal × 4
▪ M3screw × 2
▪ M3Schrauben × 2
▪ Vis M3 × 2
▪ TornilloM3 × 2
▪ Viti M3 × 2
▪ M3ネジ × 2
▪ M3
ᓲක
× 2
▪
M3 винт
× 2
▪ M3vida × 2
▪ Parafuso M3 × 2
▪ Thermalgrease × 1
▪ Wärmeleitpaste × 1
▪ Pâte thermique × 1
▪ Pastatérmica × 1
▪ Pasta Termoconduttiva × 1
▪ 放熱グリス × 1
▪
ጱሤჼ
× 1
▪
Термо-паста
× 1
▪ Termalmacun × 1
▪ Pasta térmica × 1
▪ Washer × 4
▪ Beilagscheibe× 4
▪ Rondelle × 4
▪ Arandela × 4
▪ Rondelle × 4
▪ ワッシャー × 4
▪ ါ઻ × 4
▪ Шайба × 4
▪ Pul× 4
▪ Arruela × 4
▪ Stand-off × 2
▪ Abstandshalter × 2
▪ Ecarter × 2
▪ Distanciador × 2
▪ Distanziale × 2
▪ スタンドオフ × 2
▪ ᅚߗ × 2
▪ Стойка × 2
▪ Taşıyıcı ayak × 2
▪ Espaçador × 2
www.raijintek.com
Creating Passion
Use metal nuts to fasten back plate and
MB
Verwenden Sie die Metallmuttern um
die Backplate und das MB zu fixieren.
Utilisez les écrous métalliques pour
fixer la backplate à la carte mère.
Utilice tuercas de metal para sujetar la
placa trasera y la placa base
Utilizzare I dadi in metallo per
ancorare
il backplate alla scheda madre.
Используйте
м
еталлическая гайка для
крепления задней панели к металлических
гаек.
Use as porcas de metal para fixar o
backplate à placa-mãe.
Metal somunları kullanarak arka plakayı
sıkı biçimde anakarta sabitleyin
メタルナットでボルトを締め、バックプレート
とメインボードを固定してください。
֭ͽܛᛳᓲಽ૟ࡦڕᄃ͹፟ڕᗆ׽Ą
Aim the holes of back plate to the holes of MB, then let
Knurled threaded screws through back plate and MB
Passen Sie die Lochführungen der Backplate mit denen des
MB‘s an, schieben Sie dann die Gewindeschrauben (Nr. 8)
durch die Backplate und das MB.
Alignez les trous de la backplate avec ceux du socket, puis
insérez les vis moletées à travers la backplate et la carte
mère.
Alinee los orificios de la placa posterior con los orificios de
la placa base, inserte los tornillos roscados estriados través
de la placa trasera y MB.
Allineare i fori del backplate relativi al vostro socket, e
posizionate le quattro viti zigrinate, attraverso motherboard
e backplate. Nota: Potrebbe essere necessario rimuovere i
sistema di ritenzione originale sui sistemi AMD.
Сопоставьте отверстия задней панели с отверстиями
материнской платы и вставьте резьбовые винты через
заднюю панель и материнскую плату.
Alinhe os furos da placa traseira, com os furos da
placa-mãe, em seguida, insira os parafusos rosqueados
serrilhados através do backplate e da placa-mãe.
Arka plakada yer alan delikleri, anakarttaki deliklere göre
hizalayın, ardından dişli civataları arka plakadan geçirip
anakartın ön yüzünden çıkarın
ネジ穴の位置に沿ってバックプレートをセットし、ボルトに差し込ん
でください。
૟ࡦڕֶ໰͹፟ڕҜᕚٸĂ૟αܜඈᓲߗࡍ࿅ࡦڕᄃ
͹፟ڕĄ
1.Keep and store the product away from the
reach of children.
2.
Check the component list and condition of the
product before installation. If there is any pro-
blem, contact the shop where you purchased
to get a replacement or refund.
3.RAIJINTEK Co., Ltd. is not responsible for any
damages due to external causes, including but
not limited to, improper use, problems with elec-
trical power, accident, neglect, alteration, repair,
improper installation, and improper testing.
4.CPU and motherboard are subject to damage
if the product in incorrectly installed.
1.
Conservez et stockez le produit hors de portée
des enfants.
2.
Vérifiez la liste des composants et l'état du produit
avant installation. En cas de problème, contactez
le magasin où vous l'avez acheté pour obtenir
un remplacement ou un remboursement.
3.RAIJINTEK Co., Ltd. n'est pas responsable des
dégâts dus à des causes externes, y compris mais
non limité à, une mauvaise utilisation, des pro-
blèmes d'alimentation électrique, un accident, une
négligence, une modification, une réparation, une
installation incorrecte ou un mauvais test.
4.
Le CPU et le carte mère sont sujets à dégâts si le
produit est mal installé.
1.製品はお子様の手の届かないところに設置または保
管してください。
2.取り付ける前に部品リストおよび製品状況を確認し
てください。問題がある場合は、販売店に連絡して、
交換または返金してもらってください。
3.RAIJINTEKCo.,Ltd.は、不正使用、電源に関する問題
、事故、粗略な取扱い、改造、不適切な設置、不正な
検査を含む、またはそれらに限定されない外的要因
によるいかなる損傷に対しても責任を負いません。
4.製品を正しく取り付ないと、CPUおよびマザーボード
が損傷する場合があります。
1.
ኛ૟யݡٸཉᐼхٺޅආΞᛈቑಛγĄ
2.
щ྅݈ኛᑭߤ࿬ІϫᐂயݡېڶĄтѣЇң
યᗟĂኛᓑඛଋٙᔉ෴۞થظͽ೩ֻೱఱٕߏ
ఱڇચĄ
3.RAIJINTEK
Φ૟࢑ЇңЯγొЯ৵ౄјຫ
εĄΒ߁ҭࢨטٺĂዋ༊ֹϡă࿪˧ય
ᗟăຍγְІăழنă࣒Լă࣒நăዋ༊
щ྅׶ዋ༊ീྏĄ
4.
δ఍நጡ׶͹፟ڕдϒቁгщ྅யݡ˭ٽ
צຫĄ
1.
Ürünü çocukların ulaşabileceği yerlerden uzakta
saklayın.
2.
Montajdan önce parça listesini ve ürünün duru-
munu kontrol edin. Herhangi bir sorun varsa,
yenisi almak veya para iadesi için ürünü satın
aldığınız mağaza ile temas kurun.C
3.
RAIJINTEK Co., Ltd. hatalı kullanım, elektrik şebe-
kesi ile yaşanan sorunlar, kaza, ihmal, tadilat,
onarım, hatalı kurulum ve uygun olmayan test
dahil ancak bunlarla sınırlı olmamak kaydıyla
hiçbir hasardan sorumlu değildir.
4.Ürün hatalı şekilde kurulduysa işlemci ve ana
kart hasar görebilir.
1.Kindersicher aufbewahren.
2.
Prüfen Sie vor der Installation die Komponentenliste
und den Zustand des Produktes. Sollte es dabei
ein Problem gegen, wenden Sie sich an Ihren
Händler zwecks Austauschs bzw. Rückerstattung.
3.
RAIJINTEK Co., Ltd. haftet nicht für Beschädigungen
durch äußere Einflüsse, einschließlich aber nicht
beschränkt auf unsachgemäßen Gebrauch, Strom-
versorgungsprobleme, Unfall, Nachlässigkeit,
Modifikationen, Reparaturen, unsachgemäße
Installation und unsachgemäße Überprüfung.
4.
Bei unsachgemäßer Installation können CPU und
Motherboard beschädigt werden.
1.Mantenga el producto almacenado fuera del
alcance de los niños.
2.Revise la lista de componentes y la condición
de los productos antes de la instalación. Si hay
algún problema contacte la tienda donde fue
comprado para que le reemplacen el producto
o le devuelvan su dinero.
3.
RAIJINTEK Co., Ltd. no es responsable por daños
debido a causas externas, como, uso indebido,
problemas con la corriente eléctrica, accidentes,
negligencias, alteración, reparación, instalación
indebida y testeo indebido.
4.
El procesador y placa madre pueden sufrir daño
si el producto es indebidamente instalado.
1.
Tenere il prodotto fuori dalla portata dei bambini.
2.
Controllare la completezza della dotazione e le
condizioni del prodotto prima dell' installazione.
Se dovessero esserci parti mancanti o danni
contattare immediatamente il rivenditore per
la sostituzione o il rimborso.
3.RAIJINTEK Co. Ltd.non è responsabile di danni
dipendenti da cause esterne, inclusi uso impro-
prio, problemi con la corrente elettrica, cadute
accidentali, negligenza, alterazione, tentativi
di riparazione o errata installazione/testing.
4.
Le CPU e le schede madri possono essere soggette
a danneggiamento in caso di errata installazione.
1.
Храните изделие в недоступном для детей месте.
2.
Перед установкой проверьте список компонентов
и состояние изделия. При наличии проблем,
обратитесь в магазин, где вы приобрели
изделие, для замены или получения возмещения.
3.
Компания RAIJINTEK Co., Ltd. не несет ответ-
ственности за ущерб или убытки, вызванные
внешними причинами, включая аварии, проблемы
с электричеством, небрежное или неправильное
использование, модификации изделия, самос-
тоятельный ремонт, неправильная установка
или неправильное тестирование изделия.
4.
Неправильная установка изделия может привести
к повреждению ЦПУ и материнской платы.
Precautions
Vorsichtsmaßnahmen
Précautions
Precauciones
Precauzioni
使用上の注意
ֹϡڦຍ
Меры предосторожности
Önlemler
1.
Manter e armazenar o produto longe do alcance
de crianças.
2.
Verifique a lista de componentes e o estado do
produto antes da instalação. Se houver qualquer
problema, entre em contato com a loja onde
o adquiriu para obter uma substituição ou
reembolso.
3.
RAIJINTEK Co., Ltd. não é responsável por qualquer
dano devido a causas externas, incluindo, mas
não limitado a, utilização indevida, problemas
com energia elétrica, acidente, negligência,
alteração, reparação, instalação inadequada e
testagem inadequada.
4.CPU e placa-mãe estão sujeitas a danos se o
produto for instalado incorretamente.
Precauções
Before installation, check the hole position
of M/B; Intel LGA775, LGA115x or LGA
1366; AMD AM2, AM2+, AM3 or AM4.
Prüfen Sie den zu installierenden Sockel
des M/B; Intel LGA775, LGA115x oder
LGA1366; AMD AM2, AM2+, AM3 oder
AM4 vor der Installation.
Vérifiez, avant l’installation, la position
des trous correspondant à votre socket;
Intel LGA775, LGA115x ou LGA1366;
AMD AM2, AM2+, AM3 or AM4.
Antes de la instalación, compruebe la
posición del agujero de la placa base;
Intel LGA775, LGA115x o LGA1366;
AMD AM2, AM2+, AM3 o AM4.
Prima dell’ installazione, verificare la
tipologia di socket adottato dalla vostra
Scheda Madre
Перед установкой проверьте соответствие
отверстий материнской платы; Intel LGA
775, LGA115x или LGA1366;
AMD AM2,
AM2+, AM3 или AM4.
Antes da instalação, verifique a posição dos
furos na placa-mãe: Intel LGA775, LGA
115x ou LGA1366; AMD AM2, AM2+, AM3
ou AM4.
Kurulumdan önce anakarttaki deliklerin
konumlarını kontrol edin; Intel LGA775,
LGA115x ya da LGA1366; AMD AM2,
AM2+, AM3 ya da AM4.
インストールの前にメインボードのネジ穴の
位置を確認してください。
щ྅݈ኛАቁؠ͹፟ڕҜĄ

Chat with your Raijintek Pallas 120 manual using AI

Get instant AI answers from your Raijintek Pallas 120 manual

Ask anything about the Raijintek Pallas 120. Answers come from this manual, with the pages they are based on.

Ask a Question

0/1000

Do you recommend Pallas 120?

Yes No

Frequently Asked Questions

A

The Pallas 120 supports a broad range of sockets including Intel LGA 201x/2066, LGA 1366, LGA 115x, LGA 775 and AMD AM4, AM3, AM2/AM2+.

Is this answer helpful?

A

The kit ships with a heatsink, fan, backplate(s), crossbar, mounting clips, knurled threaded screws, metal nuts, washers, standoffs, M3 screws, fan clips, thermal grease and an RGB connection cable.

Is this answer helpful?

A

Clean the CPU surface thoroughly, remove the protective film from the heatsink base, then apply thermal grease evenly on the CPU to ensure proper thermal transfer before placing the heatsink.

Is this answer helpful?

A

Verify socket compatibility and hole positions on the motherboard first; align backplate and crossbar holes precisely; tighten screws evenly and securely; improper installation can damage the CPU or motherboard.

Is this answer helpful?

A

Yes — it includes a connection cable to link the fan or RGB element to a compatible motherboard RGB header for basic lighting synchronization.

Is this answer helpful?

A

Check the component list before installation. If any item is missing or damaged, contact the retailer for a replacement or refund per the purchase terms.

Is this answer helpful?

A

Keep the product out of children’s reach, inspect components before use, and note Raijintek disclaims responsibility for damages caused by misuse, improper installation, or unauthorized repairs.

Is this answer helpful?

M: OA-GPT-5-NAN

Advantages and Disadvantages

Advantages

  • Wide socket compatibility: supports Intel LGA 201x/2066/1366/115x/775 and AMD AM4/AM3/AM2 series.
  • Complete mounting kit: includes backplate, crossbar, mounting clips, screws, metal nuts, washers and standoffs.
  • Compact footprint: suitable for mid-sized builds and systems with limited clearance.
  • RGB support: includes cable to connect to motherboard RGB header for basic lighting sync.
  • Clear step-by-step guidance: manual details alignment, fastening order, and thermal paste application.
VS

Disadvantages

  • Single-fan configuration may limit peak cooling compared with larger dual-fan towers.
  • Requires careful alignment and tightening—incorrect installation risks CPU or motherboard damage.
  • Thermal performance depends on correct thermal paste application and even mounting pressure.
  • Not targeted at extreme overclocking; better suited for mainstream or compact builds.
  • Some users may find manual multilingual layout dense; close reading needed to avoid errors.
M: OA-GPT-5-NAN

Product Specification

Design

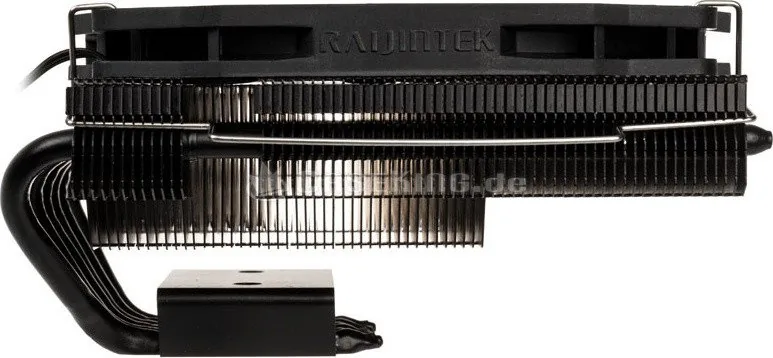
Top-blow cooler, 2U

Dimensions with fan

5.79x2.68x5.12in (WxHxD)

Fan

1x 4.72x4.72x0.51in, 200-1400rpm, 80.6m³/h, 47.43 CFM, 28.4dB(A)

Weight with fan

1.21 lb

Connector

4-Pin PWM

AMD Socket

AM4, AM2/AM2+/AM3/AM3+, FM1/FM2/FM2+

Intel Socket

2011-0/2011-1/2011-3/2066, 1356/1366, 1150/1151/1155/1156/1200, 775

Features

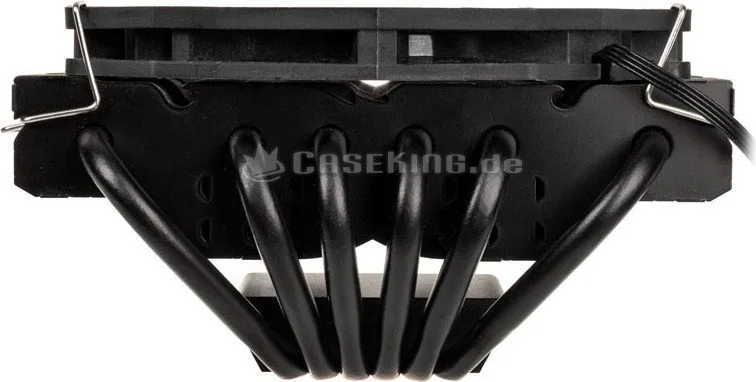
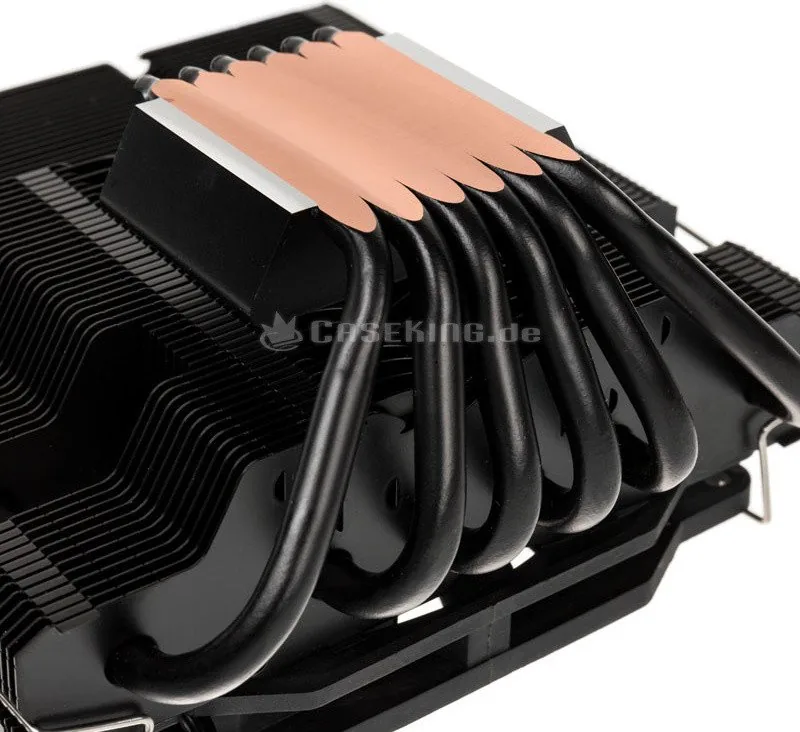
6 Heatpipes (0.24 in), Heatpipe Direct Touch, black heatsink

M: OA-GPT-54-NAN

Product Description

Raijintek Pallas 120 — Raijintek Pallas 120 Manual

The Raijintek Pallas 120 is a versatile CPU cooler designed to balance strong cooling performance, broad socket compatibility, and user-friendly installation. Built around a compact heatsink, a single PWM fan, and a complete set of mounting hardware, the Pallas 120 supports a wide range of Intel and AMD sockets including LGA 201x/2066, LGA 1366, LGA 115x, LGA 775, and AMD AM4/AM3/AM2 series. The package includes backplate(s), crossbar, mounting clips, knurled threaded screws, metal nuts, washers, standoffs, M3 screws, fan clips, thermal grease, and an RGB connection cable for motherboard headers.

The cooler emphasizes practical installation steps: align the backplate holes to the motherboard, insert knurled screws, secure with metal nuts, remove the protective film from the heatsink base, clean the CPU surface, apply thermal grease evenly, position the heatsink, fasten the crossbar to the mounting clips with M3 screws, and attach the fan with clips. The manual stresses careful hole alignment for your specific socket and tight, even fastening to avoid CPU or motherboard damage.

Compact footprint and compatibility make the Pallas 120 suitable for mid-sized builds and systems where clearance matters. The included RGB header cable enables basic synchronization with chassis lighting when connected to a compatible motherboard. Raijintek provides multilingual instructions and safety precautions: keep the product away from children, verify component integrity before installation, and note the manufacturer disclaims damages from improper use or incorrect installation.

Installation tips embedded in the manual include cleaning the CPU surface before thermal paste application, removing protective films from contact surfaces, and tightening screws securely but evenly. Users are guided step-by-step through aligning crossbar raised points with heatsink holes, seating mounting clips over threaded posts, and fastening the assembly with supplied metal nuts. The documentation also highlights verifying socket compatibility (Intel and AMD ranges) before starting.

Overall, the Raijintek Pallas 120 is presented as a compact, well-equipped cooler that prioritizes compatibility and straightforward assembly. It targets builders who want reliable cooling for mainstream CPUs with easy installation and basic RGB integration.

Notes:

  • Ensure you select the correct socket holes on the motherboard before starting.
  • Apply thermal grease sparingly and evenly to avoid air gaps.
  • Remove protective film from the heatsink base before mounting.
  • Store components away from children and inspect the kit before installation.
M: OA-GPT-5-NAN

© Copyright 2026 Manual.ly