
Palram Bella 8x8 Manual
PDF manual · 118 Pages
English



Quick check
Incorrect answer, please try again.
Chat with your Palram Bella 8x8 manual using AI
Get instant AI answers from your Palram Bella 8x8 manual
Ask anything about the Palram Bella 8x8. Answers come from this manual, with the pages they are based on.
Ask a Question
Do you recommend Bella 8x8?
Yes NoFrequently Asked Questions
The standard Bella model has an 8 x 8 footprint. The assembly guidance also covers compatible 4-foot extension modules that increase the greenhouse length.
Is this answer helpful?
Use a flat, level, solid base for best performance. Recommended options include concrete, a concrete wall, pressure-treated wood, or a wood deck. A prepared grass or soil surface can also be used with suitable ground pegs.
Is this answer helpful?
Yes. Anchoring is essential for stability and rigidity and is required for warranty validity. Select screws, plugs, masonry anchors, or pegs that match the chosen foundation. Anchoring hardware is not supplied.
Is this answer helpful?
At least two people should assemble the greenhouse for safety and easier handling. Wear gloves, eye protection, and long sleeves, and avoid assembly during wet or windy conditions.
Is this answer helpful?
Every panel marked "THIS SIDE OUT" must face outward. This positions the UV-protected surface correctly. Remove protective stickers as panels are secured in the profiles.
Is this answer helpful?
No. The roof window can only be installed on one of the specified central roof panels. With an extension module, the window must follow the placement shown for that configuration.
Is this answer helpful?
Use a mild detergent solution and rinse with cold, clean water after assembly and as needed. Do not use acetone, abrasive cleaners, or harsh specialty detergents on the polycarbonate panels.
Is this answer helpful?
Advantages and Disadvantages
Advantages

- 8 x 8 footprint provides a dedicated growing space for seeds, vegetables, and flowering plants.
- Polycarbonate panels are designed with an outward-facing UV-protected side for durable light-filled coverage.
- Aluminum framing and required anchoring support a stable, rigid garden structure.
- Optional 4-foot extension modules allow the greenhouse length to be expanded.
- A roof window supports ventilation planning and can be adjusted if it does not close correctly.
Disadvantages

- Assembly requires at least two people and careful handling of potentially sharp components.
- Anchoring screws, pegs, and masonry anchors are not included.
- A perfectly level, prepared foundation is required before installation.
- The greenhouse should not be installed in excessively windy locations.
- Roof and gutters require regular clearing of snow, leaves, and debris.
Product Specification
Glazing
Polycarbonate 0.24 in
Frame
Aluminum
Color
silver
Area
64.58 sq ft
Features
opening window, lockable
Door
double roof window
Dimensions (L x W x H)
96.06 x 96.06 x 86.22 in
Product Description
Palram Bella 8X8 Greenhouse - Read, Download & Print Free
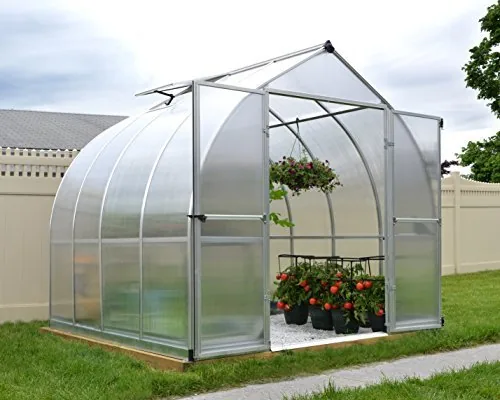
The Palram Bella 8X8 Greenhouse is designed for gardeners who want a protected, bright space for starting seeds, raising vegetables, and caring for ornamental plants through changing weather. Its rounded roof profile creates a distinctive garden centerpiece while helping provide practical headroom and usable growing space. With clear assembly, care, and anchoring guidance available, planning the installation is easier before the first component is unpacked.
The structure uses aluminum profiles and polycarbonate panels to create a durable enclosure that supports plant growth while helping shield crops from wind, rain, and outdoor debris. The panels are intended to be installed with the marked UV-protected side facing outward. This detail is important for long-term performance and for giving plants a bright environment without exposing the panel material to unnecessary wear.
Built for a Stable Garden Setup
A level, solid foundation is essential for the Bella 8X8 Greenhouse. Concrete, pressure-treated wood, and wood decking are recommended foundation options, while a prepared ground surface may also be secured with suitable pegs. The greenhouse should be firmly anchored after assembly using hardware compatible with the selected base. Anchoring materials are not supplied, so they should be selected before installation begins.
Choose a sunny location away from overhanging branches and areas exposed to excessive wind. Clear the assembly area, level the ground, and leave room around the base for access. Checking local building rules and permit requirements before installation can help avoid delays. A properly prepared site supports the greenhouse's stability, rigidity, and warranty requirements.
Assembly and Everyday Care
For safety, assembly is recommended for at least two people. Gloves, eye protection, long sleeves, and careful handling are especially useful because some components may have sharp edges. Build only in dry, calm conditions, and keep children away from the work area. During assembly, check that the base is square by measuring diagonals and verify it is level with a spirit level.
The roof window can be positioned only on specified central roof panels. If an extension module is added, window placement must follow the designated layout. Do not fully tighten most screws until panel assembly is complete, then secure all fasteners and anchor the greenhouse immediately.
For routine care, clean the greenhouse with a mild detergent solution and cold, clean water. Avoid acetone and abrasive cleaners on the panels. Keep the roof and gutters free of leaves, dirt, and snow, since heavy snow accumulation can create a safety risk.
Notes
- Keep hot grills, torches, and other heated items out of the greenhouse.
- Do not lean heavy or sharp objects against wall panels.
- Inspect the roof, anchors, and fasteners regularly, particularly after severe weather.
Search for 67,706 Manuals online


Type-in Brand or Model