
Ottinger Easy 4x4 Manual
PDF manual · 3 Pages
English



Quick check
Incorrect answer, please try again.
Chat with your Ottinger Easy 4x4 manual using AI
Get instant AI answers from your Ottinger Easy 4x4 manual
Ask anything about the Ottinger Easy 4x4. Answers come from this manual, with the pages they are based on.
Easy 4x4 Maintenance Schedule
After driving about 100 meters, check the fit of the chain on the tyre. If necessary, retighten the tension chain to avoid damage.
Check the condition and wear of the chain every 30 kilometers or after longer use on snow-free roads.
Wash the chain with hot water after use. Ensure it is thoroughly dried before storing it in its packaging.
Ask a Question
Do you recommend Easy 4x4?
Yes NoFrequently Asked Questions
No, driving on dry roads can damage the chains and affect vehicle handling. Use them only on snow or ice and check frequently for wear.
Is this answer helpful?
The maximum safe speed is 50 km/h. Exceeding this limit voids the warranty and increases the risk of chain failure.
Is this answer helpful?
You should check and retighten the chain after the first few meters of driving and again every 30 kilometers during use.
Is this answer helpful?
Yes, the chains are reversible. Once one side is worn, flip them over to use the other side for double the mileage.
Is this answer helpful?
No special tools are required. The kit includes all necessary components like tensioners and repair links for standard installation.
Is this answer helpful?
Each chain comes with emergency repair links. After fixing a break, send the chain back to Ottinger for a mandatory safety check.
Is this answer helpful?
Warranty coverage depends on ETRTO norms. Fitment is not guaranteed for foreign or reconditioned tires, which may affect validity.
Is this answer helpful?
Advantages and Disadvantages
Advantages

- Ice-free snap-in fastener prevents locking in freezing conditions
- Reversible design doubles the usable lifespan of the chain
- Includes emergency repair links for quick roadside fixes
- Rubber expander ensures consistent tension without constant adjustment
- Clear multi-language instructions facilitate easy installation
Disadvantages

- Maximum speed limited to 50 km/h restricts travel options
- Fitment not guaranteed on all foreign or reconditioned tires
- Requires retightening shortly after initial installation
- Warranty voided if repaired by unauthorized third parties
- Not suitable for use on dry pavement for extended periods
Product Specification
Vehicle Type
4x4/SUV
Type
Snow Chain
Tensioning
Manual
Link Thickness
0.18 inches
Rim Protection
No
Product Description
Ottinger Easy 4x4 Manual: The Ultimate Winter Driving Companion
Navigating snowy and icy roads requires reliable equipment, and the Ottinger Easy 4x4 Manual snow chain stands out as a top-tier solution for drivers seeking safety and ease of use. Designed specifically for 4x4 vehicles and trucks, this chain combines durability with user-friendly installation features that minimize the time spent in cold conditions.
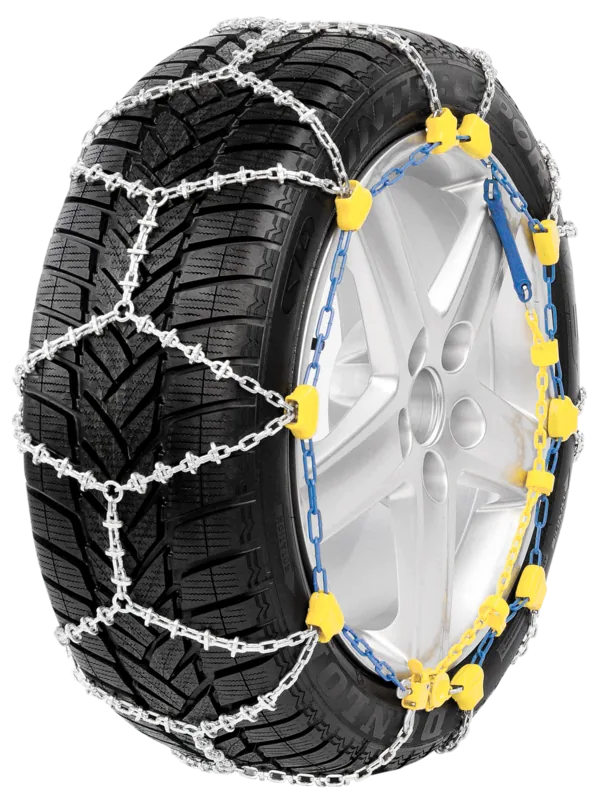
The core of the Ottinger Easy 4x4 system lies in its intelligent design components. It features an ice-free snap-in fastener that prevents locking due to freezing temperatures, ensuring you can secure your vehicle quickly even in harsh weather. The chain includes a red tension chain and a rubber expander to maintain consistent tightness against the tire tread. Additionally, the inclusion of a steel wire ring and connection pieces in red and blue simplifies the process of linking the chain ends securely around the wheel.
Installation is straightforward when following the provided guidelines. The manual emphasizes laying the disentangled chain on the ground with the yellow end facing forward before passing it behind the tire. Users must engage the safety hook and ensure the outer chain runs parallel to the rim. A critical step involves threading the red tension chain through the fastener and pulling it tight, then securing it through the guide hooks or using the rubber expander if guide hooks are absent. For broad tires, special attention should be paid to where the safety hook engages, potentially requiring adjustment near the tread area.
Safety is paramount throughout the usage of these chains. Drivers are advised to retighten the tension chain after driving just a few meters to prevent damage to both the vehicle and the chain itself. The chains are reversible, allowing for double the lifespan by flipping them once one side becomes worn. However, users must strictly adhere to a speed limit of 50 km/h and avoid jerky braking or acceleration to prevent premature wear. Regular checks every 30 kilometers or after extended use on snow-free roads are recommended to ensure optimal performance and safety.
Important Maintenance Notes
Proper care extends the life of your snow chains significantly. After each use, wash the chains with warm water to remove salt and grime, then allow them to dry completely before storing them in their packaging. If parts show more than 50% wear, they should be sent back for professional repair rather than discarded. Emergency repair links are included with every set, but any such repairs require a subsequent safety check by the manufacturer.
Pros and Cons
Pros
- Ice-free snap-in fastener prevents locking in freezing conditions.
- Reversible design doubles the usable lifespan of the chain.
- Includes emergency repair links for quick roadside fixes.
- Rubber expander ensures consistent tension without constant adjustment.
- Clear multi-language instructions facilitate easy installation.
Cons
- Maximum speed limited to 50 km/h restricts travel options.
- Fitment not guaranteed on all foreign or reconditioned tires.
- Requires retightening shortly after initial installation.
- Warranty voided if repaired by unauthorized third parties.
- Not suitable for use on dry pavement for extended periods.
Frequently Asked Questions
Can I drive on dry roads with these chains? No, driving on dry roads can damage the chains and affect vehicle handling. Use them only on snow or ice and check frequently for wear.
What is the maximum speed allowed? The maximum safe speed is 50 km/h. Exceeding this limit voids the warranty and increases the risk of chain failure.
How often should I check the chain tension? You should check and retighten the chain after the first few meters of driving and again every 30 kilometers during use.
Are the chains reversible? Yes, the chains are reversible. Once one side is worn, flip them over to use the other side for double the mileage.
Do I need special tools for installation? No special tools are required. The kit includes all necessary components like tensioners and repair links for standard installation.
What happens if the chain breaks? Each chain comes with emergency repair links. After fixing a break, send the chain back to Ottinger for a mandatory safety check.
Is the warranty valid for all tire types? Warranty coverage depends on ETRTO norms. Fitment is not guaranteed for foreign or reconditioned tires, which may affect validity.
Search for 67,706 Manuals online


Type-in Brand or Model