Manual.ly Logo

Noctua NM-M1-MP83 Manual

0.0 · 0 Ratings

PDF manual · 2 Pages

English

M: qwen/qwen3.5-flash-20260224
page

/ 2

Loading...
095eeac1317b3ba0b73aa0883621c3fdf908 page 1
This manual will guide you through the installation process
step by step using an NH-U12P heatsink as an example.
Please note that the installation procedure is identical for all
models.
Prior to installing the cooler, please consult the compatibility
centre on our website (ncc.noctua.at) and verify that the
cooler is fully compatible with your motherboard.
Please also make sure that your PC case offers sufcient
clearance for the cooler and that there are no compatibility
issues with any other components (e.g. tall RAM modules).
Double check that the heatsink and fan clips do not make
contact with the VGA card, other PCIe cards, motherboard
heatsinks or any other components.
Noctua cannot be held responsible for any damage or losses
caused by compatibility issues.
Should you encounter any difculties, please check the FAQs
on our website (faqs.noctua.at) and don’t hesitate to contact
our support team at: suppor[email protected]
Multilingual versions of this manual are available on our
website: www.noctua.at/manuals
Please note that this NM-M1-MP83 kit is compatible with
heatsinks with 83mm mounting pitch only. For heatsinks with
78mm mounting pitch, the NM-M1-MP78 kit must be used
instead.
To nd out how to determine if your cooler uses
83mm or 78mm mounting pitch, please see:
www.noctua.at/mounting-pitch
For detailed, up-to-date socket compatibility information
please visit: ncc.noctua.at/socket-compatibility-overview
Dear customer,
The NM-M1-MP83 is an enthusiast-grade, multi-socket
SecuFirm2+™ mounting-kit that represents an ideal upgrade
for users who want to migrate their Noctua CPU coolers to the
new, Torx
®
based SecuFirm2+™ standard or to the latest
sockets that their cooler did not yet support at the time of
purchase.
Keep enjoying your Noctua cooler with your new NM-M1 kit!
Yours sincerely,
Roland Mossig, Noctua CEO
Scan this code to
display multilingual
manuals on your
phone.
NOCTUA NM-M1-MP83
INSTALLATION MANUAL
Fix the new brackets with the short Torx
®
screws included
with the NM-M1 mounting-kit:
Caution: Be careful not to overtighten the screw(s), do not
apply more than 0.6 Nm torque max.! Due to the reduced
cam-out of the Torx
®
system, it is easier to accidentally
apply excessive torque.
If you would like to use the cooler on an assembled system
and your case does not have a cut-out at the rear side of the
motherboard tray, you must rst remove the motherboard
from the case in order to be able to install the supplied
backplate.
Removing the motherboard2
Setting up the backplate3
First, identify the side of the backplate that should face the
motherboard (marked with caution signs).
Then choose the appropriate hole spacing for your socket
and insert the four bolts into the backplate from the opposite
side (marked with model name, SecuFirm2™ branding and
numbers for hole spacing) at the appropriate position.
NM-IPS3 (blue)
LGA1851/1700
NM-IPS1 (black)
LGA1200/115x
Use hole position 1 for LGA1200/115x (LGA1150, LGA1151,
LGA1155, LGA1156) and hole position 2 for LGA1851/
LGA1700:
Put the plastic spacers onto the bolts of the backplate, then
add the mounting bars.
Caution: Choose the alignment of the mounting bars according
to the desired nal orientation of the cooler.
INTEL AMD
LGA1851, LGA1700,
LGA1200 & LGA115x
INTEL
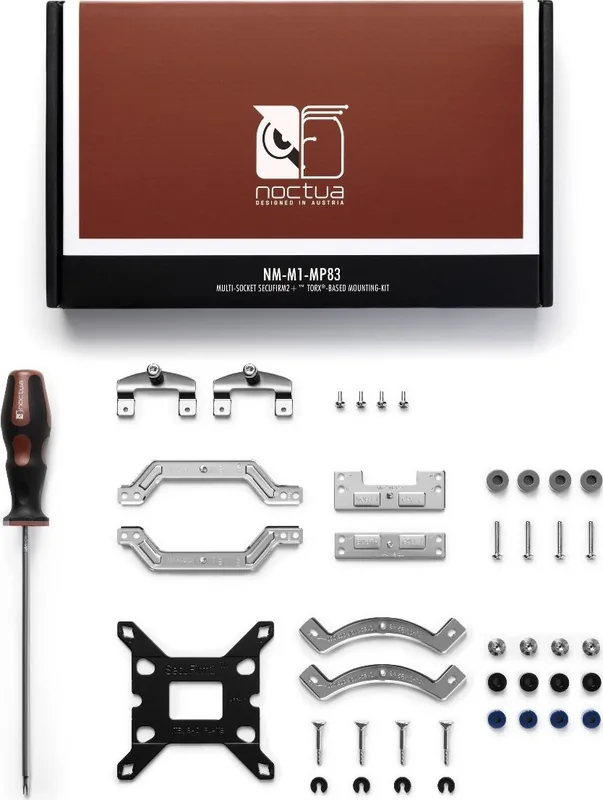
Required mounting parts:
4x NM-IPS1
black plastic spacers for
LGA1200/115x
4x NM-IPS3
blue plastic spacers for
LGA1851/1700
4x NM-IBT5
bolts
4x NM-ICS1
clip-on spacers
4x NM-STS1-TX
thumb screws
2x NM-IMB2
mounting bars
1x NM-IBP4
backplate
4x NM-SSC1-TX
short screws
2x NM-SFB2s-TX
fastening brackets
Phillips PH2 screwdriver
(not included)
NM-SD1 Torx
®
T20
screwdriver
Position 1:
LGA1200/115x
Position 2:
LGA1851/1700
3
Unscrew the original brackets using a Phillips PH2
screwdriver such as the L-shaped one supplied with the
cooler:
Replacing the original fastening brackets1
Caution: Make sure that the curved sides of the mounting
bars are pointing outwards.
Use hole position 1 for LGA1200/115x (LGA1150, LGA1151,
LGA1155, LGA1156) and hole position 2 for LGA1851/
LGA1700:
Fix the bolts using the NM-ICS1 clip-on spacers.
Attaching the backplate4
Caution: The supplied backplate will install over the
motherboard’s stock backplate, so the motherboard’s stock
backplate must not be taken off.
Place the backplate on the rear side of the motherboard so that
the bolts protrude through the mounting holes.
Position 1:
LGA1200/115x
Position 2:
LGA1851/1700
Installing the mounting bars5
Please rst choose the correct set of plastic spacers and
the correct set of holes on the mounting bars according to
whether you are using an LGA1200/LGA115x (LGA1150,
LGA1151, LGA1155, LGA1156) or an LGA1851/LGA1700
socket motherboard.
Use the black NM-IPS1 plastic spacers for LGA1200/
LGA115x (LGA1150, LGA1151, LGA1155, LGA1156) and
the blue NM-IPS3 spacers for LGA1851/LGA1700.
Orientation 1
(default orientation)
Orientation 2
Fix the mounting bars using the four NM-STS1-TX thumb
screws.
Caution: Gently tighten the screws until they stop, but do not
use excessive force (max. torque 0.6 Nm).
Applying the thermal paste6
Caution: Note that depending on the cooler model, it may be
necessary to remove the fan(s) in order to reach the mounting
screws. If you’re using the cooler for the rst time, please also take
off the protection cover at the bottom side of the heatsink rst!
Then put the heatsink onto the CPU and screw it to the screw
threads of the mounting bars. Perform 2-3 turns on each
screw, then repeat until both are fully tightened.
Fastening the heatsink to the CPU
7
If there are residual traces of thermal paste or thermal pads
on your CPU, please clean them off rst. Then apply thermal
paste onto the CPU as shown in the following images.
For LGA1851/LGA1700, apply 5 small dots; 4 dots with
~2mm diameter near the corners plus 1 dot with 3-4mm
diameter in the centre:
For LGA1200/115x (LGA1150, LGA1151, LGA1155,
LGA1156) apply a single 4-5mm dot in the centre:
Caution: Applying too much thermal paste will lower heat
conductivity and cooling performance!

Chat with your Noctua NM-M1-MP83 manual using AI

Get instant AI answers from your Noctua NM-M1-MP83 manual

Ask anything about the Noctua NM-M1-MP83. Answers come from this manual, with the pages they are based on.

Ask a Question

0/1000

Do you recommend NM-M1-MP83?

Yes No

Frequently Asked Questions

A

This kit supports a wide array of platforms including Socket AM5 and AM4 alongside Intel sockets such as LGA1851, 1700, 1200, and 115x series.

Is this answer helpful?

A

The maximum torque setting is 0.6 Nm to ensure brackets are secure without stripping threads or damaging plastic parts. Always use a torque driver.

Is this answer helpful?

A

For Intel sockets, a specific backplate installation is required. AMD installations utilize the stock backplate retention module effectively without removal usually.

Is this answer helpful?

A

Yes, it is designed for upgrading existing heatsinks to new sockets. It represents an ideal upgrade for users migrating coolers to new standards.

Is this answer helpful?

A

Verify mounting pitch is 83mm for this kit specifically. The NM-M1-MP78 kit is required for 78mm pitch models instead.

Is this answer helpful?

A

For LGA1700, five small dots are recommended while LGA1200 requires a single central dot. Applying too much paste will lower heat conductivity.

Is this answer helpful?

A

The product comes with a six-year warranty period demonstrating confidence in quality and manufacturing standards for reliability.

Is this answer helpful?

M: qwen/qwen3.5-flash-20260224

Advantages and Disadvantages

Advantages

  • Supports multiple socket types including AM5 and Intel LGA1700 for broad compatibility.
  • Six-year warranty period included with direct RMA service for peace of mind.
  • Torx system reduces cam-out risk during screw tightening compared to Phillips.
  • Compatible with both old coolers and new motherboard sockets for upgrades.
  • Detailed compatibility center available online for verification before buying.
VS

Disadvantages

  • Requires specific 83mm mounting pitch, 78mm needs different kit to work.
  • Torque limit of 0.6 Nm is strict and requires care to prevent damage.
  • Motherboard removal needed for some Intel case configurations during install.
  • Heavy coolers over 700g should be removed during shipping to prevent damage.
  • Specific backplate handling required for AMD versus Intel setups.
M: qwen/qwen3.5-flash-20260224

Product Specification

Type

Mounting kit

Compatibility

NH-D15, NH-D15 chromax.black, NH-D15 SE-AM4, NH-D15S, NH-D15S chromax.black, NH-D14, NH-D14 SE2011, NH-D9L, NH-D9L chromax.black, NH-C14, NH-C14S, NH-C12P, NH-C12P SE14, NH-L12, NH-U12, NH-U12F, NH-U12P, NH-U12P SE1366, NH-U12P SE2, NH-U9, NH-U9F, NH-U9B, NH-U9B SE2, NH-L9x65, NH-L9x65 chromax.black, NH-L9x65 SE-AM4, NH-P1

M: qwen/qwen3.5-flash-20260224

Product Description

Elevate Your Cooling Setup with the Noctua NM-M1-MP83 Kit

Building a high-performance PC requires reliable hardware, and cooling is often the deciding factor for system stability and longevity. The Noctua NM-M1-MP83 Mounting Kit offers enthusiasts a robust solution for upgrading their CPU cooling infrastructure across various platforms. This comprehensive hardware set allows you to migrate existing coolers to new sockets or adapt coolers for modern motherboards without purchasing a completely new unit. It represents an ideal upgrade path for users seeking the Torx based SecuFirm2 plus standard which improves mounting security and ease of use in future projects.

Comprehensive Socket Support and Flexibility

Compatibility is a major concern for gamers and professionals alike who upgrade hardware frequently. This kit supports a wide array of platforms including Socket AM5 and AM4 alongside Intel sockets such as LGA1851, 1700, 1200, and 115x series. Before any physical installation, verifying compatibility through the online center ensures no conflicts arise with your motherboard configuration or case dimensions. It is crucial to check clearance within your PC case carefully to avoid interference with other components like tall RAM modules or graphics cards. Double checking these details prevents potential damage and ensures a clean build environment where fans and heatsinks operate safely and efficiently throughout the year. It is essential to ensure the heatsink and fan clips do not make contact with the VGA card or other PCIe cards.

Installation Precision and Safety Protocols

The design focuses on precision and ease during the physical assembly process to minimize user error. Users utilize a Torx system for mounting which reduces the risk of cam-out compared to traditional Phillips screws. However, strict torque limits must be respected to prevent damage to the motherboard or cooler. The maximum torque setting is 0.6 Nm to ensure brackets are secure without stripping threads or damaging plastic parts. Blue spacers are designated for LGA1851 and LGA1700 while black spacers fit LGA1200 and LGA115x models. For Intel sockets, a specific backplate installation is required, while AMD installations utilize the stock backplate retention module. Always double check that the cooler is fully compatible with your motherboard before starting.

Long Term Reliability and Transport Warnings

Durability is paramount which demands long-lasting components. Noctua backs this hardware with a six-year warranty period demonstrating confidence in quality and standards. Transporting systems with heavy heatsinks requires caution, with recommendations to remove units exceeding 700g to prevent stress on the motherboard during shipping. Ensuring proper thermal paste application and contact quality leads to optimal cooling performance over the long term. For LGA1700, five small dots are recommended while LGA1200 requires a single central dot. Selecting the correct spacers for your specific socket type is vital for maintaining that performance and avoiding contact issues. Contact our support for issues.

Notes:

  • Verify mounting pitch is 83mm for this kit specifically. The NM-M1-MP78 kit is required for 78mm pitch.
  • Use recommended Torx T20 screwdriver for best results during installation.
M: qwen/qwen3.5-flash-20260224

© Copyright 2026 Manual.ly