Manual.ly Logo

Noctua NM-M1-MP78 Manual

0.0 · 0 Ratings

PDF manual · 2 Pages

English

M: OA-GPT-5-NAN
page

/ 2

Loading...
7ff6416a92317365053919a0cc3467b9ca1f page 1
This manual will guide you through the installation process
step by step using an NH-U12S heatsink as an example.
Please note that the installation procedure is identical for all
models.
Prior to installing the cooler, please consult the compatibility
centre on our website (ncc.noctua.at) and verify that the
cooler is fully compatible with your motherboard.
Please also make sure that your PC case offers sufcient
clearance for the cooler and that there are no compatibility
issues with any other components (e.g. tall RAM modules).
Double check that the heatsink and fan clips do not make
contact with the VGA card, other PCIe cards, motherboard
heatsinks or any other components.
Noctua cannot be held responsible for any damage or losses
caused by compatibility issues.
Should you encounter any difculties, please check the FAQs
on our website (faqs.noctua.at) and don’t hesitate to contact
our support team at: suppor[email protected]
Multilingual versions of this manual are available on our
website: www.noctua.at/manuals
Please note that this NM-M1-MP78 kit is compatible with
heatsinks with 78mm mounting pitch only. For heatsinks with
83mm mounting pitch, the NM-M1-MP83 kit must be used
instead.
To nd out how to determine if your cooler uses
83mm or 78mm mounting pitch, please see:
www.noctua.at/mounting-pitch
For detailed, up-to-date socket compatibility information
please visit: ncc.noctua.at/socket-compatibility-overview
Dear customer,
The NM-M1-MP78 is an enthusiast-grade, multi-socket
SecuFirm2+™ mounting-kit that represents an ideal upgrade
for users who want to migrate their Noctua CPU coolers to the
new, Torx
®
based SecuFirm2+™ standard or to the latest
sockets that their cooler did not yet support at the time of
purchase.
Keep enjoying your Noctua cooler with your new NM-M1 kit!
Yours sincerely,
Roland Mossig, Noctua CEO
Scan this code to
display multilingual
manuals on your
phone.
NOCTUA NM-M1-MP78
INSTALLATION MANUAL
INTEL AMD
LGA1851, LGA1700,
LGA1200 & LGA115x
INTEL
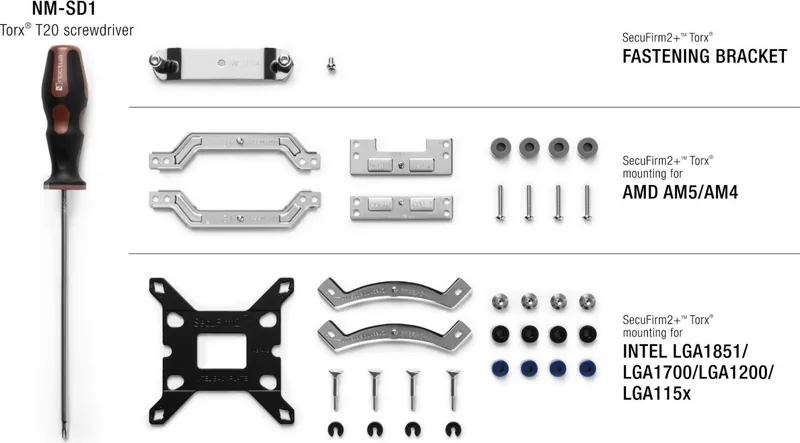
Required mounting parts:
4x NM-IPS1
black plastic spacers for
LGA1200/115x
4x NM-IPS3
blue plastic spacers for
LGA1851/1700
4x NM-IBT5
bolts
4x NM-ICS1
clip-on spacers
4x NM-STS1-TX
thumb screws
2x NM-IMB3
mounting bars
1x NM-IBP4
backplate
1x NM-SSC3-TX
short screw
1x NM-SFB4s-TX
fastening bracket
Phillips PH2 screwdriver
(not included)
NM-SD1 Torx
®
T20
screwdriver
3
Replacing the original fastening bracket1
Fix the new bracket with the short Torx
®
screw included with
the NM-M1 mounting-kit:
Caution: Be careful not to overtighten the screw, do not
apply more than 0.6 Nm torque max.! Due to the reduced
cam-out of the Torx
®
system, it is easier to accidentally
apply excessive torque.
Use hole position 1 for LGA1200/115x (LGA1150, LGA1151,
LGA1155, LGA1156) and hole position 2 for LGA1851/
LGA1700:
Attaching the backplate4
Caution: The supplied backplate will install over the
motherboard’s stock backplate, so the motherboard’s stock
backplate must not be taken off.
Place the backplate on the rear side of the motherboard so that
the bolts protrude through the mounting holes.
Installing the mounting bars5
Please rst choose the correct set of plastic spacers and
the correct set of holes on the mounting bars according to
whether you are using an LGA1200/LGA115x (LGA1150,
LGA1151, LGA1155, LGA1156) or an LGA1851/LGA1700
socket motherboard.
Use the black NM-IPS1 plastic spacers for LGA1200/
LGA115x (LGA1150, LGA1151, LGA1155, LGA1156) and
the blue NM-IPS3 spacers for LGA1851/LGA1700.
NM-IPS3 (blue)
LGA1851/1700
NM-IPS1 (black)
LGA1200/115x
Use hole position 1 for LGA1200/115x (LGA1150, LGA1151,
LGA1155, LGA1156) and hole position 2 for LGA1851/
LGA1700:
Position 1:
LGA1200/115x
Position 2:
LGA1851/1700
Put the plastic spacers onto the bolts of the backplate, then
add the mounting bars.
Caution: Choose the alignment of the mounting bars according
to the desired nal orientation of the cooler.
Caution: Make sure that the curved sides of the mounting bars
are pointing outwards.
Fix the mounting bars using the four NM-STS1-TX thumb
screws.
Caution: Gently tighten the screws until they stop, but do not
use excessive force (max. torque 0.6 Nm).
Applying the thermal paste6
Caution: Note that depending on the cooler model, it may be
necessary to remove the fan(s) in order to reach the mounting
screws. If you’re using the cooler for the rst time, please also take
off the protection cover at the bottom side of the heatsink rst!
Then put the heatsink onto the CPU and screw it to the screw
threads of the mounting bars. Perform 2-3 turns on each
screw, then repeat until both are fully tightened.
Fastening the heatsink to the CPU
7
Fix the bolts using the NM-ICS1 clip-on spacers.
Position 1:
LGA1200/115x
Position 2:
LGA1851/1700
If there are residual traces of thermal paste or thermal pads
on your CPU, please clean them off rst. Then apply thermal
paste onto the CPU as shown in the following images.
For LGA1851/LGA1700, apply 5 small dots; 4 dots with
~2mm diameter near the corners plus 1 dot with 3-4mm
diameter in the centre:
For LGA1200/115x (LGA1150, LGA1151, LGA1155,
LGA1156) apply a single 4-5mm dot in the centre:
Caution: Applying too much thermal paste will lower heat
conductivity and cooling performance!
If you would like to use the cooler on an assembled system
and your case does not have a cut-out at the rear side of the
motherboard tray, you must rst remove the motherboard
from the case in order to be able to install the supplied
backplate.
Removing the motherboard2
Setting up the backplate3
First, identify the side of the backplate that should face the
motherboard (marked with caution signs).
Then choose the appropriate hole spacing for your socket
and insert the four bolts into the backplate from the opposite
side (marked with model name, SecuFirm2™ branding and
numbers for hole spacing) at the appropriate position.
Orientation 1
(default orientation)
Orientation 2
Unscrew the original bracket using the L-shaped Phillips PH2
screwdriver supplied with the cooler or any other Phillips PH2
screwdriver with a shaft that is long enough to reach the screw:

Chat with your Noctua NM-M1-MP78 manual using AI

Get instant AI answers from your Noctua NM-M1-MP78 manual

Ask anything about the Noctua NM-M1-MP78. Answers come from this manual, with the pages they are based on.

Ask a Question

0/1000

Do you recommend NM-M1-MP78?

Yes No

Frequently Asked Questions

A

The NM-M1-MP78 supports Intel sockets LGA1851, LGA1700, LGA1200 and LGA115x (1150/1151/1155/1156) as well as AMD AM5 and AM4. Ensure your cooler uses a 78mm mounting pitch; for 83mm pitch use the NM-M1-MP83 kit.

Is this answer helpful?

A

You only need to remove the motherboard if your case lacks a rear cut-out preventing access to the backplate. For Intel the supplied backplate installs over the motherboard’s stock backplate; for AMD the kit uses the existing stock backplate after removing the retention module if present.

Is this answer helpful?

A

For Intel LGA1200/115x use a single 4–5mm center dot. For LGA1851/LGA1700 and AM5/AM4 use five dots: four small ~2mm dots near the corners and one 3–4mm dot in the center. Avoid excessive paste for best thermal conductivity.

Is this answer helpful?

A

Do not exceed 0.6 Nm torque. Torx® reduces cam-out and makes over-tightening easier, so gently tighten screws until they stop and avoid applying excessive force to prevent damage.

Is this answer helpful?

A

Yes. The NM-M1-MP78 is designed as an upgrade to migrate Noctua coolers to the Torx® SecuFirm2+™ standard or to add support for sockets not supported originally. Verify mounting pitch and compatibility before installation.

Is this answer helpful?

A

If the total cooler weight including fan exceeds 700g, Noctua recommends removing the cooler or at least the fan to reduce stress during transport. They cannot guarantee protection against transport-related forces if left installed.

Is this answer helpful?

A

Consult Noctua’s compatibility centre and manuals online (ncc.noctua.at, www.noctua.at/manuals) or check FAQs at faqs.noctua.at. For direct support, contact [email protected].

Is this answer helpful?

M: OA-GPT-5-NAN

Advantages and Disadvantages

Advantages

  • Wide socket compatibility: supports AM5, AM4, LGA1851, LGA1700, LGA1200, LGA115x.
  • SecuFirm2+™ Torx® upgrade for reliable, low-cam-out fastening and modern mounting standard.
  • Includes complete kit: backplate, bars, spacers, thumb screws and bolts for multiple sockets.
  • Offset options (-7mm/0) for improved contact on AM5 and Ryzen 5000/3000 CPUs.
  • Six-year warranty and strong Noctua support, with multilingual manuals and FAQs.
VS

Disadvantages

  • Requires attention to torque (max 0.6 Nm) to avoid overtightening with Torx® screws.
  • Not compatible with 83mm mounting pitch coolers; requires NM-M1-MP83 instead.
  • May require motherboard removal if case lacks rear cut-out to fit backplate.
  • Potential clearance issues with tall RAM, VGA cards or other motherboard heatsinks.
  • Installation can require fan removal on some coolers to access mounting screws.
M: OA-GPT-5-NAN

Product Specification

Type

Mounting kit

Compatibility

NH-L12 Ghost S1 Edition, NH-L12S, NH-U9S, NH-U9S chromax.black, NH-U12A, NH-U12A chromax.black, NH-U12S, NH-U12S SE-AM4, NH-U12S chromax.black, NH-U12S redux, NH-U14S

M: OA-GPT-54-NAN

Product Description

Noctua NM-M1-MP78 Mounting Kit [Socket AM5/AM4/1851/1700/1200/115x] Manual

The Noctua NM-M1-MP78 mounting kit is a versatile SecuFirm2+™ upgrade designed to add Torx®-based mounting compatibility to existing Noctua coolers or to enable support for sockets not covered at purchase. Built for enthusiast-grade installations, this kit supports Intel LGA1851, LGA1700, LGA1200, LGA115x and AMD AM5/AM4 platforms. It includes a backplate, mounting bars, thumb screws, bolts, clip-on spacers and plastic spacers tailored to the different socket families, and uses clear markings and offset options to ensure correct orientation and optimal contact on various CPUs.

Key features and workflow

Installation follows a straightforward sequence: replace the original fastening bracket with the supplied Torx® bracket, position the backplate over the motherboard’s stock backplate (Intel) or use the stock AMD backplate, fit the correct plastic spacers for your socket, attach the mounting bars, apply thermal paste in the recommended pattern, and fasten the heatsink with the included screws and clip-on spacers. The kit offers distinct spacer sets (black for LGA1200/115x, blue for LGA1851/1700, grey for AMD) and two mounting-bar families (NM-AMB14 / NM-AMB15) for orientation choices. Torx® screws reduce cam-out but require care to avoid overtightening (max. torque 0.6 Nm).

The manual emphasizes compatibility checks — use Noctua’s compatibility centre and mounting-pitch guide to confirm cooler pitch (78mm vs 83mm) and socket support. For AMD AM5/AM4 installations, the kit leverages the motherboard’s stock backplate and provides offset hole positions (0 or -7mm) to improve contact on certain Ryzen/AM5 CPUs. For Intel, the supplied backplate installs over the motherboard’s stock backplate. Detailed step-by-step guidance covers spacer selection, mounting-bar alignment (NORTH/SOUTH/WEST/EAST markings), fan reattachment, thermal paste patterns (single center dot or five-dot method), and transport recommendations.

Noctua underlines safe practices: avoid excessive torque, ensure case clearance and component compatibility (RAM, VGA, PCIe cards), and remove heavy coolers for transport if system stress is a concern. The product comes with a six-year warranty and Noctua support and FAQ resources for troubleshooting and multilingual manuals.

Notes

  • Use black spacers for LGA1200/115x, blue for LGA1851/1700, grey for AMD.
  • Torque limit: 0.6 Nm — Torx® reduces cam-out but increases risk of overtightening.
  • Ensure mounting pitch is 78mm; use NM-M1-MP83 for 83mm pitch coolers.
  • For transport, consider removing heavy coolers (700g threshold).
M: OA-GPT-5-NAN

© Copyright 2026 Manual.ly