
Monoprice MP Mini SLA Manual
PDF manual · 30 Pages
English



Quick check
Incorrect answer, please try again.
Chat with your Monoprice MP Mini SLA manual using AI
Get instant AI answers from your Monoprice MP Mini SLA manual
Ask anything about the Monoprice MP Mini SLA. Answers come from this manual, with the pages they are based on.
MP Mini SLA Maintenance Schedule
Check the printer and power cord for physical damage before operation. Do not use the printer if damage is present.
Ensure the resin tank and build platform are clean before printing, and keep cured resin particles out of the tank.
Clean the resin tank after printing. Remove cured resin and keep the FEP liner as clean as possible.
Wash the completed model in isopropyl alcohol for about 30-60 seconds, no longer than 5 minutes, then cure it in sunlight or UV light.
Ask a Question
Do you recommend MP Mini SLA?
Yes No
Laura Schmidt
10 months ago
After a firmware update my printer keeps getting stuck during startup. It then cancels printing. What troubleshooting steps can I try, and where can I find proper documentation for the print parameters?

Manual.ly
10 months ago
Sorry about that. If the printer hangs on boot, please try: (1) power-cycle: switch off, unplug for 2 minutes, then reconnect and restart; (2) factory reset (from the device menu) and set up again; (3) confirm the firmware update finished successfully, and if needed reinstall the latest firmware using the official file for your model; (4) remove any SD card/USB drives before starting. For print parameters, the key settings are typically in your print software (paper type, quality, speed) and sometimes in the device menu. If you tell us your exact model and how you update firmware, we can share the correct parameter checklist and the right menu locations.
Video Manual
From FDM to SLA - 18 tips about first-time resin printers - the Monoprice MP SLA v2
Frequently Asked Questions
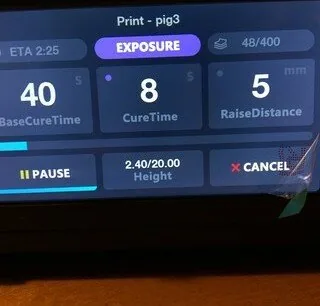
Monoprice recommends a base cure time of 60 seconds for the first three layers and 8 seconds for each subsequent layer when using their standard resin. Adjust these settings in the profile if using other resins.
Is this answer helpful?
Generate a wifi.conf file using the provided web link, copy it to the included microSD card, insert the card while the printer is powered off, then power on; the printer reads the file, connects to 2.4 GHz Wi‑Fi, and deletes the file. The Web UI IP appears on the Main Menu.
Is this answer helpful?
Remove the print, place it in a container with 91%+ isopropyl alcohol, cover and shake vigorously for 30–60 seconds (do not exceed ~5 minutes), then perform final curing in sunlight or under a UV light until fully cured.
Is this answer helpful?
Always wear nitrile or neoprene gloves and safety goggles when handling uncured resin, work in a well-ventilated area, avoid skin contact, wash immediately with soap and water if contact occurs, and consult the resin MSDS for safety specifics.
Is this answer helpful?
Wear gloves, pour resin into a separate container, use a plastic scraper (expired card) to gently peel cured resin from the FEP (avoid sharp tools), then clean with isopropyl alcohol and paper towels before reinstalling the vat.
Is this answer helpful?
Common causes include insufficient base-layer cure time, debris or cured particles in the resin vat disrupting auto-calibration, or inadequate supports. Increase base cure time, clear the vat, and add supports as needed.
Is this answer helpful?
You can use the built-in Web Slicer, ChiTuBox, Creation Workshop, or Print Studio. The Web UI accepts sliced GIFs for direct printing; ChiTuBox is commonly used for support generation and slicing workflows.
Is this answer helpful?
Advantages and Disadvantages
Advantages

- High-detail prints enabled by 2K LCD and 405nm UV curing for fine surface resolution.
- Compact footprint and light weight suitable for desktop use and small workspaces.
- Web UI and Web Slicer with Wi‑Fi support for remote management and direct uploads.
- User-adjustable profiles (base cure, exposure, lift) to tune prints for various resins.
- Comes with starter accessories: sample resin, microSD card, hex wrench, and power adapter.
Disadvantages

- Small build volume (118 x 65 x 110 mm) limits large or tall prints.
- Requires careful resin handling, PPE, and post-processing (IPA wash and UV cure).
- FEP vat liner is delicate and can be punctured if improper tools are used for cleaning.
- Wi‑Fi limited to 2.4 GHz and requires manual wifi.conf file generation for setup.
- Used resin has shorter shelf life and must be filtered and stored separately to avoid contamination.
Product Specification
Method
LCD/TFT Stereolithography
Configuration
1x LCD panel from below, 1x movable print bed (up/down)
Construction
Ready-made model, closed print chamber (with viewing window, removable lid), control in the device (Android)
Manufacturer's recommended materials
Liquid resin, open system, 405nm wavelength
Print size
4.65x4.33x2.56in (WxHxD)
Imaging
1x LCD panel (5.5" diagonal, 2560x1440 pixels, 405nm)
Layer height
0.00098-0.00394in
Accuracy X
50µm
Accuracy Y
50µm
Accuracy Z
25µm
Speeds
0.79in/h
Print bed
Rectangular, metal with coating
Interfaces
USB-A 2.0, 1x RJ-45, 1x Wi-Fi
Camera
N/A
Scanner
N/A
Screen
4.3" diagonal (800x480 pixels), color, IPS, Touchscreen
Control
Touchscreen, optional via computer (Windows)
Power supply
100V/240V, 60W
Operating environment
68-86°F
Dimensions
10.24x15.16x10.24in (WxHxD)
Weight
6.61lb (empty)
Color
Grey (housing), transparent orange (cover)
Scope of delivery
1x Printer
Product Description
Monoprice MP Mini SLA LCD High Resolution Resin 3D Printer
The Monoprice MP Mini SLA LCD High Resolution Resin 3D Printer offers a compact, high-detail resin printing solution for hobbyists and small workshop users. Equipped with a 2K LCD and a 405 nm UV light array, it cures resin layer-by-layer beneath a transparent FEP vat liner to produce fine surface detail and smooth finishes that filament printers cannot match. Its build volume is modest (118 x 65 x 110 mm), making it ideal for detailed miniatures, dental models, jewelry prototypes, and intricate small parts.
Key Features and Workflow
This printer uses an LCD mask to expose each layer, lifting the build platform between exposures to allow uncured resin to flow back into the vat. It includes automatic calibration at home position, a microSD card slot, and optional Wi‑Fi access with a Web UI and Web Slicer for slicing, uploading, and remote print control. Users can also slice models with ChiTuBox, Creation Workshop, or Print Studio.
Operation centers on simple front-panel controls for navigating menus, adjusting exposure and lift parameters, and starting prints. Print profiles let you set base-layer cure time, regular exposure time, lift distance, and other parameters to match different resins. The recommended Monoprice profile uses 60 seconds for the first three base layers and 8 seconds per subsequent layer for standard Monoprice resin.
Practical Notes for Users
Start by ensuring the Z axis and FEP liner are clean and unobstructed; debris can ruin leveling and prints. Shake resin before pouring, fill the vat about halfway, and use nitrile or neoprene gloves and safety goggles when handling uncured resin. After printing, remove the build plate by twisting off the magnetic mount, clean parts in isopropyl alcohol (91%+), and perform final curing in sunlight or a UV chamber. Store unopened resin in a dark, ventilated place at recommended temperatures and fully cure any resin before disposal.
Maintenance tips include routinely cleaning the resin vat and FEP liner (use plastic tools only), filtering recycled resin to remove cured particulates, and running the Clear function to verify the LCD and UV lamp. The printer supports 2.4 GHz Wi‑Fi only; Wi‑Fi setup requires generating a wifi.conf file and copying it to the microSD card.
Notes
- Use the Web UI for uploads, remote control, and profile editing.
- ChiTuBox workflows support automatic and manual supports; top support tips must be >=0.25mm and base >=0.6mm.
- Keep the printer in a dark, well-ventilated area and maintain ambient temperature between 15–30°C.
Search for 67,706 Manuals online


Type-in Brand or Model
Hans Müller
9 months ago
After a firmware update, my printer keeps hanging while it powers on and printing stops. What troubleshooting steps should I take, and where can I find documentation for the print parameters?
Manual.ly
9 months ago
Sorry about the start-up hang. First, perform a full power reset: turn off, unplug for 1-2 minutes, then restart. If it still freezes, try a factory reset and re-check that you installed the correct firmware model/version. If possible, reinstall the firmware using the official file from our support page (avoid partial installs). Also confirm no error lights appear and allow the printer to complete its boot process fully. For print parameters: the available options and how to configure them are listed in the user manual and the advanced settings section (menu items and meaning of each parameter). If your documentation pack is missing, contact us with your printer model and firmware version and we will share the correct guide.