Manual.ly Logo

Kerbl Automatic Pet Feeder Manual

0.0 · 0 Ratings

PDF manual · 2 Pages

English

M: QW-35-FL
page

/ 2

Loading...
d154ca386c7506fa0c36ebcc60e32a4d5e45 page 1
(DE)
! Lesen Sie die Bedienungsanleitung aufmerksam
durch und bewahren Sie diese auf !
Inbetriebnahme:
1.) Legen Sie in das sich auf der Unterseite befindliche
Batteriefach 4 x AA Mignon Batterien ein.
2.) Betätigen Sie den ON Knopf und gewährleisten Sie einen
sicheren Stand auf ebener Fläche. Das Display leuchtet auf.
3.) Durch gleichzeitiges Drücken der beiden Kunststoffnasen
auf dem Mittelpunkt der Oberseitenabdeckung können
Sie diese öffnen.
4.) Sie können nun die Näpfe 4 – 5 mit Futter befüllen. Bitte
befüllen Sie diese nicht bis über den Rand. Bei Bedarf kann
auch noch der Napf 1 befüllt werden, welcher direkt nach der
Programmierung zugänglich ist.
5.) Drehen Sie nun die befüllten Näpfe gegen den Uhrzeigersinn
bis zum Anschlag, um den internen Federmechanismus
aufzuziehen.
6.) Setzen Sie nun die Abdeckung wieder auf, sodass die
Öffnung über Napf 1 ist. Die Abdeckung rastet ein.
Programmierung:
1.) Drücken Sie SET um die Fütterungsintervalle zu programmieren.
2.) Mit den Pfeiltasten kann nun das gewünschte Fütterungs-
intervall eingestellt werden. Bei erneutem Drücken von SET
wechseln Sie zwischen Stunden und Minuten.
3.) Zur Bestätigung drücken Sie nochmals SET
4.) Durch das Drücken der rotierenden Pfeiltaste wird eine
manuelle Fütterung ausgelöst. Diese hat keinen Einfluss
auf den weiterhin eingestellten Fütterungsintervall.
Gewöhnung:
Zur Gewöhnung von schreckhaften oder jungen Tieren verwenden
Sie den Futterautomat eine Zeit lang ohne Aktivierung
Reinigung:
Zur Reinigung kann zuerst die Abdeckung wie oben beschrieben
abgenommen werden. Die Drehscheibe kann im Anschluss
entnommen und im Geschirrspüler oder per Hand gereinigt
werden. Der Automat selbst, sowie die Abdeckung, können
feucht abgewischt werden. Achten Sie bitte beim Wiedereinsetzen
der Drehscheibe das die Pfeile an der Drehscheibe mit jenen des
Automaten übereinanderliegen.
(FR)
! Lisez attentivement le mode d’emploi et conservez-le afin
de pouvoir le consulter ultérieurement!
Mise en service:
1.) Insérez 4piles Mignon AA dans le compartiment à piles situé
sur le dessous.
2.) Actionnez le bouton ON et placez l’appareil en position stable
sur une surface plane. L’écran s’allume.
3.) Une pression simultanée sur les deux ergots en plastique au
centre du couvercle vous permet d’ouvrir ce dernier.
4.) Vous pouvez maintenant remplir d’aliments les écuelles 4
– 5. Veillez à ne pas dépasser le bord lors du remplissage. Au
besoin, il est également possible de remplir l’écuelle1,
accessible directement après la programmation.
5.) Tournez maintenant dans le sens antihoraire jusqu’en butée
les écuelles remplies, afin de remonter le mécanisme interne
à ressort.
6.) Remettez maintenant le couvercle en place de manière à ce
que l’ouverture se trouve au-dessus de l’écuelle1.
Le couvercle se verrouille.
Programmation:
1.) Appuyez sur SET pour programmer l’intervalle entre les repas.
2.) Les touches fléchées permettent maintenant de régler
l’intervalle souhaité entre les repas. Appuyez de nouveau sur
SET pour basculer entre les heures et les minutes.
3.) Pour confirmer, appuyez une nouvelle fois sur SET
4.) Une pression sur la touche fléchée rotative permet de
déclencher un repas manuel. Celui-ci n’a aucun impact sur
l’intervalle entre les repas, qui reste réglé sur la valeur de
votre choix.
Pour habituer l’animal à l’appareil:
pour habituer les animaux peureux ou jeunes au nourrisseur
automatique, utilisez-le pendant un certain temps sans l’activer
Nettoyage:
pour le nettoyage, retirez d’abord le couvercle comme décrit plus
haut. Le disque rotatif peut ensuite être démonté et nettoyé au
lave-vaisselle ou à la main. L’appareil en lui-même, tout comme
le couvercle, est lavable avec un chiffon humide. Lors de la
remise en place du disque rotatif: veillez à superposer les
flèches du disque rotatif et celles de l’appareil.
(EN)
! Read the user guide carefully and keep it safe!
Commissioning:
1.) Insert 4 x AA Mignon batteries into the battery compartment
on the underside.
2.) Press the ON button and ensure the product is positioned
securely on a level surface. The display lights up.
3.) By simultaneously pressing the two plastic lugs in the middle
of the top cover, you can open the cover.
4.) You can now fill feeding bowls 4 - 5 with food. Please do not
fill these beyond the rim. If necessary, feeding bowl 1 can
also be filled, which is accessible immediately after
programming.
5.) Now turn the filled feeding bowls anti-clockwise all the way
to prime the internal spring mechanism.
6.) Now replace the cover so that the opening is over feeding
bowl 1. The cover engages.
Programming:
1.) Press SET to program the feeding intervals.
2.) The arrow keys are then used to set the required feeding
interval. Pressing SET again allows you to switch between
hours and minutes.
3.) Press SET again to confirm
4.) Pressing the rotating arrow button triggers a manual feed.
This has no effect on the other feeding interval set.
Familiarisation:
To familiarise nervous or young animals, use the feeder for a
while without activation
Cleaning:
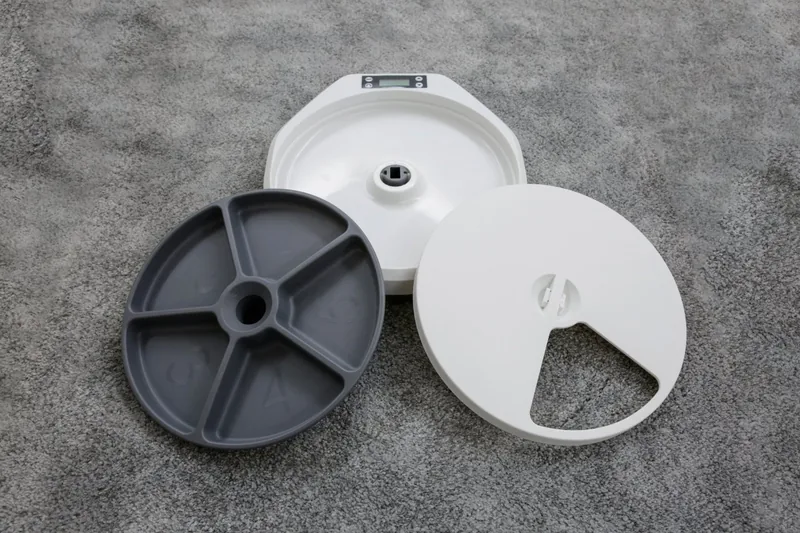
For cleaning, the cover can first be removed as described above.
The rotary disc can then be removed and washed in the
dishwasher or by hand. The feeder itself, along with the cover,
can be wiped down with a damp cloth. When reinserting the
rotary disc, ensure that the arrow on the disc aligns with the
arrow on the feeder.
(PL)
! Prosimy ouważne przeczytanie instrukcji obsługi i
zachowanie jej na później!
Uruchomienie:
1.) Do komory baterii na spodzie urządzenia włożyć cztery
baterie typu AA (Mignon).
2.) Nacisnąć przycisk ON i upewnić się, że urządzenie pewnie
stoi na prostej powierzchni. Wyświetlacz włączy się.
3.) Pokrywę można otworzyć, naciskając równocześnie oba
przyciski z tworzywa sztucznego na środku górnej pokrywy.
4.) Teraz można napełnić miski 4 i5 karmą. Misek nie należy
napełniać po brzegi. W razie potrzeby można napełnić miskę
1, która jest dostępna bezpośrednio po programowaniu.
5.) W celu zwinięcia wewnętrznego mechanizmu sprężynowego
napełnione miski należy obrócić przeciwnie do kierunku
ruchu wskazówek zegara aż do zablokowania.
6.) Ponownie założyć pokrywę, tak aby otwór znajdował się nad
miską 1. Pokrywa zatrzaśnie się.
Programowanie:
1.) Nacisnąć przycisk SET, aby ustawić interwały karmienia.
2.) Przy pomocy strzałek można ustawić żądany interwał karmie-
nia. Ponowne naciśnięcie przycisku SET powoduje przejście
pomiędzy godzinami a minutami.
3.) W celu zatwierdzenia należy ponownie nacisnąć przycisk SET.
4.) Naciśnięcie przycisku zobracającymi się strzałkami powoduje
uruchomienie karmienia ręcznego. Nie ma ono wpływu na
ustawione interwały kamienia.
Przyzwyczajanie:
Aby przyzwyczaić płochliwe i młode zwierzęta, należy przez
pewien czas używać automatu paszowego bez włączania go.
Czyszczenie:
Do czyszczenia należy najpierw zdjąć pokrywę, jak opisano
powyżej. Następnie należy wyjąć tarczę obrotową i wyczyścić ją
w zmywarce lub ręcznie. Automat oraz pokrywa mogą być
czyszczone na mokro. Podczas ponownego wkładania tarczy
obrotowej należy upewnić się, że strzałki na tarczy są wyrów-
nane ze strzałkami na urządzeniu.
80846=BA_Futterautomat_Pet_Feeder_0321
Albert Kerbl GmbH
Felizenzell 9
84428 Buchbach, Germany
Tel. +49 8086 933 - 100
Fax +49 8086 933 - 500
www.kerbl.de
Kerbl Austria Handels GmbH
Wirtschaftspark 1
9130 Poggersdorf
Tel. +43 4224 81555
Fax. +43 4224 81555-629
www.kerbl-austria.at
Kerbl France Sarl
3 rue Henri Rouby, B.P 46 Soultz
68501 Guebwiller Cedex, France
Tel. +33 3 89 62 15 00
Fax +33 3 89 83 04 46
www.kerbl-france.com
Kerbl UK Limited
8 Lands End Way
Oakham, Rutland
LE15 6RF UK
Phone +44 01572 722558
Fax +44 01572 757614
www.kerbl.co.uk

Chat with your Kerbl Automatic Pet Feeder manual using AI

Get instant AI answers from your Kerbl Automatic Pet Feeder manual

Ask anything about the Kerbl Automatic Pet Feeder. Answers come from this manual, with the pages they are based on.

Automatic Pet Feeder Maintenance Schedule

As needed
Clean the rotary disc and cover

Remove the cover and rotary disc. Wash the disc in a dishwasher or by hand. Wipe the feeder and cover with a damp cloth.

As needed
Replace AA batteries

Insert 4 x AA Mignon batteries into the compartment on the underside when power is low or during initial setup.

M: qwen/qwen3.8-flash

Ask a Question

0/1000

Do you recommend Automatic Pet Feeder?

Yes No

Frequently Asked Questions

A

This feeder is designed specifically for dry kibble. Wet food or moist treats may clog the mechanism or spoil quickly inside the bowls. Ensure the kibble size fits within the bowl dimensions.

Is this answer helpful?

A

Press the SET button, then use the arrow keys to select hours and minutes. Press SET again to confirm the interval. You can trigger a manual feed anytime without affecting the scheduled times.

Is this answer helpful?

A

Yes, the removable rotary disc and the individual feeding bowls can be safely cleaned in a dishwasher. The main motor unit and cover should only be wiped with a damp cloth.

Is this answer helpful?

A

Since this model runs on four AA batteries, it operates independently of household electricity. It will continue to function during power outages as long as the batteries have charge.

Is this answer helpful?

A

Run the feeder for a few days without activating the dispensing mechanism. This allows the animal to get used to the sight and sound of the machine before it starts moving food.

Is this answer helpful?

M: QW-35-FL

Advantages and Disadvantages

Advantages

  • Includes a digital display for clear interval monitoring
  • Five 240ml bowls provide generous portion capacity
  • Manual feed option does not reset the automatic timer
  • Rotary disc is dishwasher safe for easy cleaning
  • Simple setup requires only four standard AA batteries
VS

Disadvantages

  • Requires frequent battery replacement if used heavily
  • Only compatible with dry kibble, not wet food
  • Spring mechanism must be manually wound before each cycle
  • No Wi-Fi connectivity for remote smartphone control
  • Cover removal requires simultaneous pressure on two lugs
M: QW-35-FL

Product Specification

Type

Feeder

Suitability

Cat, Dog

Material

Plastic

Color

White

Dimensions

14.2x13x2 inches

Features

Display, Dishwasher Safe, Timer

M: QW-35-FL

Product Description

The Kerbl Feeder: Precision and Convenience for Your Pet

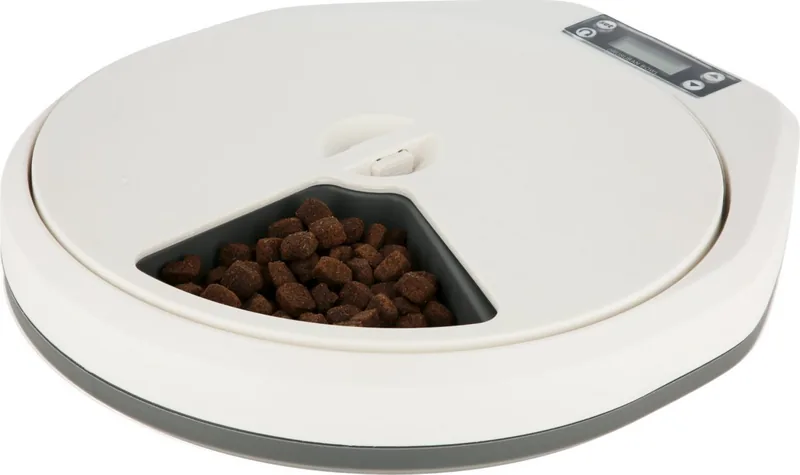
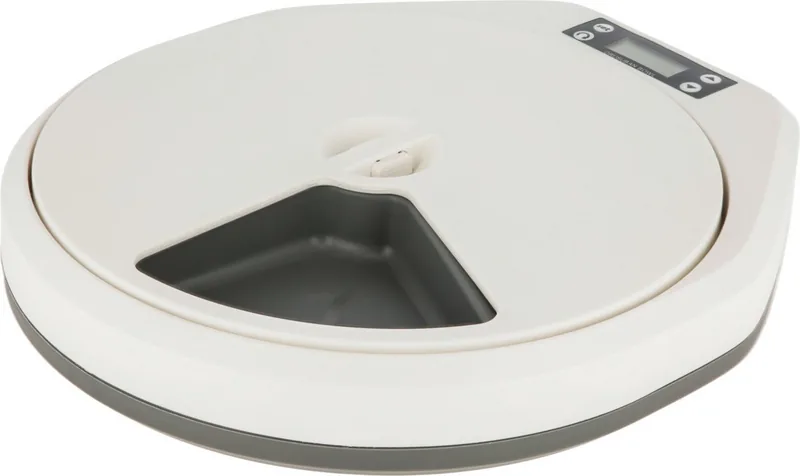
The Kerbl Feeder, featuring a sleek white design with a digital display and timer, is the ultimate solution for pet owners seeking reliability and ease of use. This automatic feeder is designed to ensure your furry friends receive fresh meals on schedule, even when you are away from home. With five separate 240ml bowls, it offers ample capacity for multiple pets or large portions for one, making mealtime stress-free.

Setting up this device is straightforward. Simply insert four AA batteries into the compartment located on the underside and press the ON button. The digital display will illuminate, signaling that the unit is ready. To load food, press the two plastic lugs on the top cover to open it. You can fill bowls four through five with dry food, being careful not to overfill them. For immediate access after programming, bowl one can also be filled. Once loaded, rotate the bowls anti-clockwise to tension the internal spring mechanism. Close the cover so the opening aligns with bowl one, and it will lock securely.

Programming the feeding intervals is intuitive. Press the SET button to begin, then use the arrow keys to adjust the time in hours or minutes. Confirm your settings by pressing SET again. A unique feature allows for manual feeding via the rotating arrow button without disrupting the programmed schedule. This is perfect for treating your pet or adjusting portions temporarily. For nervous animals, the device can be run without activation initially to help them get used to the noise and movement.

Cleaning is equally simple. The rotary disc can be removed and washed in a dishwasher or by hand. The main body and cover should be wiped down with a damp cloth. When reassembling, ensure the arrows on the disc align perfectly with those on the feeder base. This product combines functionality with durability, ensuring your pets stay healthy and happy with consistent nutrition.

M: QW-35-FL

© Copyright 2026 Manual.ly