Manual.ly Logo

Icy Dock ToughArmor MB840M2P-B Manual

0.0 · 0 Ratings

PDF manual · 1 Pages

English

M: qwen/qwen3.5-flash-20260224
page

/ 1

Loading...
c6a3aa1158a34cf7ceeae1fcafb6099ab589 page 1
Copyright
©
ICY DOCK International. All Rights Reserved. 650266 VER 1.0
ToughArmor
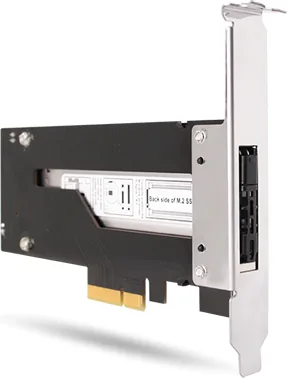
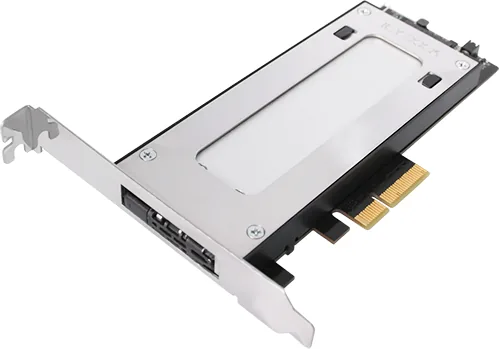
M.2 NVMe SSD to PCIe 3.0 x4 Hot-Plug Mobile Rack for PCIe Expansion Slots
User manual
Device
1 x #6-32*5 hexagon
Phillips screw with washer for device
Note: Please use the included screws to secure the device & drive tray.
Front View
1
2
Drive tray ejection button
Half Height
IO Faceplate
Full Height
IO Faceplate
LED indicator (Power: solid green LED; Drive access: flashing green LED)
1
2
Full / Half height expansion slot faceplate
(Default)
Drive Tray Inner View
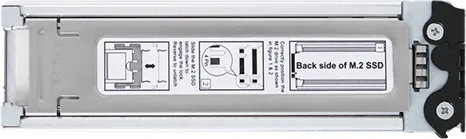
Adjustable M.2 SSD Locker
Golden Finger Position
Top View
3
操作步骤
操作步驟製品の組み込み手順について
Installation Guide Installationsanleitung Guide d'Installation Guía
de instalación
2 Pin Header for Front Panel LED Activity Indicator
1
2
1
2
Full Height IO Faceplate
Half Height IO Faceplate
PCIe 3.0 x4 Golden Finger (Compatible with PCIe x4 / 8 / 16 Slot )
3-1
3-2
3-3 3-4
Push the tray ejection button to eject
the drive tray.
Pull to remove the drive tray. To install M.2 SSD, flip the drive tray upside
down to the bottom side.
3
3
4
4
设备安装步骤
Device Installation Installation eines Gerätes
Installation du
裝置安裝步驟
デバイス取付手順
dispositif Instalación del dispositivo de
4
3-5 3-6
3-7 3-8
2
3
Use the included #6-32*5 screw to secure the device.
Fully connect the device’s PCIe connector into the system’s PCIe slot.
(Optional) Connect the 2 Pin header to the system’s front panel LED
cable for LED activity indications.
1
2
3
1
3-9
3-10
1
2
Press down the top cover and push towards
the guided arrow to open the top cover.
With the M.2 SSD laying flat on the tray, slide
the adjustable locker to secure the M.2 SSD.
Lorem ipsum
Remove the protective film from the thermal
pad located inside the drive tray.
1
2
To prevent incorrect positioning of the M.2
SSD, align the gap on the connector of the M.2
SSD to the drive tray’s rear metal pin. Then
insert the M.2 SSD towards the pin, exposing
the SSD’s golden finger connector.
Latch the rear end of the top cover into the rear
tray’s groove first, then press down the front end
of the top cover to complete M.2 installation.
NOTA
注釋
5.
3. Due to different drive specifications for the device activity signal, some drives may not support
the access LED. If the LED does not function, but the user can read and write to the drive, it
falls under this category. If the LED does not function, and the drive cannot be read or written
to, please contact us for troubleshooting.
2
1.
5.
3. Auf Grund unterschiedlicher Spezifikationen kann es vorkommen, dass manche Laufwerke das
Aktivitätssignal nicht unterstützen. Dieser Fall trifft zu, wenn Sie Lese- und Schreibzugriff auf das
Laufwerk haben, die LED aber kein Zugriffssignal anzeigt. Sollten Sie keinen Lese- und
Schreibzugriff auf das Laufwerk haben und die LED auch nicht funktionieren, so kontaktieren
Sie uns bitte zur zur Fehlerbehebung.
1. ICY DOCK
2. I
2. ICY DOCK ne pourra être tenu responsable de la perte ou dégradation de tout logiciels, matériels
ou données suite à des dommages ou des disfonctionnements de matériels utilisés avec nos
produits ICY DOCK. La responsabilité de ICY DOCK ne pourra être engagées que pour ces
propres produits.
1. ICY DOCK
3. A cause des différentes spécifications des signaux d'activité, certains disques durs ne supportent
pas l'accès. Si la LED témoin ne s’allume pas, alors le disque dur n’est pas pris en charge,
contactez-nous pour un dépannage.
5. Si vous souhaitez obtenir plus d’informations sur nos produits, vennez visiter notre site:
http://www.icydock.fr
4. To utilize the
Hot-Plug
function, the host must also support
Hot-Plug
. To check if your host
supports
Hot-Plug
, please refer to the motherboard or controller card specifications and user
manual.
4. Zur Nutzung der Hot-Plug-Funktion muss der Host auch Hot-Plug unterstützen. Prüfen Sie anhand
der Spezifikationen und Bedienungsanleitung von Motherboard und Controller-Karte, ob Ihr Host
Hot-Plug unterstützt.
4. Pour profiter pleinement la fonction
Hot-Plug
, vérifiez que votre configuration accepte également
la fonction
Hot-Plug
.
3.
5.如欲知更多产品资讯,欢迎上网浏览本公司网站:http://www.icydock.com。
1.本公司保留产品升级与变更之权利,如改版,恕不另行通知。
2.本公司仅负责ICY DOCK产品本身相关的维修。任何跟其它软件、硬件、数据相关的故障请联络其相
关公司协助维修。
5.如欲知更多產品資訊,歡迎上網瀏覽本公司網站:http://www.icydock.com。
2.本公司僅負責ICY DOCK產品本身相關的維修。任何跟其它軟體、硬體、資料相關的故障請聯絡其相
關公司協助維修。
1.本公司保留產品升級與變更之權利,如改版,恕不另行通知。
5. Si tiene alguna pregunta o duda acerca de los productos ICY DOCK, visite nos en el sitio web
http://www.icydock.com
3. Debido a las diferentes especificaciones de las unidades para la señal de actividad a dichas unidades,
algunas de estas puede que no admitan el LED de acceso. Si el LED no funciona pero el usuario
puede realizar operaciones de lectura y escritura en la unidad, dicho LED se encuentra dentro de
esta categoría. Si el LED no funciona y no se pueden realizar operaciones de lectura o escritura
en la unidad, póngase en contacto con nosotros para solucionar el problema.
1. ICY DOCK se reserva el derecho de cambiar las especificaciones técnicas no relacionadas y está
sujeto a cambio sin previo aviso.
2. ICY DOCK no asumirá ninguna responsabilidad por ningún software, hardware o dato almacenado
en los productos ICY DOCK, o que interactúe con estos, que provoque daños o averías. ICY DOCK
solamente asumirá la responsabilidad de reparaciones y tareas de servicio de productos ICY DOCK.
5. ICY DOCK製品に関するお問い合わせは弊社のホームページhttp://www.icydock.comへアクセスしてください。
2. 当公司はただICY DOCK製品自身と関連している修理だけ責任を負います。いかなるとの他のソフ卜ウェア、
データと関連している故障はその関連している会社と連絡し、修理を協力して下さい。
1. 当公司は
因为硬盘LED外送讯号的规格根据不同硬盘厂商会有所不同,有一些硬盘可能不支持产品的LED指示灯灯号。
如果数据读写没有问题,则不影响操作,如果LED指示灯不亮亦无法读写数据,请联络我们。
因為硬碟LED外送訊號的規格根據不同硬碟廠商會有所不同,有一些硬碟可能不支持產品的LED指示燈燈
號如果數據讀寫沒有問題,則不影響操作,如果LED指示燈不亮亦無法讀寫數據,請聯絡我們。
3.
HDD出力信号仕様はメーカーにより異なります。場合によって一部分HDDが本製品のLEDランプに対応できない
場合があります。もしデータの読み書きが問題なければ操作に影響がありません。LEDランプ点灯しない上読み
書きできない場合、問い合わせください。
3.
4.
若欲完全使用Hot-Plug
的功
能,主机板端对应接口本身需具备Hot-Plug功能。
4.若欲完全使用Hot-Plug的功能,主機板端對應接口本身須具備Hot-Plug功能。
4.
フルでHot-Plug機能を使用する場合、Host側もHot-Plug機能に対応する必要があります。
4. Para utilizar la función de conexión en caliente, el dispositivo principal también debe admitir esta
función. Para comprobar sea el dispositivo principal admite la función de conexión en caliente,
consulte las especificaciones y el manual del usuario de la placa base o de la tarjeta controladora.

Chat with your Icy Dock ToughArmor MB840M2P-B manual using AI

Get instant AI answers from your Icy Dock ToughArmor MB840M2P-B manual

Ask anything about the Icy Dock ToughArmor MB840M2P-B. Answers come from this manual, with the pages they are based on.

Ask a Question

0/1000

Do you recommend ToughArmor MB840M2P-B?

Yes No

Frequently Asked Questions

A

No. The host system must support hot-plug functionality. You should check your motherboard or controller card specifications and user manual to verify if your host configuration accepts this feature before attempting to use it.

Is this answer helpful?

A

If the LED does not light up but you can read and write to the drive successfully, the device is working correctly. This happens because some drives do not support the activity signal. If you cannot read or write data, then contact support for troubleshooting.

Is this answer helpful?

A

Yes. The device is specifically designed as an M.2 NVMe SSD to PCIe 3.0 x4 hot-plug mobile rack. It is compatible with various M.2 SSD sizes and uses an adjustable locker to secure them properly.

Is this answer helpful?

A

The installation process is straightforward. It involves removing the top cover, securing the SSD with the locker, and inserting the PCIe connector. You must only use the included screws to secure the device and drive tray to ensure proper mounting.

Is this answer helpful?

A

This unit supports both full height and half height expansion slot faceplates. You can change the default faceplate to fit your specific computer case requirements using the included hardware.

Is this answer helpful?

A

ICY DOCK assumes responsibility only for repairs and service tasks related to their own products. They are not responsible for damage or degradation of software, hardware, or data following damage from other devices used with their products.

Is this answer helpful?

M: qwen/qwen3.5-flash-20260224

Advantages and Disadvantages

Advantages

  • Flexible PCIe slot compatibility including x4, x8, and x16 configurations
  • Support for hot-plug functionality allows drive swaps without shutdown
  • Sturdy aluminum chassis protects internal components from damage
  • Includes thermal pad for effective heat dissipation management
  • Adjustable drive locker secures M.2 SSDs firmly in the tray
VS

Disadvantages

  • LED activity indicator may not work with certain drive models
  • Host system must support hot-plug for that feature to function
  • Warranty does not cover data loss caused by other hardware
M: qwen/qwen3.5-flash-20260224

Product Specification

Adapter

PCIe -> M.2 PCIe

Host

1x PCIe 3.0 x4 (male)

Target

1x M.2/M-Key (PCIe 3.0 x4, 22110/2280/2260/2242/2230, female)

Additional Power Supply

N/A

Form Factor

Add-In Card (full size)

Dimensions

6.30x4.80x0.87in

Features

Hot-Swap, screwless M.2 mounting

M: qwen/qwen3.5-flash-20260224

Product Description

Upgrade Your Storage Performance with Icy Dock ToughArmor MB840M2P-B

Achieving maximum system efficiency often requires expanding your storage without compromising performance. The Icy Dock ToughArmor MB840M2P-B offers a robust solution for enthusiasts and professionals alike who demand reliability. This hot-plug mobile rack allows users to integrate M.2 NVMe SSDs directly into standard PCIe slots within a desktop chassis. It transforms unused expansion space into high-speed storage access while maintaining thermal efficiency through dedicated cooling zones.

Building for Reliability

Construction quality matters significantly when installing internal hardware components. This device features a sturdy aluminum chassis designed to protect your investment from physical damage and vibration. The unit supports both full height and half height PCIe expansion slots, ensuring compatibility with various computer cases and industry standards. You can easily swap faceplates to fit the specific requirements of your system layout without needing additional tools. The drive tray includes an adjustable locker mechanism that secures M.2 SSDs firmly in place during operation.

Installation and Usability

Setting up the system is straightforward for technicians and beginners alike. Users can utilize the included mounting screws to ensure the device sits securely into the expansion slot. Installing the M.2 SSD involves removing the top cover, placing the drive on the tray, and sliding the locker into position to catch the golden finger connector. Ensure the protective film is removed from the thermal pad prior to installation to prevent overheating. A thermal pad is included inside the tray to assist with heat dissipation during heavy computational workloads. Connecting the optional two-pin header enables the LED activity indicator on the front panel for visual feedback.

Performance Features

The interface supports PCIe 3.0 x4 speeds, which aligns perfectly with modern NVMe solid state drives. This compatibility extends to PCIe x4, x8, and x16 slots, giving you flexibility in PCIe lane allocation for bandwidth optimization. Hot-plug functionality allows you to add or remove drives without powering down your computer, provided the host system supports the feature. This adds significant convenience for dynamic data management tasks and reduces downtime during upgrades.

Important Considerations

While the hardware is robust, users must verify host compatibility for specific features before use. The LED activity indicator relies on signals from the M.2 SSD itself to function correctly. Some drives may not transmit this signal correctly due to manufacturer differences. If read and write operations function normally without the light, the device operates as intended for standard usage. Any data loss incidents involving external hardware fall outside the manufacturing warranty scope. Regular maintenance of the interface ensures optimal signal transmission over time. Always consult your motherboard specifications before utilizing hot plug capabilities to ensure system stability.

Note: If the LED does not light up but data transfers work, the system is functioning correctly. Contact support only if data access fails completely.

M: qwen/qwen3.5-flash-20260224

© Copyright 2026 Manual.ly