
Flashforge Creator 3 Pro V2 Manual
PDF manual · 60 Pages
English



Quick check
Incorrect answer, please try again.
Chat with your Flashforge Creator 3 Pro V2 manual using AI
Get instant AI answers from your Flashforge Creator 3 Pro V2 manual
Ask anything about the Flashforge Creator 3 Pro V2. Answers come from this manual, with the pages they are based on.
Creator 3 Pro V2 Maintenance Schedule
If the equipment is used frequently, add lubricating oil or grease to the moving parts at least once every three months.
If the equipment is not used for a long time, add lubricating oil or grease to the moving parts at least once every six months.
Clean up filament residue and sundries in the printing cavity after each print to prevent them from falling into the bottom circuit board.
Replace printing stickers when adhesion drops or they are damaged to maintain print quality. No fixed interval is specified.
Free maintenance reminders
Timed to your purchase date. Always free, unsubscribe anytime.
Ask a Question
Do you recommend Creator 3 Pro V2?
Yes NoFrequently Asked Questions
The machine supports PLA, ABS, PETG, Nylon, PC, HIPS, ASA, and composite filaments. Use official or specified filaments to avoid blockage.
Is this answer helpful?
Soak the model in water to dissolve PVA supports. Use hot water for faster results but keep under 35 degrees for PLA. After dissolving, rinse and dry the model.
Is this answer helpful?
Yes, connect via Tools Menu on the touch screen. Enable WLAN and select your network to establish a connection for file transfers.
Is this answer helpful?
If power fails, the printer can resume printing after power is restored. Ensure recovery printing is enabled in the settings.
Is this answer helpful?
Clean it regularly with unclogging tools. Replace brass nozzles when printing abrasive materials to extend life. Use hardened nozzles for composites.
Is this answer helpful?
Yes, the build plate is magnetic. It allows you to bend it slightly to pop off the model once the machine has cooled down completely.
Is this answer helpful?
Yes, you can use the FlashCloud service or send files via USB and network. A camera allows you to watch the print remotely.
Is this answer helpful?
Advantages and Disadvantages
Advantages

- Dual independent extruders enable multi-material and support printing.
- Large build volume of 300x250x200mm suits medium projects.
- Touch screen interface simplifies navigation and control.
- Wi-Fi, Ethernet, and USB connectivity options available.
- Built-in camera allows remote monitoring via web browsers.
Disadvantages

- Standard nozzle wears with abrasive materials like carbon fiber.
- PVA support material requires careful storage and water dissolution.
- Network cable length limited to 3 meters for operation.
- Heavy unit weighing 40kg limits portability.
- Requires initial leveling and calibration for best results.
Product Specification
Process
Fused Filament Fabrication (FFF)
Mechanical Arrangement
2x moving print head (front/back, left/right), 1x moving print bed (up/down)
Construction
Pre-assembled model, enclosed print chamber (with viewing window lid, with viewing window front, lid door, front door), all-metal frame, control inside device, noise-reducing stepper motor drivers, integrated filament holder
Manufacturer Recommended Materials
1.75mm Filament, open system (53mm spool inner diameter), PLA, ABS, PVA, PETG, HIPS, PA, PC, Wood, ASA, Carbon
Build Volume
11.81x7.87x9.84 in (WxHxD)
Extruder System
2x print head (1x print nozzle with direct feed, 0.016 inches, stainless steel, interchangeable, 122-608 F), 2x direct extruder, 2x print nozzle cleaning device (brush)
Layer Height
0.002-0.016 inches
Accuracy X
0.0004 inches
Accuracy Y
0.0004 inches
Accuracy Z
0.0001 inches
Print Speeds
0.39-5.91 ips Printing (max. 3.94 ips recommended)
Print Bed
rectangular (11.81x9.84 in WxD), heated (32-248 F), removable, flexible, automatic print bed leveling
Interfaces
USB-A 2.0, Wi-Fi, 1x RJ-45 (10/100/1000Base-T)
Camera
1280x800 Pixels, with Web interface
Scanner
N/A
Additional Features
N/A
Display
4.3 inch Diagonal, color, Touchscreen, IPS
Control
Touchscreen, 8GB integrated storage, optional via Computer, via Cloud
Sound Pressure
55dB(A)
Power Supply
100-240V, 500W
Operating Environment
64.4-86 F
Dimensions
24.69x24.21x19.09 in (WxHxD)
Weight
88.18 lbs (empty)
Color
black (Housing), blue (Print Bed)
Package Contents
1x Printer, 2x 2.20 lbs PLA Filament, Tool Set
Special Features
Print chamber lighting, print chamber ventilation, IDEX 3D Printer
Manufacturer Warranty
one year
Product Description
About the Creator 3 Pro Machine
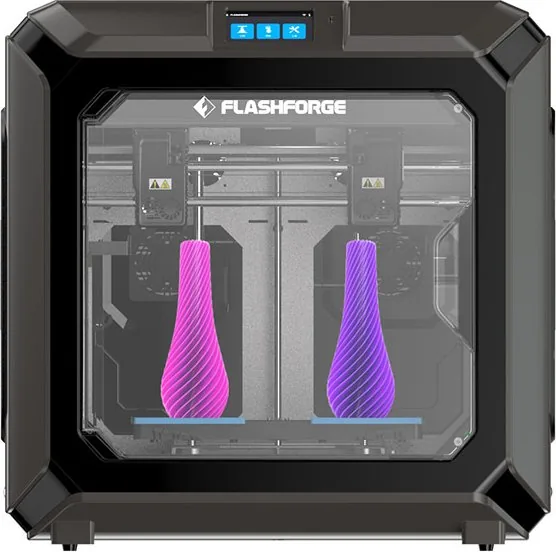
The Flashforge Creator 3 Pro stands out in the desktop 3D printing market with its robust dual-extrusion capabilities. This machine is designed for users who require versatility in their printing projects. It features two independent hotends, allowing for simultaneous printing of dual materials or support structures. This capability makes it ideal for complex geometry where soluble supports like PVA are necessary. The build volume measures 300 by 250 by 200 millimeters, providing ample space for medium-sized objects without sacrificing precision.
Safety and Operation Standards
Safety is paramount with this equipment. Users must ensure the printer sits in a dry, ventilated area away from flammable substances. The unit requires a grounded outlet to prevent electrical hazards. Operation involves a 4.3-inch color IPS touch screen which simplifies navigation through settings and printing tools. Connectivity options include Wi-Fi, Ethernet, and USB storage for file transfer. This flexibility ensures seamless integration into various workstation setups. Users should avoid operating near dust or humidity to prevent leakage risks.
Material Flexibility and Maintenance
Material compatibility is extensive. PLA, ABS, PETG, Nylon, PC, and composite filaments are supported. However, abrasive materials like carbon fiber require special care. The standard brass nozzle wears down with such filaments, so upgrading to a hardened steel nozzle is recommended for longevity. Maintenance involves regular lubrication of moving parts and cleaning the build plate. Before initial use, leveling the build plate is crucial for adhesion. The printer includes a self-leveling function accessible through the menu. For remote oversight, an internal camera allows streaming via web browsers.
Advanced Features and Support
Post-processing is streamlined. When using water-soluble PVA for supports, models can be soaked in water to dissolve the support structure. The print bed temperature can be adjusted during the process to optimize adhesion. Firmware updates are available to keep features current. The software FlashPrint is required for slicing models before sending them to the printer. Overall, this system delivers reliability and advanced function for serious hobbyists and professionals alike. Proper environmental controls ensure consistent performance over time.
The printer offers specific modes like Mirror and Duplicate for faster prototyping. When duplicating, the X-axis size is limited to ensure accuracy for both objects. The machine features recovery printing if power fails, which is crucial for long jobs. Troubleshooting guides assist with layer adhesion issues or off-center extrusion. The magnetic build plate allows for easy model removal once cooled. These features combined with the wide support matrix make it a powerful tool.
Temperature ranges 15 to 30 Celsius with humidity between 20 and 70 percent. The device needs clearance space around it for airflow. Left and right sides need 20 centimeters while the front requires 35 centimeters. Do not operate during thunderstorms. Keep it away from children. Do not print illegal items or food storage products.
Search for 67,706 Manuals online


Type-in Brand or Model