
Fixpoint EP 5 Manual
PDF manual · 44 Pages
English



Quick check
Incorrect answer, please try again.
Chat with your Fixpoint EP 5 manual using AI
Get instant AI answers from your Fixpoint EP 5 manual
Ask anything about the Fixpoint EP 5. Answers come from this manual, with the pages they are based on.
EP 5 Maintenance Schedule
Wipe the hot tip on a moist sponge before storage and leave a small amount of solder on it to prevent oxidation.
Burn off production residues by melting solder on the tip at approx. 200°C to create a thin film.
Check that the connection between carrier tube, heating element and tip is tight; tighten if necessary to ensure sensor control.
Ask a Question
Do you recommend EP 5?
Yes NoFrequently Asked Questions
It is designed for hobby electronics, repair work, workshop use, and soft soldering on circuit boards, wires, and small electronic components. It works well for tinning, soldering, and desoldering in dry indoor environments.
Is this answer helpful?
Yes. The 48W soldering iron is made for fast warm-up, and the station can reach 330°C in about 1.5 minutes. That makes it convenient for short jobs and repeated use.
Is this answer helpful?
The station allows stepless adjustment from 150°C to 450°C. The LCD display shows both the set value and the actual tip temperature, helping users match heat to the task.
Is this answer helpful?
Yes, it can be beginner-friendly because of the clear display, simple controls, and included stand and sponge. Still, beginners should follow safety guidance and practice good tip handling.
Is this answer helpful?
No. The iron should never be operated without the soldering tip, because the heating element and temperature sensor can be damaged or destroyed.
Is this answer helpful?
Electronic solder with a colophony resin core is recommended. Halogen-containing flux should be avoided. A 1 mm solder wire is often suggested for electronics work.
Is this answer helpful?
Advantages and Disadvantages
Advantages

- Fast 48W heating makes the station ready quickly for common soldering tasks.
- Digital LCD readout shows both target and real temperature for better control.
- Wide 150–450°C range supports different electronics and repair jobs.
- Compact stand with sponge tray improves tip cleaning and everyday usability.
- Temperature memory saves the last setting, which helps repeat work faster.
Disadvantages

- Not suitable for wet areas, outdoor use, or heating liquids and plastics.
- Requires careful tip maintenance; poor cleaning can reduce soldering quality.
- Only intended for low-voltage soft soldering, so it is not a general-purpose heater.
- Safety rules are strict, and improper use can damage components or create hazards.
Product Specification
Power
48W (24V)
Temperature
302-842°F
Heat-up time
90s
Weight
4.41 lb
Package contents
Soldering iron, Soldering iron stand
Product Description
Fixpoint EP5 Digital Soldering Station: A Practical Pick for Precise Everyday Soldering
The Fixpoint EP5 Digital Soldering Station Manual points to a tool built for hobby electronics, workshop repairs, and small production tasks. At its core, the EP5 is designed to make soft soldering more controlled and comfortable, especially for users who want steady heat, fast warm-up, and clear temperature feedback. With a compact body, a stable stand, and a digital LCD display, it offers a straightforward setup that feels approachable for beginners while still being useful for experienced makers.
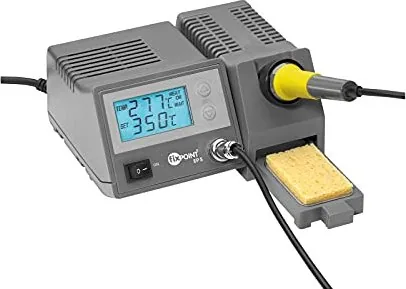
One of the most appealing features is the station’s temperature range of 150–450°C, which allows fine tuning for different soldering jobs. The 48-watt iron heats up quickly and uses safety-low voltage, helping the tool reach working temperature in a short time. The display shows both the set temperature and the actual tip temperature, which makes it easier to work with confidence and avoid overheating delicate circuit boards or components.
The EP5 also focuses on practical everyday use. It includes a soldering iron stand with contact protection and a pull-out sponge tray, so cleaning the tip is quick during longer sessions. The temperature control is electronic and sensor-based, and the station can signal faults with both light and sound. That kind of feedback is useful when working on electronics, where consistency matters and a small error can affect the quality of a joint.
This station is best suited for dry indoor spaces and for tasks such as soldering wires, tinning conductor paths, and handling electronic parts on printed boards. It is not meant for heating liquids or plastics, and it should always be used with proper ventilation. Like most soldering tools, it rewards careful handling: keep the tip tinned, clean it before each joint, and use the right solder wire for the job.
Notes
- Best for light electronics, repairs, and hobby projects
- Fast heat-up helps reduce waiting time
- Temperature memory supports repeat jobs
- Safety warnings should be followed closely
- Tip care strongly affects soldering quality
Search for 67,706 Manuals online


Type-in Brand or Model