Manual.ly Logo

Ergotec 440 Manual

0.0 · 0 Ratings

PDF manual · 1 Pages

English

M: OA-GPT-54-NAN
page

/ 1

Loading...
06656508673b345da89e272e902121698635 page 1
Vielen Dank, dass Sie sich beim Kauf Ihrer neuen Lenkerhörnchen für ein Produkt
aus unserem Haus entschieden haben.
Lesen Sie vor Gebrauch die nachfolgenden Montage- und
Sicherheitshinweise aufmerksam durch. Bewahren Sie die Hinweise
sorgfältig auf und geben Sie diese ggf. an den Nachbesitzer weiter.
Montage
Die Montage setzt eine entsprechende Grundkenntnis voraus. Sollten Sie über
diese nicht verfügen, so wenden Sie sich bitte an den Fahrrad-Fachhandel.
Überprüfen Sie vor der Montage die Kompatibilität zwischen den
Lenkerhörnchen und dem Lenkerbügel.
Überprüfen Sie auch, ob der Klemmbereich des Lenkerbügels mit dem
Klemmbereich der Lenkerhörnchen übereinstimmt.
Es gibt hier 2 unterschiedliche Ausführungen:
Bei außen geklemmten Lenkerhörnchen (Bild 1) muss der Innendurch messer
der Lenkerhörnchenklemmung mit dem Außendurchmesser des Lenkerbügels
übereinstimmen.
Bei innen geklemmten Lenkerhörnchen (Bild 2) muss der Außendurch messer
der Lenkerhörnchenklemmung mit dem Innendurchmesser des Lenkerbügels
übereinstimmen. Zum reduzieren des Durchmessers der Lenkerhörnchen-
klemmung entfernen Sie die Adapterhülse
c
.
Kombinieren Sie aus Sicherheitsgründen keine Stahl-Lenker-
hörnchen mit einem Aluminium-Lenkerbügel (Materialmix),
es besteht Bruchgefahr!
Achten Sie darauf, dass die Klemmflächen sauber
und fettfrei sind!
Setzen Sie den Klemmbereich des Lenkerhörnchens in bzw. auf den
Klemmbereich des Lenkerbügels.
Richten Sie jetzt die vertikale Position der Lenkerhörnchen auf Ihre
individuellen Bedürfnisse aus.
Stellen Sie die Lenkerhörnchen nicht senkrecht oder nach
hinten, dies könnte bei einem Sturz zu Verletzungen führen.
Ziehen Sie nun die Klemmschrauben
d
mit dem an der Lenker klemmung
angegebenen Anzugswert fest. Sollte kein Anzugswert
vorgegeben sein, gelten folgende Werte:
Lenkerhörnchen mit Außenklemmung: M5 – 6-8 Nm / M6 – 8-10 Nm,
Lenkerhörnchen mit Innenklemmung: M7 – 15-17 Nm / M8 – 21-23 Nm.
Aus Sicherheitsgründen dürfen die Lenkerhörnchen nicht
an Lenkerbügel mit einer Wandstärke kleiner als 1,2 mm
montiert werden.
Sicherheitshinweis
Kontrollieren Sie auch den Anzugswert der Schrauben nach ca. 500 km und
anschließend regelmäßig im Rahmen der Service-Intervalle, mindestens
jedoch 1 x pro Jahr.
Lenkerhörnchen mit einer Innenklemmung sind nicht für Wettkämpfe
geeignet. Die hohen Beanspruchungen könnten zum Bruch der
Lenkerhörnchen führen.
Um einen Sturz oder Unfall zu vermeiden, müssen die Lenkerhörnchen
nach einer Beschädigung unbedingt ausgetauscht werden.
Gewährleistung
Es gelten die gesetzlichen Bestimmungen. Eventuelle Gewährleistungsansprüche
sollten über den Fahrrad-Fachhandel abgewickelt werden.
Montage- und Sicherheitshinweise für
Lenkerhörnchen
deutsch
Stand 01.12.2015
RICHTIGRADFAHREN.DE
d
Bild 1
d
c
Bild 2
Thank you for deciding to buy your bar ends from our company.
Before use please read the following assembly and safety
instructions carefully. Keep them in a safe place and pass
them on to the next owner if necessary.
Assembly
Basic technical knowledge is required for the assembly of this product. If you do
not have this knowledge, please use the services of a specialist bicycle dealer.
Before assembly please check that the bar ends and the handlebars
are compatible.
You should also check that the clamping area of the handle bars fits
the clamping area of the bar ends.
There are two versions here:
For bar ends which are attached externally (Illustration 1) the internal diameter
of the bar end clamping section must be the same as the external diameter of the
handlebars.
For bar ends which are attached internally (Illustration 2) the external diameter
of the bar end clamping section must be the same as the internal diameter of the
handlebars. To reduce the diameter of the bar end clamping section you can
remove the adapter sleeve
c
.
For safety reasons aluminium handlebars should not be
combined with steel bar ends (mixed materials), because
this could lead to breakage!
Make sure that the surfaces to be clamped are clean and
free from grease!
Place the clamping area of the bar ends in or on the the clamping area of the
handlebars.
Now set the vertical position of the bar ends to your individual requirements.
Do not position the bar ends vertically or facing backwards,
because this could lead to injury in the event of a fall.
Now tighten the fixing screws
d
to the tightness value indicated for
clamping. If no the tightness value is indicated the following values apply:
Bar ends with external clamping: M5 – 6-8 Nm / M6 – 8-10 Nm,
Bar ends with internal clamping: M7 – 15-17 Nm / M8 – 21-23 Nm.
For safety reasons the bar ends should not be mounted on
handlebars with a material thickness less than 1.2 mm.
Safety instructions
The tightness of the bolts must be checked after approx. 500 km and once more
during the regular service intervals (with once a year as a minimum).
Bar ends with a internal clamping system are not suitable for
competitions. The heavy demands could lead to breakage of the
bar ends.
To avoid the risk of falls or accidents the bar ends should always
be replaced if they have been damaged.
Guarantee
The guarantee is subject to the applicable regulations. Any claims under the
guarantee should be submitted through a specialist bicycle dealer.
Assembly and safety instructions for
Bar Ends
english
Valid: 01.12.2015
CYCLINGRIGHT.COM
d
Illustration 1
d
c
Illustration 2

Chat with your Ergotec 440 manual using AI

Get instant AI answers from your Ergotec 440 manual

Ask anything about the Ergotec 440. Answers come from this manual, with the pages they are based on.

Ask a Question

0/1000

Do you recommend 440?

Yes No

Frequently Asked Questions

A

They provide an additional hand position on the handlebar, helping riders improve comfort, reduce fatigue, and vary posture on longer or more demanding rides.

Is this answer helpful?

A

Basic mechanical knowledge is recommended. If you are unsure about fit, torque, or alignment, it is best to have a bicycle dealer handle the installation.

Is this answer helpful?

A

Check that the clamping type and dimensions match your handlebar. External and internal clamp versions have different diameter requirements, so compatibility should be verified first.

Is this answer helpful?

A

No. The manual warns against combining steel bar ends with aluminum handlebars because mixed materials can increase the risk of breakage.

Is this answer helpful?

A

If no specific value is listed on the clamp, follow the recommended torque range for your clamp type and screw size. Proper tightening is important for safety and stability.

Is this answer helpful?

A

Recheck bolt tightness after about 500 km and then during regular service intervals, at least once a year. Also replace the bar ends immediately if they become damaged.

Is this answer helpful?

M: OA-GPT-54-NAN

Advantages and Disadvantages

Advantages

  • Improves hand position variety and can reduce pressure on the wrists during longer rides.
  • Clear clamping and torque guidance helps achieve a safer, more secure installation.
  • Adapter sleeve support makes diameter matching more flexible for compatible setups.
  • Regular maintenance reminders encourage long-term reliability and safer use.
VS

Disadvantages

  • Installation requires basic technical knowledge, so some riders may need a bike shop.
  • Not all handlebar and bar-end combinations are compatible, which limits universal use.
  • Steel and aluminum material mixing is discouraged due to breakage risk.
  • Internal-clamp versions are not suitable for competition and must be replaced if damaged.
M: OA-GPT-54-NAN

Product Specification

Type

Barends

Version

External clamping

Colors

black

Material

Aluminium

Weight

0.53 lb

M: OA-GPT-54-NAN

Product Description

Ergotec 440 Bar Ends Manual

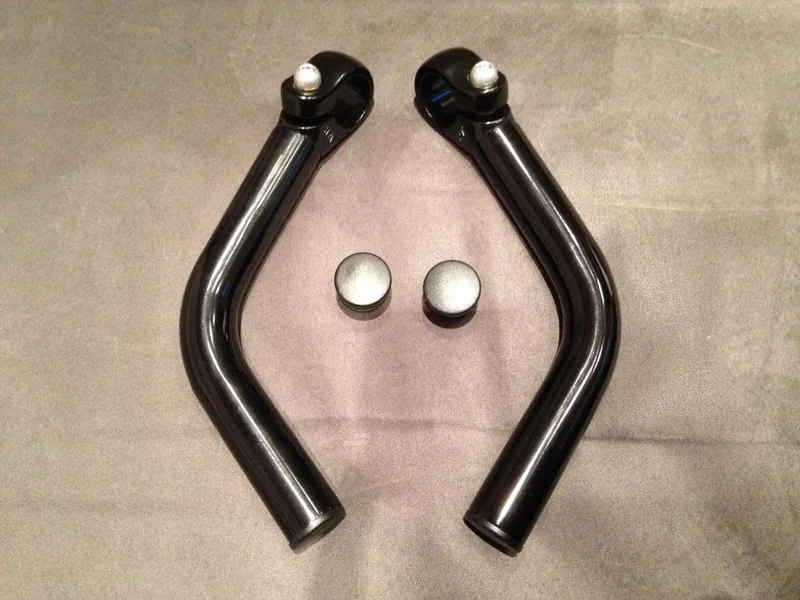
The Ergotec 440 Bar Ends Manual is all about one thing: helping riders set up their bar ends safely, correctly, and for lasting comfort. Bar ends may look like a small accessory, but they can make a big difference on longer rides by offering an extra hand position and a more natural way to vary pressure on the wrists and shoulders. For commuters, touring cyclists, and everyday riders alike, that added flexibility can improve control and reduce fatigue.

One of the most important ideas behind the Ergotec 440 Bar Ends is compatibility. Before installation, the handlebar and the clamping area must match properly, whether the bar ends use an external or internal clamp. The manual also highlights the use of an adapter sleeve when diameter adjustment is needed. That attention to fit is not just technical detail; it is a safety requirement that helps prevent slipping, stress, and breakage during use.

Installation is straightforward only when the basics are understood. Clean, grease-free clamping surfaces are essential, and the bar ends should be positioned to suit the rider’s preference without pointing straight up or backward. The recommended tightening values are clearly defined, which makes it easier to secure the parts with confidence. This is a practical reminder that small components deserve the same care as larger bike parts.

The safety guidance is equally valuable. The manual warns against mixing steel bar ends with aluminum handlebars and advises against mounting on handlebars with walls thinner than 1.2 mm. It also recommends periodic re-checking of bolt tightness after about 500 km and then at regular service intervals. For riders who expect reliable performance, that kind of maintenance routine is a smart habit rather than a burden.

In everyday use, the Ergotec 440 Bar Ends Manual reflects a simple philosophy: comfort should never come at the expense of safety. These bar ends are best treated as a precision fit accessory, not a universal add-on. When installed correctly and maintained over time, they can support a more efficient riding posture and add useful versatility to the cockpit.

Notes

  • Check fit before mounting.
  • Use the correct torque values.
  • Replace damaged bar ends immediately.
  • Internal-clamp versions are not meant for competition use.
  • Recheck screws regularly for continued safety.
M: OA-GPT-54-NAN

© Copyright 2026 Manual.ly