Manual.ly Logo

Dennerle BIO-CO2 Bio 60 Manual

0.0 · 0 Ratings

PDF manual · 2 Pages

English

M: qwen/qwen3.5-flash-20260224
page

/ 2

Loading...
df78e6d365d4ac2eb0192573e91a5036dd42 page 1
Bio 60
- Biological CO
2
fertilization for 60 cm aquaria
(40-80 l). With control gel and Mini-Topper.
What’s what
햲 Bottle support
햳 Bio CO
2
bottle with starter capsule
햴 Short CO
2
hose (CO
2
bottle – bubble counter)
햵 Bubble counter
햶 Long CO
2
hose (bubble counter – Flipper)
햷 CO
2
Micro-Flipper
Set-up and connection
1 Select a readily accessible point on the aquarium for attachment of the bottle support. Remove protective film from adhesive strip.
Place Bio CO
2
bottle in bottle support and fix bottle support in place in an upright position at the top of a clean, grease-free aquarium
pane. Press the two fixing tabs with the adhesive strips at the sides of the bottle support firmly onto the aquarium pane.
Please note: The adhesive strips grip the pane very firmly. The bottle support cannot be moved, once it has been pressed firmly into
place.
2 Remove bottle from support and unscrew top. Open hinged lid and remove starter capsule. Remove green half of capsule by pulling
carefully upwards. Pour contents of the starter capsule into the CO
2
bottle together with the empty capsule halves.
3 Fill CO
2
bottle up to marking (arrows) with tap water at a temperature of 20 to 25 °C (not over 25 °C!). Screw bottle top firm.
Note: The hose connector on the bottle top incorporates a white micro-filter – do not remove.
4 Break off or carefully cut off hinged lid.
5 Pour tap water into bubble counter until it is 3/4 full. TIP: For this purpose, submerge the bubble counter in upright position and tap
gently on the lid.
6 Use the short hose to connect the CO
2
bottle to the long tube of the bubble counter. Fit hose firmly to hose connectors.
7 Fit long hose to the 2nd connector (without tube) of the bubble counter.
8 Place CO
2
bottle together with the connected bubble counter into the support from above. Note: CO
2
production causes the CO
2
bottle to
expand somewhat. The bottle support is correspondingly larger, so as to enable it to expand without any problems
9 Rinse all parts of the Micro-Flipper with warm tap water (no detergents!) Press suction clip into bottom part, turning the clip as you
insert it.
10 Insert hose in the bottom part. The end of the hose must be cut off straight
and must fit flush against the stop.
11 Press top part into place.
12 Fit collector.
13 Select a spot in the aquarium where the water movement is good. The selected location should not be too exposed to light, in order to
prevent algae formation. Fix Flipper in the aquarium in vertical position
, at least 5 cm below the surface of the water.
When the system is applied correctly, CO
2
production will begin within 24-48 hours and your aquarium will be supplied with CO
2
for at least
30 days.
Changing the CO
2
bottle
When bubbles no longer issue from the Micro-Flipper, this indicates that the CO
2
bottle is empty. Proceed as follows:
Remove CO
2
bottle from bottle support and disconnect hose from bottle top.
Activate and connect new CO
2
bottle.
The contents of the used CO
2
bottle can be disposed of via the sewerage system.
Cleaning the Micro-Flipper
• Remove collector.
• Slide top part up by approx. 1 cm and open up. 헀
• Clean with water and soft brush. Do not use any detergents.
What if ... – Troubleshooting
Special information
Shelf life in unopened condition: Bottle contents approx. 5 years; starter capsules: approx. 12 months at 20 °C, approx. 19 months at
10 °C. Consequently, please store Bio CO
2
bottles in cool and dry conditions. Protect from sunlight, heat and frost!
Important:
• Should larger quantities of the bottle contents accidentally enter into the aquarium water during operation of the Bio CO
2
fertilizer
system, this may cloud the water and lead to oxygen deficiency. In this case, part of the water should be replaced immediately and the
fertilizer system should be checked for correct functioning. For this reason, do NOT fill the CO
2
bottle beyond the marking (arrows)!
Always use the bottle in its support, to prevent it from falling over!
• Always keep CO
2
bottle out of the reach of children and in an upright position!
Spare parts (available from specialist retailers)
3004 Bio CO
2
bottle
1557 5 starter capsules
3075 CO
2
Micro-Flipper
Bio 60
- Fumure biologique au CO
2
pour aquariums de
60 cm (40-80 l). Avec gel de contrôle et mini Topper.
Expliecations
햲 Boîte support
햳 Dépôt de réserve de CO
2
bio avec capsule de démarrage
햴 Flexible CO
2
court (dépôt de réserve - compte-bulles)
햵 Compte-bulles
햶 Flexible CO
2
long (compte-bulles - Flipper)
햷 Diffuseur CO
2
Micro-Flipper
Structure et raccordement
1 Choisissez un endroit facilement accessible de l’aquarium pour fixer la boîte support. Détachez le film protecteur des bandes adhésives.
Installez le dépôt de réserve de CO
2
bio et la boîte support dans le haut de l’aquarium, collez-le verticalement sur une vitre propre et
dégraissée. Appuyez fermement sur les pattes de fixation latérales dotées de bandes adhésives.
Important! Les bandes adhésives collent très bien. Une fois que vous aurez appuyé, vous ne pourrez plus déplacer la boîte de support.
2 Retirez la bouteille de la boîte support et dévissez le couvercle. Basculez le couvercle rabattable et retirez une capsule de démarrage.
Retirez la moitié verte de la capsule prudemment vers le haut.
Versez le contenu de la capsule de démarrage et les moitiés de capsule vides dans le dépôt de réserve.
3 Remplissez le dépôt de réserve jusqu’au marquage (flèche) avec de l’eau de distribution entre 20 et 25°C (pas plus de 25°C!).
Revissez fermement le couvercle. Remarque:
Le raccordement du couvercle au tuyau contient un micro-filtre blanc. Ne le retirez pas.
4 Détachez ou découpez soigneusement le couvercle rabattable.
5 Remplissez le compte-bulles à trois quarts d'eau de distribution. Conseil : Pour ce faire, immergez-le verticalement dans l’eau et
tapotez légèrement sur le couvercle.
6 Raccordez le dépôt de réserve au tube fin et long du compte-bulles, à l’aide du flexible court. Placez le flexible fermement sur les
raccords prévus.
7 Placez le flexible long sur le second raccord (sans tube fin) du compte-bulles.
8 Glissez le dépôt de réserve avec le compte-bulles raccordé par le haut dans la boîte support. Remarque:
Le dépôt de réserve prend un
peu de volume en produisant du CO
2
. La boîte support est un peu plus grande pour lui permettre de s’étendre sans problème.
9 Rincez tous les éléments du diffuseur Micro-Flipper à l’eau de distribution chaude (sans produit de nettoyage!). Fixez les ventouses
dans la partie inférieure par un mouvement de rotation.
10 Placez le flexible dans la partie inférieure. L’extrémité du flexible doit être coupée droite
et doit affleurer la butée.
11 Engagez la partie supérieure par pression.
12 Placez le collecteur qui convient..
13 Dans l'aquarium, choisissez un emplacement avec un brassage d'eau suffisant. Cet emplacement ne devrait pas être trop éclairé pour
éviter la formation d'algues. Fixez le diffuseur Flipper verticalement
, au moins 5 cm sous la surface de l'eau.
Si les conditions d’utilisation sont respectées, la production de CO
2
commence dans un délai de 24 à 48heures et alimente votre aquarium
pendant au moins30jours.
Changer le dépôt de réserve de CO
2
bio
Le dépôt de réserve est épuisé quand les bulles cessent de s’échapper de l’ouverture du Micro-Flipper. Dans ce cas:
• Retirez le dépôt de réserve de la boîte support et ôtez le flexible du couvercle.
• Démarrez un nouveau dépôt de réserve et raccordez-le à nouveau.
Vous pouvez jeter le contenu du dépôt de réserve usagé dans les canalisations.
Nettoyer le diffuseur Micro-Flipper
• Retirez le collecteur.
• Déplacez la partie supérieure d'env. 1 cm vers le haut et pliez-la vers l'extérieur. 헀
• Nettoyez avec de l'eau et une brosse douce, n'utilisez aucun produit d'entretien.
Que faire si... - Résolution des problèmes
Remarques particulières
Conservation dans son emballage fermé : Contenu de la bouteille, env. 5 ans ; capsules de démarrage : env. 12 mois à 20 °C, env. 18
mois à 10 °C. Privilégier donc la conservation du dépôt de réserve de CO
2
dans un endroit frais et sec. Protéger du soleil, de la chaleur
et du gel !
Attention !
• Si de grandes quantités du contenu de la bouteille venaient à se déverser dans l’aquarium pendant l’utilisation de l’installation de
fumure CO
2
bio, cela peut troubler l’eau et entraîner un manque d’oxygène. Dans ce cas, effectuez immédiatement un changement
partiel de l’eau et vérifiez le bon fonctionnement de l’installation de fumure. Conclusion : Ne PAS dépasser le marquage (flèche) lors
du remplissage! Utilisez toujours la bouteille dans la boîte support afin qu’elle ne se renverse pas!
• Conservez toujours le dépôt de réserve de CO
2
bio à la verticale et hors de portée des enfants!
Pièces de rechange (disponibles dans les magasins spécialisés)
3004 Dépôt de réserve de CO
2
bio
1557 5 capsules de démarrage
3075 Diffuseur CO
2
Micro-Flipper
Bio 60
- Biologische CO
2
-Düngung für 60 cm Aquarien
(40-80 l). Mit Control-Gel und Micro-Flipper.
Was ist was
햲 Haltebox
햳 Bio CO
2
Vorrats-Depot mit Starterkapsel
햴 Kurzer CO
2
Schlauch (Vorrats-Depot – Blasenzähler)
햵 Blasenzähler
햶 Langer CO
2
Schlauch (Blasenzähler - Flipper)
햷 CO
2
Micro-Flipper
Aufbau und Anschluss
1 Wählen Sie eine gut zugängliche Stelle am Aquarium zur Befestigung der Haltebox. Schutzfolie von Klebestreifen abziehen. Bio CO
2
Vorrats-Depot in Haltebox stellen und Haltebox oben am Aquarium, senkrecht an eine saubere, fettfreie Aquarienscheibe ankleben. Die
beiden seitlichen Befestigungslaschen mit den Klebestreifen fest andrücken.
Bitte beachten: Die Klebestreifen haften sehr fest. Nach dem Andrücken lässt sich die Haltebox nicht mehr verschieben.
2 Flasche aus Haltebox nehmen und Deckel abschrauben. Klappdeckel öffnen und Starterkapsel herausnehmen. Grüne Kapselhälfte
vorsichtig nach oben abziehen. Inhalt der Starterkapsel und leere Kapselhälften in das Vorrats-Depot geben.
3 Vorrats-Depot bis zum Markierungsstrich (Pfeile) mit 20 bis 25 °C warmem Leitungswasser füllen (nicht über 25 °C!). Deckel fest
zuschrauben. Hinweis:
Im Schlauchanschluss des Deckels ist ein weißer Mikro-Filter eingebaut - nicht entfernen.
4 Klappdeckel abbrechen oder vorsichtig abschneiden.
5 Blasenzähler zu 3/4 mit Leitungswasser füllen. TIPP: Blasenzähler dazu senkrecht unter Wasser tauchen und leicht auf den Deckel
klopfen.
6 Vorrats-Depot mit dem kurzem Schlauch an das lange Röhrchen des Blasenzählers anschließen. Schlauch auf Schlauchanschlüsse fest
aufstecken.
7 Den langen Schlauch auf den 2. Anschluss (ohne Röhrchen) des Blasenzählers stecken.
8 Vorrats-Depot zusammen mit dem angeschlossenen Blasenzähler von oben in die Haltebox stellen. Hinweis:
Das Vorrats-Depot wird
durch die CO
2
-Produktion etwas voluminöser. Damit es sich problemlos ausdehnen kann, ist die Haltebox entsprechend größer.
9 Alle Bauteile des Micro-Flipper mit warmem Leitungswasser (ohne Reinigungsmittel!) abspülen. Haltesauger mit drehender Bewegung
in das Unterteil eindrücken.
10 Schlauch in das Unterteil einlegen. Das Schlauchende muss gerade abgeschnitten sein und bündig am Anschlag
liegen.
11 Oberteil aufdrücken.
12 Auffangwanne aufstecken.
13 Im Aquarium eine Stelle mit guter Wasserbewegung wählen. Die Stelle sollte nicht zu hell sein, um möglicher Veralgung vorzubeugen.
Flipper senkrecht, mindestens 5 cm unter dem Wasserspiegel im Aquarium befestigen.
Die CO
2
-Produktion beginnt bei richtiger Anwendung innerhalb 24-48 Stunden und versorgt Ihr Aquarium mindestens 30 Tage mit CO
2
.
Bio CO
2
Vorrats-Depot wechseln
Wenn im Micro-Flipper keine Blasen mehr austreten, ist das Vorrats-Depot verbraucht, dann:
• Vorrats-Depot aus Haltebox nehmen und Schlauch vom Deckel abziehen.
• Neues Vorrats-Depot starten und wieder anschließen.
Der Inhalt des verbrauchten Vorrats-Depots kann über die Hauskanalisation entsorgt werden.
Micro-Flipper reinigen
• Auffangwanne abziehen.
• Oberteil ca. 1 cm nach oben verschieben und herausklappen. 헀
• Mit Wasser und weicher Bürste reinigen, keine Reinigungsmittel verwenden.
Was tun wenn... - Fehlerbehebung
Besondere Hinweise
Haltbarkeit in ungeöffnetem Zustand: Flascheninhalt ca. 5 Jahre; Starterkapseln: ca. 12 Monate bei 20 °C, ca. 18 Monate bei 10 °C.
Deshalb Bio CO
2
Vorrats-Depot bitte kühl und trocken lagern. Vor Sonne, Hitze und Frost schützen!
Achtung!
• Sollten während des Betriebs der Bio CO
2
-Düngeanlage versehentlich größere Mengen des Flascheninhalts ins Aquarium gelangen, so
kann dies zu Wassertrübung und Sauerstoffmangel führen. In diesem Fall sofort entsprechenden Teilwasserwechsel durchführen und
sachgerechte Funktion der Düngeanlage überprüfen. Deshalb: Vorrats-Depot NICHT über Markierungsstrich (Pfeile) füllen! Flasche stets
in Haltebox betreiben, um ein Umfallen zu verhindern!
• Bio CO
2
Vorrats-Depot für Kinder unerreichbar und immer stehend aufbewahren!
Ersatzteile (im Fachhandel erhältlich)
3004 Bio CO
2
Vorrats-Depot
1557 5 Starterkapseln
3075 CO
2
Micro-Flipper
D
Vertrieb: DENNERLE GmbH, D-66957 Vinningen • Kundenservice: DENNERLE GmbH, Industriestraße 4, D-66981 Münchweiler • www.dennerle.com
Vente: DENNERLE GmbH, D-66957 Vinningen • Service après - ventes: DENNERLE GmbH, Industriestraße 4, D-66981 Muenchweiler • www.dennerle.com Sales: DENNERLE GmbH, D-66957 Vinningen • Kundenservice: DENNERLE GmbH, Industriestraße 4, D-66981 Muenchweiler • www.dennerle.com
햲
햳
햴
햵
햲
햴
햳
햵
햷
햶
햸
햹
Problème
Aucune bulle n’est visible dans
le Micro-Flipper au bout de
48heures
Cause
Le couvercle du dépôt de réserve ou le raccor-
dement du flexible n’est pas hermétique.
La production de CO
2
n’a pas encore démarré
car le dépôt de réserve est trop froid en rai-
son de la faible température de la pièce.
Démarrage retardé.
La capsule de démarrage n’a pas encore lancé
le processus de fermentation.
Solution
Vissez fermement le couvercle, insérez le flexible.
Recontrôlez la production de CO
2
48heures plus
tard. Augmentez éventuellement un peu la tem-
pérature de la pièce.
Redémarrez le dépôt de réserve avec une 2e cap-
sule (disponible en animalerie).
Fehler
Nach 48 Stunden
keine Blasen im
Micro-Flipper
zu sehen.
Ursache
Deckel des Vorrats-Depots oder Schlauchverbindung
undicht.
CO
2
-Produktion noch nicht angesprungen, da
Vorrats-Depot durch niedrige Raumtemperatur zu
kühl, dadurch verzögerter Start.
Starterkapsel hat Gärprozess nicht richtig in Gang
gebracht.
Behebung
Deckel fest zuschrauben, Schlauch fest aufstecken.
Nach 48 Stunden CO
2
-Produktion erneut prüfen.
Raumtemperatur eventuell etwas erhöhen.
Vorrats-Depot mit einer 2. Kapsel
(im Fach han del erhältlich) neu starten.
Fault
No bubbles visible in
the Micro-Flipper after
48 hours.
Cause
Top of CO
2
bottle or hose connector leaking.
CO
2
production not yet started, as CO
2
bottle too cool
due to low room temperature, resulting in delayed start.
Starter capsule has not triggered fermentation process
correctly.
Remedy
Screw top firm, fit hose firmly.
Check CO
2
production again after 48 hours. Raise
room temperature slightly, if appropriate.
Start CO
2
bottle again with a 2nd capsule (availa-
ble from dealers).
햺
햻
햽
햾 햿 헀
햶
햷
F

Chat with your Dennerle BIO-CO2 Bio 60 manual using AI

Get instant AI answers from your Dennerle BIO-CO2 Bio 60 manual

Ask anything about the Dennerle BIO-CO2 Bio 60. Answers come from this manual, with the pages they are based on.

BIO-CO2 Bio 60 Maintenance Schedule

Remind me when maintenance is due
Monthly
Replace CO2 bottle

Replace the bottle when no bubbles emerge from the Micro-Flipper. Disconnect old bottle and activate a new one.

As needed
Clean Micro-Flipper

Remove collector, slide top part up 1 cm, open, and clean with water and soft brush without detergents.

Free maintenance reminders

Timed to your purchase date. Always free, unsubscribe anytime.

By submitting you agree to the privacy policy. Unsubscribe with one click in any email.
M: QW-35-FL

Ask a Question

0/1000

Do you recommend BIO-CO2 Bio 60?

Yes No

Frequently Asked Questions

A

The Dennerle BIO-CO2 Plant Fertilizer Set Bio 60 is designed for aquariums measuring sixty centimeters, with a capacity ranging from forty to eighty liters.

Is this answer helpful?

A

Once the system is active, the supply remains consistent for at least thirty days, providing continuous support for your aquatic plants.

Is this answer helpful?

A

Biological production begins within twenty-four to forty-eight hours after the correct water temperature is applied and hoses are connected.

Is this answer helpful?

A

You must fill the bottle with tap water at a temperature between twenty and twenty-five degrees Celsius, ensuring it does not exceed twenty-five degrees.

Is this answer helpful?

A

Clean the Micro-Flipper with water and a soft brush only. Do not use any detergents as they could damage the equipment or harm the plants.

Is this answer helpful?

A

Yes, spare parts such as new bottles or additional starter capsules are available from specialist retailers if you need to restock after use.

Is this answer helpful?

A

Overfilling risks water clouding and oxygen deficiency if the contents enter the aquarium. Always follow the marking arrow and replace water immediately if leakage occurs.

Is this answer helpful?

M: qwen/qwen3.5-flash-20260224

Advantages and Disadvantages

Advantages

  • Biological process reduces yeast smell compared to chemical yeast CO2
  • Includes complete kit with bubble counter, hoses, and Micro-Flipper
  • Provides consistent CO2 supply for at least thirty days
  • Specifically designed for small tanks around forty to eighty liters
  • Adhesive support prevents tank tipping during operation
VS

Disadvantages

  • Adhesive support cannot be moved once pressed firmly into place
  • Single-use bottle limits long-term economic value for large tanks
  • Requires specific water temperature between twenty and twenty-five degrees Celsius
  • Slow startup time of twenty-four to forty-eight hours before production
  • Overfilling risks water clouding and oxygen deficiency in the tank
M: qwen/qwen3.5-flash-20260224

Product Specification

Application

CO2 supply, plant fertilization

Type

CO2 fertilization system (Storage Tank, Starter Capsules, Bubble Counter, Control-Gel, unregulated, with CO2 dosing device Micro-Flipper), Complete Set, BIO-CO2

Specifications

approx. 30 days duration

Suitability

Freshwater, Aquariums, 10.57 - 21.13 gal

Consumables

BIO-CO2 Control-Gel

Features

includes CO2 hose

M: qwen/qwen3.5-flash-20260224

Product Description

Enhancing Your Aquarium Flora with Dennerle BIO-CO2 Plant Fertilizer Set Bio 60

Achieving lush plant growth in a smaller aquarium environment requires precise and safe fertilization methods. The Dennerle BIO-CO2 Plant Fertilizer Set Bio 60 offers a biological solution tailored specifically for tanks measuring around sixty centimeters. This system provides a reliable source of carbon dioxide, which is essential for photosynthesis and healthy aquatic plant development. By utilizing a biological process, this set ensures a steady supply of nutrients without the complexity associated with high-pressure systems. Many aquarists prefer this method because it maintains stable water parameters while promoting dense greenery throughout the tank.

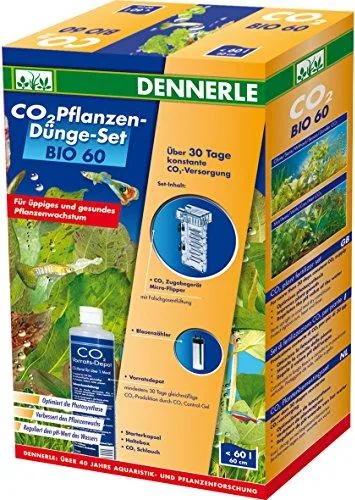
The kit is designed for aquariums ranging from forty to eighty liters. Inside, you will find everything needed for a complete installation. This includes a bottle support, a biological carbon dioxide bottle equipped with a starter capsule, various hoses, a bubble counter, and a specialized Micro-Flipper diffuser. The bottle support features strong adhesive strips that secure firmly to clean glass surfaces, allowing the system to stand upright without risk of tipping over. The support accounts for slight expansion during gas production. Each component is integrated to streamline the process.

Setting up the unit involves simple steps that can be completed within an hour. First, prepare the water temperature between twenty and twenty-five degrees Celsius. Pour the water into the bottle up to the marked arrow level, ensuring you do not exceed this guideline. Insert the starter capsule contents carefully into the bottle and attach the hoses sequentially. The bubble counter helps regulate the flow of gas into the water column through the diffuser. Place the Micro-Flipper at least five centimeters below the surface in an area with good water movement. Ensure the white micro-filter remains in the hose connector.

Once the system is active, biological production begins within twenty-four to forty-eight hours. The supply remains consistent for at least thirty days, providing continuous support for your underwater garden. Regular maintenance involves checking the bubble counter and replacing the bottle once production ceases. Cleaning the diffuser requires water and a soft brush, avoiding harsh chemicals. Proper storage away from sunlight and frost ensures longevity. Keep the bottle out of reach of children at all times during the cycle.

Safety is paramount when using fertilizers in enclosed water systems. If contents enter the water, replace part of it immediately to avoid oxygen deficiency. Use the bottle in its support to prevent falling. Shelf life for unopened bottles is about five years, while starter capsules last up to twelve months depending on storage. Spare parts are available if you need to restock. This set remains a top choice for hobbyists seeking efficiency and plant vitality within their aquatic setup.

M: qwen/qwen3.5-flash-20260224

© Copyright 2026 Manual.ly