


Cisco Nexus 9364C Manual
PDF manual · 76 Pages
English



Quick check
Incorrect answer, please try again.
Chat with your Cisco Nexus 9364C manual using AI
Get instant AI answers from your Cisco Nexus 9364C manual
Ask anything about the Cisco Nexus 9364C. Answers come from this manual, with the pages they are based on.
Nexus 9364C Maintenance Schedule
Clean connectors regularly depending on the environment; clean if exposed to dust or touched. Use wet or dry cleaning techniques.
Inspect routinely for dust and damage. If damage is suspected, clean and inspect under a microscope.
Ask a Question
Do you recommend Nexus 9364C?
Yes NoFrequently Asked Questions
It is built for high-density data center networking, especially in ACI-style spine-leaf fabrics. It helps aggregate large traffic loads while keeping cabling and management structured.
Is this answer helpful?
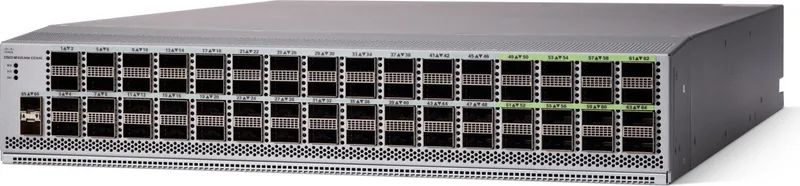
It includes 64 QSFP28 ports for high-speed connectivity and 2 SFP+ ports for additional lower-speed or management-oriented connections.
Is this answer helpful?
Yes. The QSFP28 ports are designed for 40G and 100G operation, making the switch suitable for scalable backbone or leaf-spine deployments.
Is this answer helpful?
Yes, many modules are field-replaceable during operation. However, replacement must follow airflow and redundancy rules so the system keeps cooling properly.
Is this answer helpful?
All fan and power modules must move air in the same direction. If they do not match, the switch can overheat and shut down, especially in a crowded rack.
Is this answer helpful?
A stable 19-inch two-post or four-post EIA rack is recommended. It must be properly secured, grounded, and large enough to provide the needed clearance and cabling space.
Is this answer helpful?
Yes. It is designed for ACI deployments and fits into leaf-spine architectures where consistent uplinks and predictable fabric behavior are important.
Is this answer helpful?
Advantages and Disadvantages
Advantages

- 64 QSFP28 ports provide strong 40/100G density for spine-leaf scaling.
- Two SFP+ ports add flexible low-speed or management connectivity.
- Hot-swappable fans and power supplies simplify maintenance during operations.
- Redundant power options help improve uptime in enterprise environments.
Disadvantages

- Airflow direction must match across modules, which limits mixed configurations.
- Installation requires careful rack, grounding, and clearance planning.
- DC and HVDC wiring adds complexity compared with simpler AC setups.
- Power redundancy depends on temperature and optics conditions in some cases.
Product Specification
Function
Switch, SAN Switch
Type
Standalone, Rackmount (via mounting brackets)
Network ports
2x SFP+, 64x QSFP28
Speeds
2x SFP+ (1G/10Gb/s), 64x QSFP28 (40G/100Gb/s)
PoE
N/A
Backplane
12.84Tb/s, 4.3Gp/s, 40MB packet buffer, 96k MAC addresses
Officially supported standards
IGMP
Configuration
Web interface, Console, serial (RJ-45, USB-A 2.0, rear), Network (SFP+, RJ-45, dedicated, 10/100/1000Base-T)
Cooling
active, 3x fans (3.15in, 1x hot-plug each)
Dimensions (WxHxD)
17.36x3.39x22.28in, 2U
Weight
27.40lb
Color
silver
Special features
Metal housing, removable mounting brackets, firmware updates possible, redundant power supply (redundant power input), 2x hot-plug power supply units
Manufacturer warranty
one year
Product Description
Cisco Nexus 9300 Rackmount 40G Managed Switch: Built for Dense ACI Fabrics
The Cisco Nexus 9300 rackmount switch is designed for modern data centers that need high port density, resilient connectivity, and predictable performance. With 64 QSFP28 ports and 2 SFP+ ports, it fits naturally into spine-leaf environments where speed, scale, and simplified traffic paths matter. This model is especially attractive for ACI deployments because it is built to support large-scale fabric interconnects while keeping operations manageable.
One of its biggest strengths is flexibility. The QSFP28 interfaces can support 40G and 100G speeds, giving teams room to grow without redesigning the network. The two SFP+ ports add useful options for management or lower-speed connectivity, which can be handy during setup, troubleshooting, or integration with existing infrastructure. For blog readers comparing enterprise switches, this balance of density and practicality makes the platform stand out.
Operational design is another highlight. The switch supports multiple airflow directions, letting teams match hot-aisle or cold-aisle layouts as needed. Fan modules and power supplies are field-replaceable, and the chassis is designed with redundancy in mind. That means less disruption when maintenance is needed and more confidence in always-on environments.
The installation guidance also shows how seriously Cisco treats real-world deployment. Site preparation covers temperature, humidity, altitude, dust control, grounding, rack stabilization, and clearance planning. These details matter because a switch of this class is meant for controlled enterprise spaces, not casual placement. Proper rack mounting and power planning help preserve uptime and reduce avoidable failures.
In day-to-day use, this switch is a strong fit for leaf-spine fabrics, APIC-connected environments, and high-capacity aggregation roles. Its architecture emphasizes clean cabling, structured airflow, and dependable redundancy. For organizations building a future-ready network core, it offers the kind of backbone that supports growth without sacrificing control.
Notes
- Match all fan and power modules to the same airflow direction.
- Confirm rack depth, grounding, and clearance before installation.
- Use supported optics and cables for best compatibility.
- Plan power feeds carefully if redundancy is required.
Search for 67,706 Manuals online


Type-in Brand or Model